

Have you ever looked at a crack, hole, or water stain on your wall? You’re not alone. In Brooklyn apartments and brownstones, drywall damage is extremely common, and knowing how to repair it the right way can save you stress, money, and future headaches.
This guide explains the process of drywall repair in NYC apartments, covering damage types, material selection, and each repair step, from patching to painting.
Understanding Drywall and Sheetrock
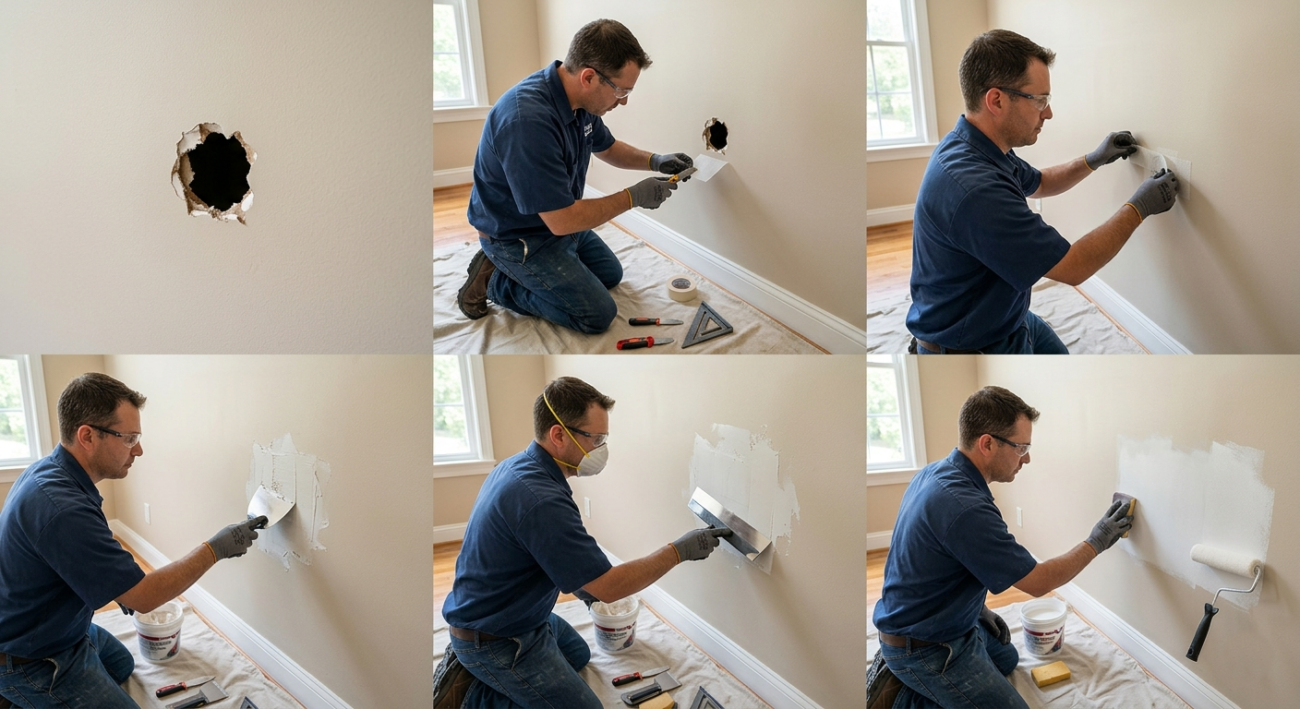
When you hear people talk about drywall and Sheetrock, they’re really talking about almost the same thing. Drywall is the general name for the flat panels made from gypsum and paper that form most modern walls and ceilings. Sheetrock is simply a well-known brand of drywall, not a different material. In Brooklyn apartments, contractors often use the words “drywall” and “Sheetrock” as if they mean the same thing, and for most homeowners, they basically do.
When You Should Repair Drywall — And When You Should Replace It (Brooklyn Edition)
Not every crack or hole means you need to rip out a whole wall. In a typical Brooklyn apartment, you’ll often have a mix of small spots you can patch and a few areas that really should be replaced.
You should usually repair drywall when:
- You see small dents, nail holes, or screw pops: Tiny marks from hanging pictures or a popped screw head are classic “quick repair” cases. You can normally fix these with a little compound, sanding, and paint without touching the rest of the wall.
- You have hairline cracks that are not growing: Fine cracks around doors, windows, or corners are often caused by normal building movement. If the area is dry and stable, you can open the crack slightly, tape it, and mud over it instead of replacing the board.
- Damage is small and localized (like a doorknob hole): A single hole from a doorknob or a bumped chair can usually be patched with a backing piece and a small drywall patch. As long as the surrounding drywall is solid, there’s no need to replace the whole sheet.
- There was a minor leak, but the drywall dried out and stayed firm. If a small leak was fixed quickly and the drywall never got soft, you can often seal stains with a stain-blocking primer and repair only the surface flaws. The key is that the water source is gone, and there is no mold or mushy texture behind the paint.
- You’re preparing for painting and just need a smoother finish: Sometimes you only need to skim-coat rough areas or old patch marks to get a clean paint job. In that case, repair is about leveling and smoothing, not tearing out good material.
Common Drywall Problems in NYC Homes
Because many Brooklyn and NYC buildings are older and heavily used, drywall issues show up in almost every apartment at some point. If you learn to spot these early, you can fix them before they turn into bigger and more expensive repairs.
- Cracks around doors, windows, and corners: These hairline cracks are usually caused by normal settling or small shifts in the building structure. They often start small but can spread if there’s movement or if they weren’t taped and reinforced properly.
- Nail pops and screw pops: You’ll see small bumps or circles where fasteners have pushed out toward the surface. This happens when studs move slightly, or fasteners weren’t set correctly, creating ugly spots that show through paint.
- Holes and dents from daily life: Everything from moving furniture to kids playing can leave dents, gouges, or holes in your walls. They may not be serious structurally, but many small marks together make a room look tired and poorly maintained.
- Water stains, bubbling paint, and soft areas: Leaks from upstairs neighbors, bathrooms, or roofs can soak drywall and cause stains, bubbles, or a soft, spongy feel. If you ignore this, it can lead to mold growth, odors, and, in some cases, a need for much larger repairs.
- Tape seams that bubble or peel: When tape wasn’t applied correctly, or the wall moved, seams can lift, creating ridges or bubbles under the paint. These lines are very visible in the light and usually need to be re-taped and mudded, not just painted over.
- Sagging or cracked ceilings: Ceiling drywall can sag from age, moisture, or heavy plaster layers on top. In NYC apartments, this is something you should take seriously because it can eventually break or fall if the underlying problem is not fixed.
The Right Materials for Long-Lasting Drywall Repairs
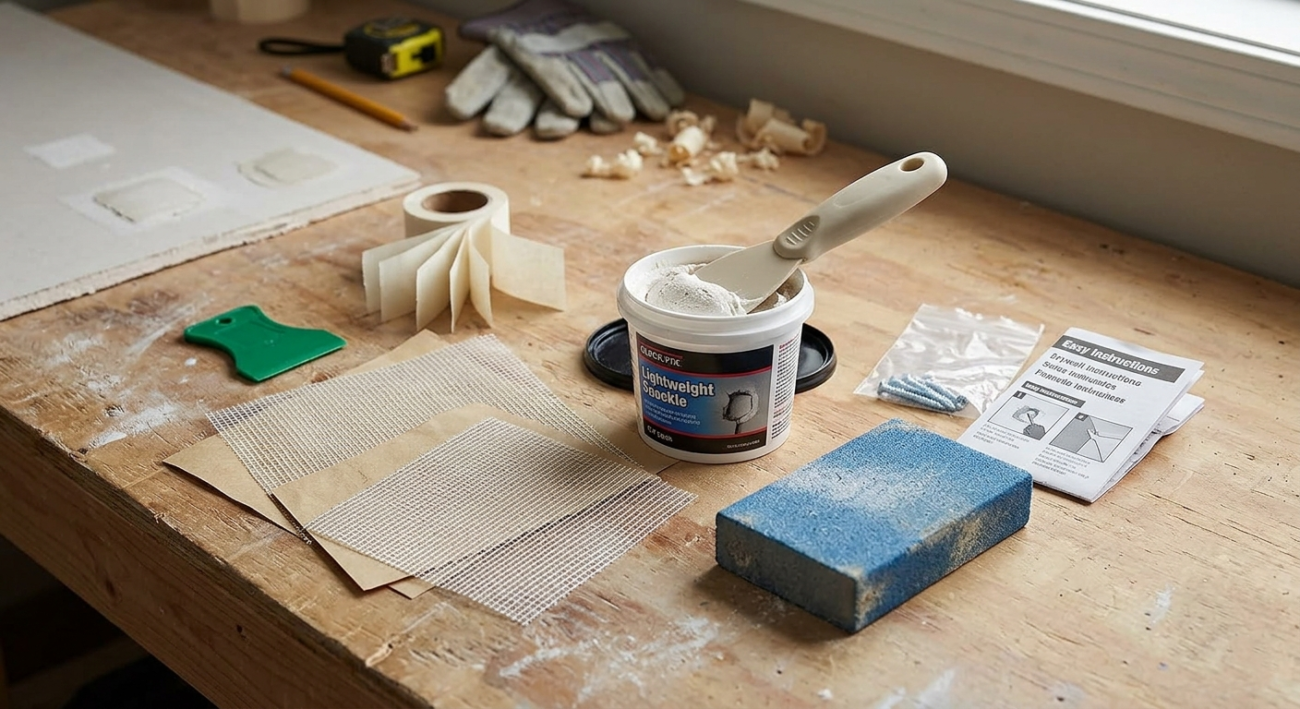
If you use the right products from the start, your repair is more likely to hold up in a busy Brooklyn apartment. Here are the core materials you or your contractor will usually rely on for strong, long-lasting results:
- Standard drywall panels
- Moisture-resistant drywall (for bathrooms and basements)
- Mold-resistant drywall
- Fire-rated drywall (Type X)
- Cement board (for shower and tub areas)
- Drywall screws
- Paper drywall tape
- Self-adhesive mesh tape
- Metal or vinyl corner bead
- All-purpose joint compound
- Lightweight finishing compound
- Setting-type (fast-set) compound for deep fills
- Sanding sponge or fine-grit sandpaper
- Stain-blocking and drywall primer
- Low-VOC interior paint
Step-by-Step Drywall Repair: From Patch to Paint in a NYC Apartment
Let’s slow this down and walk through the whole process in real detail, as if we’re standing in your Brooklyn apartment looking at the wall together. I’ll give you the “how” and the little insights that pros usually talk about.
Step 1: Look at the damage and figure out what you’re really dealing with
Before you grab a knife, take a careful look at the wall or ceiling:
- Identify the type of damage. Is it a tiny nail hole, a hairline crack, a fist-size hole, or a sagging, stained section of drywall? The size and cause decide whether you do a quick patch or a full cut-out.
- Check for water and mold. Yellow or brown stains, peeling paint, soft “spongy” drywall, or a musty smell usually mean water damage. In NYC, this matters a lot, because water + drywall often = mold if it sits too long.
- Know the Local Law 55 basics. Under Local Law 55, NYC landlords in buildings with 3+ apartments must keep units free of mold and fix the leaks that cause it. For mold over 10 sq ft, they usually have to bring in licensed mold pros, and simply patching over the drywall is not allowed.
- Think about permits – but don’t panic. Small “ordinary repairs” (such as patching holes or replacing small sections of drywall that don’t change the structure or systems) usually do not require a DOB permit. Bigger jobs that change layouts, touch fire-rated assemblies, or are part of a larger renovation might. If your project is more than “a few patches,” it’s worth checking DOB’s “Do I Need a Permit?” info or talking with your building/contractor.
Step 2: Gather the right tools and materials (so you’re not running to the store mid-patch)
You don’t need a pro truck, but you do need the basics laid out:
- Cutting + fastening tools: utility knife, drywall saw (or jab saw), drill/driver, drywall screws.
- Patching supplies a small piece of drywall or a repair patch, a wood backing strip for larger holes, and drywall tape (mesh or paper).
- Finishing supplies: joint compound (mud) or spackle, putty knives (2–3 sizes), sanding sponge or fine-grit sandpaper, primer for new drywall, matching paint, roller/brush.
A few smart choices here:
- For tiny holes (nail holes, picture hooks), lightweight spackle is fine.
- For real repairs (cracks, larger holes), use actual drywall compound—it sands better and is what pros use.
Step 3: Protect your apartment and control dust like a pro
Drywall dust is the enemy in a small NYC apartment:
- Cover and seal. Move furniture if you can; cover what’s left with plastic or old sheets. Lay drop cloths on the floor and tape plastic over the doorway if you’re sanding a larger area, so dust doesn’t drift into the rest of the apartment or the hallway.
- Manage air movement. Turn off fans that blow across the work area. If you can, crack a window and use a fan blowing out to pull dust away from you, not deeper into your home.
- Protect yourself. Wear a dust mask or respirator and eye protection. Drywall dust is fine and irritating; you don’t want it in your lungs or on your skin.
Step 4: Prepare the damaged area so the patch has something solid to grab
This is where many DIY jobs go wrong — they try to patch over loose, flaky material.
- Scrape and clean. Use your knife to remove loose paint, crumbly drywall, and any popped mud around the damage. You want firm edges and a solid surface.
- Square up bigger holes. For anything more than about a coin-size, cut a neat square or rectangle. Perfect geometry isn’t required, but straight lines make it easier to fit a patch that doesn’t show.
- Check for hidden issues. If you’ve opened up the wall and see damp insulation, dark staining, or mold, you’re not in “simple patch” territory anymore; you’re in “fix the cause first” mode. In NYC, that often means involving your landlord or a specialist before you close the wall again.
Step 5: Patch small holes, cracks, and nail pops
Small issues are the easiest, and they make a big visual difference:
- Nail pops and tiny holes: For a nail pop, first drive a drywall screw into the stud near the pop to re-secure the drywall, then cut away the popped area. Fill the hole with joint compound or spackle, smooth it with a putty knife, and let it dry. For tiny holes, you can usually just fill, smooth, dry, and sand.
- Hairline cracks: Lightly open the crack with your knife (so the compound can get in), wipe away dust, then apply a thin coat of compound. For cracks that recur often, add a strip of mesh tape before mudding to bridge wall movement.
Step 6: Patch medium and large holes with backing and a new piece of drywall
For anything bigger than around 1–2 inches, you need real structure behind the patch:
- Add backing: Cut a strip of thin wood (like a 1×2) a few inches longer than the hole’s width. Slide it behind the hole and screw it from the front through the existing drywall at the top and bottom, so it acts like a brace.
- Cut and fit your patch: Use the hole as a template — trace it onto a scrap of drywall, cut that piece with your knife, and test-fit until it sits tight. Screw it into the backing so it’s flush with the wall surface.
- Alternative: patch kits: For medium holes, you can use metal/mesh patch kits that stick over the hole. They’re faster but slightly thicker, so you’ll need good feathering to hide the edges.
Step 7: Tape the seams and cracks so they stay closed
Taping is what keeps repaired joints from re-cracking:
- Choose your tape.
- Paper tape: strongest, best for inside corners, but needs a good bed of mud.
- Self-adhesive mesh tape: easier for beginners, especially on flat seams and small patches, but can crack if you use just one thin coat.
- Embed the tape: Apply a thin layer of compound over the seam, press the tape into it (if using paper), then smooth it with your knife to remove any bubbles. With mesh tape, stick it down first, then go straight to mud over it.
- Don’t skip corners: For outside corners with damaged metal or vinyl bead, you may need to replace the corner bead or at least repair and cover it carefully to avoid sharp lines in the finished wall.
Step 8: Lay down the first coat of joint compound
Now you start building the surface back up:
- Keep it thin: Using a 4–6″ knife, spread a thin, even coat of mud over the taped areas and the patch. Push enough to fill gaps, but don’t leave big lumps; they’ll just need more sanding later.
- Feather the edges: Press harder at the outer edge of your knife so the mud thins out into the existing wall. This “feather” is what makes the patch vanish instead of showing a hard edge.
- Let it really dry: Most compounds need many hours to dry, especially in humid NYC summers or in bathrooms. If it still feels cool or slightly soft, wait — sanding or recoating too soon is a recipe for ridges and cracks.
Step 9: Add second (and maybe third) coats for a seamless blend
This is where you refine things:
- Lightly sand between coats: Use a fine sanding sponge to knock down high spots and ridges. Don’t gouge; you’re just flattening.
- Widen the repair: Each new coat should be wider than the last. Start with a 6″ knife, then move to an 8–10″ knife so the patch gently fades into the wall rather than forming a hump.
- Know when to stop: Two coats are often enough for small repairs; larger or deeper patches may need a third. When the area feels smooth, and you can’t feel a sudden edge with your hand, you’re ready for final sanding.
Step 10: Sand smooth without turning the apartment into a dust storm
The sanding stage can make or break the look:
- Use the right tools: A sanding sponge is easier to control in small spaces than loose paper. For larger areas, a pole sander with a vacuum attachment is ideal, but even a simple shop vac and a sanding sponge can make a big difference.
- Check the surface in “raking light.”: Shine a lamp across the wall at a low angle. This shows humps, scratches, or ridges that normal lighting hides. Lightly sand until the surface looks and feels even.
- Clean thoroughly: Vacuum the wall and surrounding area, then wipe the patch with a barely damp cloth. Paint does not like dust — it will telegraph every speck if you leave it there.
Step 11: Prime the patch so the repair doesn’t flash through the paint
Primer is not optional if you want a pro-looking finish:
- Use a proper drywall or stain-blocking primer.: Bare compound soaks in paint differently than a previously painted wall. Primer evens out absorption and helps hide the repair. For past water stains, use a stain-blocking primer to prevent yellow marks from bleeding through.
- Feather the primer too: Don’t just dab the patch; roll or brush a slightly larger area so you don’t create a visible “primer halo” in the middle of your wall.
Step 12: Paint and blend with the rest of the wall
Now you hide all your hard work:
- Match the paint as closely as you can: Use the same brand, sheen, and color if you know it. If you don’t, you may need to repaint the full wall for a truly invisible repair, especially with older paint or darker colors.
- Apply thin, even coats: Start with a light coat over the primed area and extend out a bit. Add one or two more thin coats, feathering the edges so there’s no hard ring where new paint meets old.
Step 13: Do a final check, clean up, and know when to call in a pro next time.
- Inspect different lighting: Check the wall in daylight and at night with lamps. If you see a minor line or pinhole, you can do a tiny touch-up; if you see a big hump or hollow, it might be worth a professional skim coat.
- Clean the space fully: Take down plastic, shake out drop cloths outside if possible, and vacuum floors and nearby furniture. In NYC apartments, small dust piles can turn into big annoyances fast.
- Know your limits: Next time, if you’re dealing with large ceiling sections, significant water damage, mold, or anything tied to building safety or permits, it’s wise to involve a licensed contractor who understands NYC codes and Local Law 55. That protects your health, your neighbors, and your wallet in the long run.
How Much Does Drywall Repair Cost in Brooklyn?
| Cost item | Typical Brooklyn / NYC range (2025) | What this usually covers |
|---|---|---|
| Small handyman drywall patch (up to ~6" hole) | From ≈ $85+ per visit | Very small repairs such as nail holes, minor dents, or a single small hole; often does not include full-room repainting. |
| Typical single drywall repair visit (pro contractor) | ≈ $300 – $700+ per trip | One or a few patches in the same area, basic taping, mudding, sanding, and simple touch-up paint on walls. |
| Wall drywall repair (priced by size) | ≈ $4.45 – $8.10 per sq ft | Labor and materials to repair damaged wall areas, blend into existing surfaces, and prep for paint. |
| Drywall replacement instead of repair (walls) | ≈ $5.50 – $6.50 per sq ft | Removal of bad drywall plus new boards, taping, mudding, and basic finishing for larger damaged sections. |
| Drywall repair labor rate in Brooklyn | ≈ $80 – $120 per hour (per person) | Charged by many local contractors or handymen for repair work; materials and paint are usually extra. |
| Minimum service / trip fee | Often ≈ $250 – $500+ | Base charge many NYC pros use to cover travel, set-up, protection, and clean-up, even for small repairs. |
| Ceiling drywall repair (per patched area) | ≈ $550 – $700+ per patch | Overhead repairs to damaged or sagging ceilings; usually higher because of access, safety, and extra prep. |
| Repairing cracks in drywall (per crack / area) | ≈ $300 – $500+ per crack/section | Opening the crack, taping, mudding, sanding, and blending; cost depends on length and location. |
| Water-damaged drywall repair (1 affected wall/ceiling area) | ≈ $550 – $1,600+ per area | Cutting out soaked drywall, replacing boards, and refinishing; mold remediation or plumbing work is usually charged separately. |
| Drywall removal & debris disposal | ≈ $0.75 – $3.00 per sq ft | Taking down old drywall, bagging, hauling, and legal disposal; higher end is common in NYC because of access and dump fees. |
| Moisture-resistant drywall upgrade (bathrooms/basements) | + ≈ $0.70 – $0.90 per sq ft (materials) | Extra cost on top of standard drywall for boards designed to handle humidity better in Brooklyn bathrooms and lower levels. |
| Soundproof / acoustic drywall upgrade | + ≈ $2.30 – $3.75 per sq ft (materials) | Premium boards or systems added during repair or replacement to reduce noise between apartments. |
| Priming and painting after drywall repair (walls only) | ≈ $2.00 – $6.00 per sq ft (typical) | Primer plus paint over repaired areas; some NYC painters charge more (up to ≈ $10–$12 per sq ft) for full-service interior painting. |
| Plaster repair (older Brooklyn walls instead of drywall) | ≈ $3.00 – $10.00 per sq ft or ≈ $60 – $120 per hour | For pre-war units with plaster instead of drywall; often more labor-intensive than standard drywall repair. |
Special Considerations for Drywall Ceiling Repairs in Brooklyn
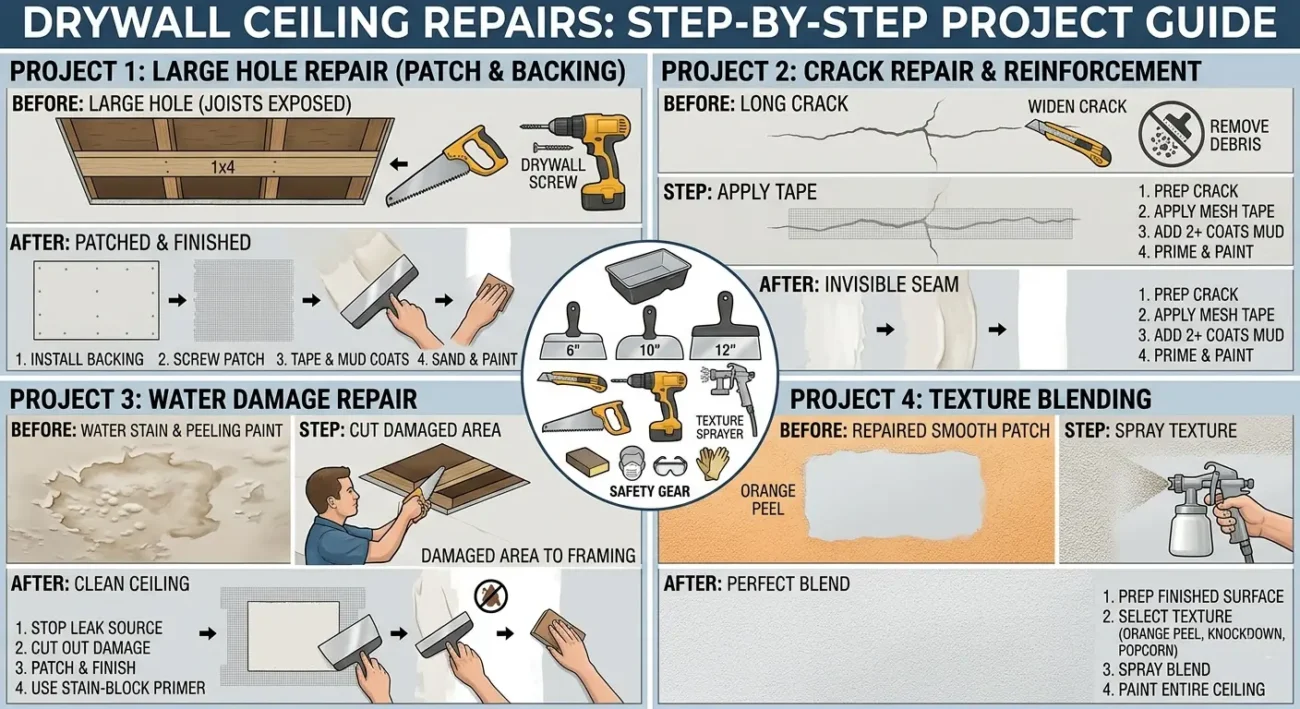
Ceiling repairs in Brooklyn apartments are tougher than wall repairs because you’re working overhead and often dealing with old materials. Many older buildings still have a mix of plaster and drywall on ceilings, so you or your contractor needs to determine what you have before choosing a repair method. Damage from upstairs units, roof leaks, or bathroom plumbing is common and often requires cutting out wet sections, checking the framing, and replacing the drywall rather than just patching the surface.
Because gravity is always pulling on the drywall, proper fastening, enough screws, and sometimes thicker or fire-rated boards are important for safety and code compliance. For all these reasons, many Brooklyn homeowners choose to hire a pro for ceiling work, especially when there are large, sagging areas or signs of ongoing leaks.
How Drywall Repair Can Improve Soundproofing and Comfort in Your Apartment
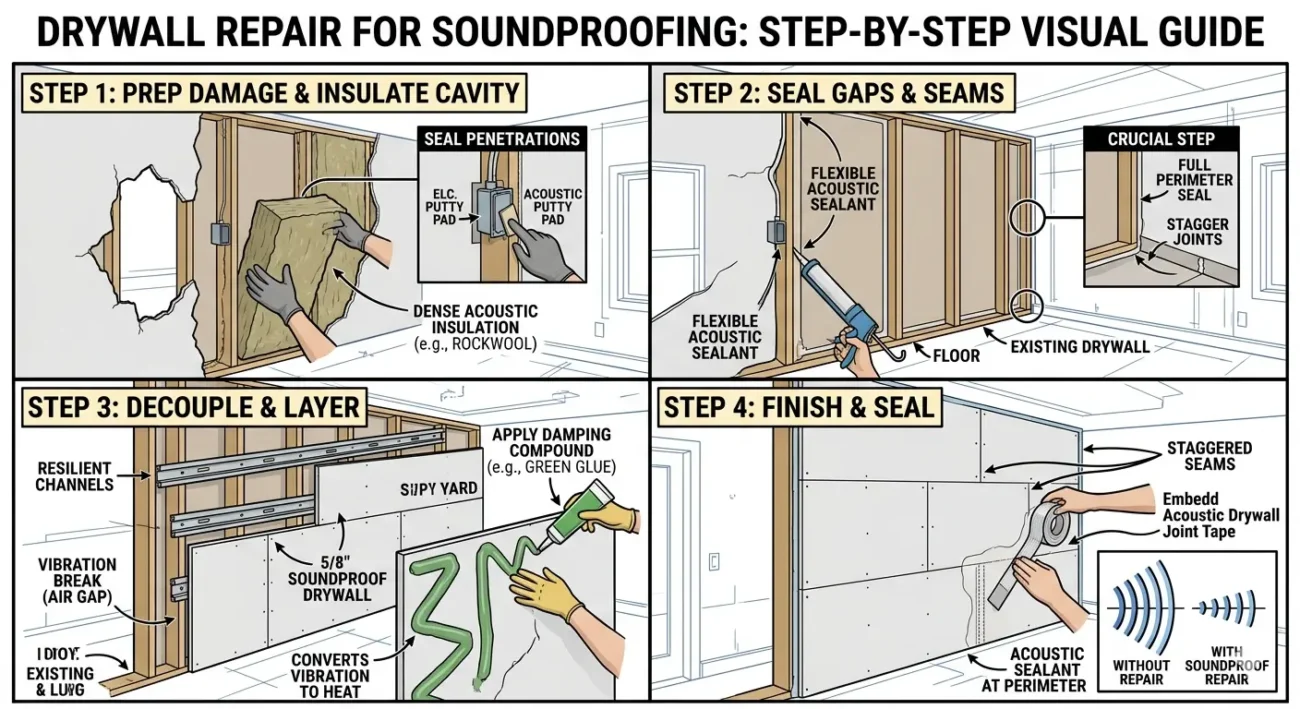
Drywall repair isn’t just about looks; it’s also an opportunity to make your apartment quieter and more comfortable. When a wall or ceiling is open for repair, you can add sound-absorbing insulation, such as mineral wool or dense fiberglass, between the studs to help reduce noise from neighbors and the street.
In some cases, your contractor can add a second layer of drywall with a sound-dampening compound between layers, or use specialized acoustic boards to further boost sound blocking. Sealing gaps, cracks, and electrical openings with proper sealants stops sound leaks and reduces drafts. Together, these upgrades can make your Brooklyn home feel more peaceful and private, even if you’re sharing walls with busy neighbours.
Where to Find the Best Brooklyn Contractors
Are you looking for an expert contractor in Brooklyn, NYC? SR General Construction has you covered! Our business is located at 8807 Avenue B, Brooklyn, NY 11236, United States, in the Canarsie area.
Additionally, we offer services at Rockaway Parkway and Ralph Avenue, providing fast access to Flatlands, East Flatbush, Bergen Beach, Brownsville, and the Spring Creek section of East New York.
FAQ
1. What is drywall repair, exactly?
Drywall repair means fixing physical damage to your walls or ceilings, from tiny nail holes and dents to large holes, cracks, water damage, or mold-affected areas. The repair can be as simple as filling and repainting, or as involved as cutting out and replacing entire sections of drywall.
2. How do I know if my drywall needs repair or full replacement?
Small holes, shallow dents, and hairline cracks usually only need patching, sanding, and painting. If the drywall is soft, sagging, severely water-damaged, or moldy, it often needs to be cut out and replaced rather than repaired.
3. How much does drywall repair typically cost in Brooklyn, NY?
Local data shows drywall repair in Brooklyn often falls around $4.45–$8.10 per square foot, with hourly rates around $80–$120 per hour plus materials, and minimum trip fees commonly in the $250–$500+ range. Ceiling repairs, water damage, and complex access can push costs higher than basic wall patches.
4. Does my NYC landlord have to fix damaged or moldy drywall?
Under Local Law 55 (Asthma-Free Housing Act), landlords in buildings with three or more units must keep apartments free of indoor mold and fix leaks and moisture conditions that cause it. That usually means they must properly repair or replace moldy or water-damaged drywall instead of just painting over it.
5. What type of drywall is best for bathrooms and basements in Brooklyn?
In humid spaces like bathrooms and basements, moisture-resistant or mold-resistant drywall is usually better than standard drywall. In direct wet areas such as shower and tub surrounds, cement board is preferred because it tolerates water much better behind tile.
Для успешной торговли используются [url=https://binarium-signals.ru/]бесплатные сигналы форекс бинариум[/url], которые значительно повышают шансы на прибыль.
Применение передовых технологий обеспечивает высокую точность и актуальность сигналов.
—
Профессионалы применяют данные сигналы для повышения точности своих торговых стратегий.
Denemek isteyen arkadaşlara hep aynısını söylüyorum. Kapanan sitelerden çektim resmen anlatamam. Gerekli teknik incelemeleri tek tek tamamlayıp sistemi test ettim. Güvenilir bir kaynak bulmanın ne kadar zor olduğunu hepimiz biliyoruz işte size o adres: 1xbet güncel adres [url=https://1xbet-giris-87.com]1xbet güncel adres[/url]. Şimdi size doğru düzgün anlatayım — canlı bahis kısmı bile yeterli aslında.
Hiçbir sıkıntı yaşamadım bugüne kadar oynarken. Kendi adıma konuşuyorum size — başka yerde kaybolup durmayın yani. Herkese hayırlı olsun…
Если честно, сам перерыл кучу форумов в поисках нормальной обивки. Оказалось, что выбрать подходящий вариант совсем непросто. Итак, смотрите, вот здесь реально толково расписано про плотность, ворс и износостойкость для диванов и кресел, а главное — показаны варианты, которые легко чистить. Вся полезная информация доступна здесь: ткань для обивки дивана [url=https://tkan-dlya-mebeli-2.ru]ткань для обивки дивана[/url] Дальше сами гляньте каталог с ценами. Да, и не берите первое, что попалось — я уже сделал ошибку, когда брал дешёвую ткань для обивки мебели. Эта тема реально вывозит по износу. Кстати: ткань для обивки мебели купить лучше уже с нормальной пропиткой от грязи. Да и трётся такое полотно гораздо меньше. Не поленитесь, откройте.
Результаты лабораторных анализов являются важной частью многих медицинских процедур. Мы помогаем получить документы для предоставления в нужные организации https://baza-spravki.com/spravka-o-sostave-semi/
1xbet app
Слушайте, а вы в курсе, что найти нормальную клинику сейчас — это всегда целая проблема и головная боль. Многие лично сталкивались с такой ситуацией,, когда родным или близким людям внезапно потребовалась экстренная и профессиональная поддержка. И тут сразу возникает главный вопрос: куда именно везти человека?
Мой коллега по работе долго искал по-настоящему работающий и безопасный выход. В интернете сейчас столько мусора и дорвеев, что голова идет кругом. Если коротко, лучше сразу перейти на официальный сайт, где нет вранья, там действительно раскладывают по полочкам всю подноготную про круглосуточную наркологическую поддержку и условия проживания. В такой ситуации лучше один раз внимательно глянуть самостоятельно, чтобы четко во всем разобраться.
Вся актуальная информация и контакты доступны прямо здесь: стационарное лечение алкоголизма спб [url=https://narkologicheskij-staczionar-sankt-peterburg-12.ru]https://narkologicheskij-staczionar-sankt-peterburg-12.ru[/url]. Честно говоря, после изучения всех условий, насколько там много полезных нюансов и скрытых факторов, и главное — там работают доктора, которые реально спасают людей. В Питере это определенно достойный внимания и доверия медицинский центр, который стабильно работает и имеет хорошие отзывы.
Honestly, I’ve wasted so much time on sketchy rental deals around South Beach. Or worse — they freeze your credit card for an extra two grand and smile like it’s totally normal. No thanks, I am completely done with that circus. If you actually need a proper vehicle to cruise around the city, make sure to check the actual fleet reviews before signing anything. Miami without a decent whip is pretty rough, whether you are heading to Brickell, Coconut Grove, or just driving down to Key Biscayne.
I’ve literally compared maybe 15 different local providers last month alone, but I eventually found a service with zero hidden fees and no bait-and-switch tactics. If you are looking for an honest source for premium rentals across Florida, check the details here: rolls royce cullinan rental near me [url=https://luxury-car-rental-miami-2.com]https://luxury-car-rental-miami-2.com[/url]. Yeah, finding parking in downtown is still its own separate nightmare, but that’s on you. Anyway, at least there’s one trustworthy service left in this town, hope this helps someone save a few bucks.
Случается, когда уже не до раздумий — человек в ступоре , а тащить в клинику нет сил. Моя семья такое пережила недавно. Сидишь, не знаешь что делать . Начинаешь обзванивать знакомых , а вокруг сплошной развод . Пока случайно не наткнулся на один реально работающий вариант. Требуется срочная помощь — а ехать куда-то просто нереально, то нужно вызывать врача на дом. Я про наркологическую помощь на дому . У нас в Самаре, если честно, хватает левых контор без лицензии. Вся проверенная информация ниже по ссылке: вызвать анонимного нарколога [url=https://narkolog-na-dom-samara-13.ru]https://narkolog-na-dom-samara-13.ru[/url] Честно скажу , после того как вник в детали, многое прояснилось . Там и про капельницы подробно , и про последующее кодирование. И цены адекватные, без разводов. Рекомендую не тянуть .
Справки различного назначения могут потребоваться для государственных учреждений, работодателей и учебных заведений. Мы предлагаем удобный сервис оформления документов: https://baza-spravki.com/spravka-079-y-v-lager/
Вот реально ситуация — родственник в тяжелом запое , а тащить в больницу просто нереально . Моя семья такое пережила пару лет назад . Руки опускаются, время тикает. Лезешь в интернет, а вокруг сплошной развод . Пока случайно не нашел один реально работающий вариант. Требуется немедленная консультация — а везти самому нет физической возможности , то нужно вызывать врача на дом. Речь конкретно про вызвать нарколога на дом . В Самаре , если честно, хватает шарлатанов . Нормальные контакты, кто реально приезжает вот тут : нарколог на дом срочно выезд на дом [url=https://narkolog-na-dom-samara-14.ru]https://narkolog-na-dom-samara-14.ru[/url] Откровенно говоря, после того как прочитал , понял, как правильно действовать. И про снятие запоя на дому, и про консультацию нарколога . И цены адекватные, без разводов. Советую не откладывать.
опасность откатывания мерседес
Срочно нужен совет кто уже заказывал партию к выставке. Готовимся к конференции. Везде говорят про индивидуальный подход, но реально найти нормальную сувенирную продукцию с логотипом. изготовление продукции с логотипом [url=https://suvenirnaya-produkcziya-s-logotipom-9.ru]https://suvenirnaya-produkcziya-s-logotipom-9.ru[/url] Интересует именно изготовление под ключ — от кружек до брендированных блокнотов. Нам нужно от 500 штук, можно меньше. А то бюджет уже вчера утвердили, а поставщика нет.
автоматизация подготовки ВКР
A piece that did not try to be timeless and ended up reading as durable anyway, and a look at findyournextstrategicmove extended that durable feel, content that stays useful past its publication date without straining for permanence is content that ages well and this site has the kind of evergreen quality that I value highly today.
Слушайте, а вы в курсе, что найти нормальную клинику сейчас — это реально отдельная и очень сложная история. Многие лично сталкивались с такой ситуацией,, когда кому-то из членов семьи срочно понадобилась грамотная помощь врачей. И в этот момент обычно начинается паника просто из-за банальной нехватки информации.
Мой коллега по работе долго искал действительно надежный медицинский вариант. Очень сложно с ходу отличить реальные отзывы пациентов от банальной рекламы. Короче говоря, советую присмотреться к одному источнику, там действительно раскладывают по полочкам всю подноготную про круглосуточную наркологическую поддержку и условия проживания. В такой ситуации лучше один раз внимательно глянуть самостоятельно, чтобы четко во всем разобраться.
Вся актуальная информация и контакты доступны прямо здесь: лечение алкоголизма в стационаре цены санкт петербург [url=http://www.narkologicheskij-staczionar-sankt-peterburg-12.ru]лечение алкоголизма в стационаре цены санкт петербург[/url]. Честно говоря, после изучения всех условий, насколько там много полезных нюансов и скрытых факторов, включая комфортные условия содержания, современные палаты и полную анонимность. В Питере это определенно достойный внимания и доверия медицинский центр, так что рекомендую сохранить себе в закладки на всякий случай.
Вот такая беда — человек в ступоре , а тащить в клинику просто нереально . Я сам через это прошёл пару лет назад . Руки опускаются, время идёт. Начинаешь обзванивать знакомых , а вокруг сплошной развод . Пока случайно не наткнулся на один реально работающий вариант. Требуется немедленная консультация — а везти самому просто нереально, то нужно вызывать врача на дом. Я про наркологическую помощь на дому . В Самаре , к слову , хватает левых контор без лицензии. Вся проверенная информация ниже по ссылке: нарколог на дом частная скорая помощь [url=https://narkolog-na-dom-samara-13.ru]https://narkolog-na-dom-samara-13.ru[/url] Честно скажу , после того как вник в детали, понял, как правильно действовать. И про снятие запоя на дому, и про последующее кодирование. И цены адекватные, без разводов. Рекомендую не откладывать.
Если честно, сам перерыл кучу форумов в поисках нормальной мебельной ткани. Оказалось, что выбрать подходящий вариант реальная проблема. Итак, смотрите, вот здесь реально толково расписано про плотность, ворс и износостойкость для диванов и кресел, а главное — показаны варианты, которые не линяют. Вся полезная информация доступна здесь: мебельная ткань москва [url=https://tkan-dlya-mebeli-2.ru]https://tkan-dlya-mebeli-2.ru[/url] Дальше сами гляньте фактические отзывы. Да, и не берите первое, что попалось — я уже сделал ошибку, когда брал ткань для мебели на распродаже. Эта тема реально вывозит по качеству. Для информации: ткань для обивки мебели купить лучше уже с нормальной пропиткой от грязи. Да и садится такое полотно гораздо меньше. Здесь реально дельные советы.
https://ustanovka-otopleniya-02.kz/
Знаете ситуацию выматывает , когда близкий просто не может остановиться . Ломаешь голову , а вокруг одна потёмки . Знакомому потребовался действительно рабочий выход . Пьют успокоительное , но это ерунда . Нужно именно профессиональная помощь . Пролистал пол-интернета , пока понял одну простую вещь: без нормальных условий ничего не выйдет . Потому что дома срыв стопроцентный . Если ищешь где сделать качественного вывода из запоя с помещением в клинику — обрати внимание на один проверенный вариант . В Нижнем , кстати, тоже полно шарлатанов . Советую перейти на сайт, где нет вранья про кодировку от алкоголя и выезд врача . Вся суть здесь: нарколог подростковый [url=https://vyvod-iz-zapoya-v-staczionare-nizhnij-novgorod-22.ru]нарколог подростковый[/url] Честно скажу , сам удивился , сколько подводных камней в этой теме. И кстати, цены адекватные. Для нашего города это реально стоящий вариант.
Слушайте, кто шарит, долго присматривался к разным платформам, но вчера все-таки зарегился ради интереса в мелбет. Скажу так — очень зашло с первых минут,. У кого новый айфон — всё четко и стабильно работает. Надо скачать мелбет на андроид? За пять минут софт поставил на смарт,.
Короче, сами гляньте все условия по ссылке: . Кстати, кто спрашивал про мелбет скачать приложение — мобильная версия работает без лагов,. И бонусы для новичков норм дают,. Я уже выводил пару раз выигранные деньги — никаких косяков с выплатами нет,. Всем искренне рекомендую. Пользуйтесь на здоровье, пусть повезет!
bitcoin poker keys [url=http://www.onlinepokerbitcoin.de]http://www.onlinepokerbitcoin.de[/url] .
Знаете, поиск действительно проверенного медицинского центра — это всегда целая проблема и головная боль. Многие лично сталкивались с такой ситуацией,, когда кому-то из членов семьи внезапно потребовалась экстренная и профессиональная поддержка. И в этот момент обычно начинается паника просто из-за банальной нехватки информации.
Я сам недавно детально изучал этот вопрос, искал действительно надежный медицинский вариант. В интернете сейчас столько мусора и дорвеев, что голова идет кругом. Если коротко, лучше сразу перейти на официальный сайт, где нет вранья, там действительно раскладывают по полочкам всю подноготную про анонимное снятие запоя в условиях клиники. В общем, не тяните время и долго не раздумывайте,, чтобы четко во всем разобраться.
Все важные детали и лицензии центра находятся только тут: наркологический стационар в спб [url=http://narkologicheskij-staczionar-sankt-peterburg-12.ru]наркологический стационар в спб[/url]. Честно говоря, после изучения всех условий, насколько там много полезных нюансов и скрытых факторов, включая комфортные условия содержания, современные палаты и полную анонимность. В Питере это определенно достойный внимания и доверия медицинский центр, который стабильно работает и имеет хорошие отзывы.
cos crazy time [url=https://crazy-timegratis.com/]cos crazy time[/url] .
free crazy time [url=http://crazy-timeitalia.com]http://crazy-timeitalia.com[/url] .
Вот такая тема реально бесит , когда родственник просто срывается в штопор . Ломаешь голову , а вокруг одна потёмки . Моему брату потребовался срочный метод . Пьют успокоительное , но это не помогает . Требуется именно врачебное вмешательство . Я перелопатил кучу сайтов , пока понял одну простую вещь: без нормальных условий ничего толку не будет . В обычной квартире срыв гарантирован . Ищешь нормальный вариант для вывода из запоя в стационаре — обрати внимание на один проверенный вариант . В Нижнем Новгороде , кстати, тоже полно шарлатанов . Советую перейти на сайт, где нет вранья про кодирование от алкоголизма и работу нарколога . Вся суть здесь: лечение алкогольной зависимости нижний новгород [url=https://vyvod-iz-zapoya-v-staczionare-nizhnij-novgorod-22.ru]лечение алкогольной зависимости нижний новгород[/url] Честно скажу , сам удивился , сколько подводных камней в этой теме. Главное — анонимность и палаты. Для нашего города это реально стоящий вариант.
https://zaoavis.ru/
Знаете, ситуация бывает — родственник в запое , а везти в больницу просто нереально . Моя семья такое пережила недавно. Сидишь, не знаешь что делать . Лезешь в интернет, а вокруг бабло тянут. Пока кто-то не подсказал один нормальный проверенный вариант. Требуется немедленная консультация — а везти самому просто нереально, то нужно вызывать врача на дом. Я про наркологическую помощь на дому . У нас в Самаре, к слову , хватает левых контор без лицензии. Нормальные контакты, кто реально приезжает вот тут : вызов нарколога на дом самара [url=https://narkolog-na-dom-samara-13.ru]вызов нарколога на дом самара[/url] Откровенно говоря, после того как вник в детали, многое прояснилось . И про снятие запоя на дому, и про последующее кодирование. Плюс анонимность — это важно . Советую не тянуть .
Слушайте, а вы в курсе, что найти нормальную клинику сейчас — это реально отдельная и очень сложная история. Многие лично сталкивались с такой ситуацией,, когда родным или близким людям внезапно потребовалась экстренная и профессиональная поддержка. И в этот момент обычно начинается паника просто из-за банальной нехватки информации.
Я сам недавно детально изучал этот вопрос, искал действительно надежный медицинский вариант. Очень сложно с ходу отличить реальные отзывы пациентов от банальной рекламы. Короче говоря, советую присмотреться к одному источнику, там подробно расписаны все важные условия и нюансы про анонимное снятие запоя в условиях клиники. В общем, не тяните время и долго не раздумывайте,, чтобы четко во всем разобраться.
Все важные детали и лицензии центра находятся только тут: наркологический стационар [url=narkologicheskij-staczionar-sankt-peterburg-12.ru]наркологический стационар[/url]. Честно говоря, после изучения всех условий, насколько там много подводных камней, на которые стоит обращать внимание, включая комфортные условия содержания, современные палаты и полную анонимность. Для Санкт-Петербурга это точно один из самых лучших вариантов, так что рекомендую сохранить себе в закладки на всякий случай.
Mobil bahise merak salalı çok oldu valla. Play Store’da bulamayınca ne yapacağımı bilemedim. Güncel bilgileri kontrol edip süreci hatasız başlattım. En sonunda doğru adrese ulaştım ve size de tüm detayları aktarmak istedim, güncel bilgilere buradan bakabilirsiniz: 1xbet apk son sürüm [url=https://1xbet-apk-2.com]1xbet apk son sürüm[/url]. Valla bak net söyleyeyim — android cihazlar için biçilmiş kaftan diyebilirim.
Hiçbir donma yaşamadım şu ana kadar. İşin doğrusunu söylemek gerekirse — başka yerde vakit kaybetmeyin yani. Herkese hayırlı olsun…
https://zaoavis.ru/
Случается, когда уже не до раздумий — близкий совсем плох, а тащить в клинику просто нереально . Моя семья такое пережила пару лет назад . Сидишь, не знаешь что делать . Лезешь в интернет, а вокруг бабло тянут. Пока кто-то не подсказал один реально работающий вариант. Если нужна срочная помощь — а ехать куда-то нет возможности , то нужно вызывать врача на дом. Речь конкретно про вызвать нарколога на дом . У нас в Самаре, к слову , хватает шарлатанов . Нормальные контакты, кто реально приезжает ниже по ссылке: вызов нарколога на дом самара [url=https://narkolog-na-dom-samara-13.ru]вызов нарколога на дом самара[/url] Честно скажу , после того как вник в детали, понял, как правильно действовать. Там и про капельницы подробно , и про консультацию . И цены адекватные, без разводов. Рекомендую не откладывать.
пинко официальный сайт казино казино пинко играть
Кровь и пламя возвращаются на экраны – сериал дом дракона 3 сезон дата выхода. Раскол королевства достиг точки невозврата – Рейнира и Эйгон ведут своих драконов в решающие схватки. Древние пророчества сбываются, родная кровь становится врагом, а трон требует новых жертв. Долгожданное продолжение саги!
Вот такая ситуация — родственник уходит в штопор , а руки опускаются . Я через это прошёл пару лет назад. Думаешь, сам справится, но хрен там. Нужна реальная медицина. Перерыл весь интернет — одни обещания. Пока не нашёл один действительно рабочий вариант. Ищешь где сделать качественное выведение из запоя с госпитализацией , не ведись на дешёвые обещания . В Нижнем Новгороде , к слову , тоже хватает шарлатанов . Реальные контакты по ссылке ниже: лечение алкогольной зависимости нижний новгород [url=https://vyvod-iz-zapoya-v-staczionare-nizhnij-novgorod-25.ru]лечение алкогольной зависимости нижний новгород[/url] Откровенно скажу, после того как прочитал , понял свои ошибки. И про кодировку от алкоголя подробно, и про выезд нарколога на дом . Главное — анонимно . Рекомендую не откладывать.
Знаете ситуацию реально бесит , когда человек просто срывается в штопор . Ломаешь голову , а вокруг одна потёмки . Мне вот потребовался срочный выход . Многие хватаются за таблетки , но это ерунда . Нужно именно врачебное вмешательство . Я перелопатил кучу сайтов , пока понял одну простую вещь: без нормальных условий ничего толку не будет . В обычной квартире срыв гарантирован . Ищешь нормальный вариант для качественного вывода из запоя с помещением в клинику — обрати внимание на один проверенный вариант . В Нижнем Новгороде , кстати, развелось этих “центров” . Советую перейти на сайт, где нет вранья про кодирование от алкоголизма и работу нарколога . Вся суть здесь: психиатр нарколог нижний новгород [url=https://vyvod-iz-zapoya-v-staczionare-nizhnij-novgorod-22.ru]психиатр нарколог нижний новгород[/url] После прочтения , сам офигел , сколько подводных камней в этой теме. И кстати, цены адекватные. Для Нижнего это проверенный временем вариант.
недвижимость в Турции Покупка квартиры в Турции открывает перспективы для выгодных инвестиций и комфортной жизни у теплого Средиземноморья. [недвижимость в Турции] Рынок недвижимости Турции предлагает широкий выбор объектов, от уютных квартир в жилых комплексах до роскошных вилл. [купить квартиру в Турции] Инвестиции в недвижимость Турции, особенно в таких популярных регионах, как Анталья и Фетхие, могут принести стабильный доход от аренды. [инвестиции в недвижимость] Анталья, жемчужина турецкого побережья, славится своими пляжами и развитой инфраструктурой, делая недвижимость Анталия весьма привлекательной. [недвижимость Анталия] Фетхие, с его живописными бухтами и уникальной природой, привлекает тех, кто ищет спокойствие и уединение. [недвижимость Фетхие] Квартиры у моря в Турции – это не только прекрасная возможность для отдыха, но и выгодное вложение средств. [квартиры у моря] Виллы в Турции предлагают роскошный стиль жизни и уединение, идеально подходящие для тех, кто ценит комфорт и приватность. [виллы в Турции] Инвестиции за границей, в частности в турецкую недвижимость, становятся все более популярными среди иностранных покупателей, ищущих диверсификацию своих активов. [недвижимость за рубежом] Переезд в Турцию – это возможность начать новую жизнь в стране с богатой культурой, гостеприимными людьми и благоприятным климатом. [переезд в Турцию] Жизнь в Турции предлагает высокое качество жизни по доступным ценам, особенно в таких городах, как Анталья. [жизнь в Турции] Получение ВНЖ Турции при покупке недвижимости становится проще, открывая путь к легализации и долгосрочному пребыванию. [ВНЖ Турция] Гражданство Турции через инвестиции в недвижимость – это реальный шанс стать полноправным гражданином страны и наслаждаться всеми ее преимуществами. [гражданство Турции] Квартиры в Анталии представлены в широком ассортименте, от бюджетных вариантов до элитных апартаментов с видом на море. [квартиры в Анталии] Недвижимость Коньяалты, одного из самых престижных районов Анталии, привлекает своей близостью к пляжу и развитой инфраструктурой. [недвижимость Коньяалты] Недвижимость Лиман также пользуется спросом благодаря своему расположению и потенциалу роста стоимости. [недвижимость Лиман] Квартиры в Фетхие предлагают разнообразие выбора, от современных комплексов до традиционных домов в уютных районах. [квартиры в Фетхие] Недвижимость для инвестиций в Турции – это стратегическое решение, способное обеспечить высокую доходность. [недвижимость для инвестиций] Доходная недвижимость в Турции – это квартиры и коммерческие объекты, приносящие стабильный пассивный доход от аренды. [доходная недвижимость] Покупка недвижимости в Турции с INEST HOMES – это надежный шаг к осуществлению вашей мечты. [покупка недвижимости в Турции] На рынке недвижимости Турции действуют выгодные предложения, способные удовлетворить самые взыскательные запросы. [рынок недвижимости Турции] Элитная недвижимость Турции – это эксклюзивные виллы и апартаменты, соответствующие высочайшим стандартам качества и комфорта. [элитная недвижимость Турции] Недвижимость Средиземноморья, представленная в Турции, является идеальным местом для жизни и отдыха. [недвижимость Средиземноморья] Жизнь у моря в Турции – это возможность каждый день наслаждаться солнечной погодой и морским бризом. [жизнь у моря] Яхтинг в Турции – одна из популярных активностей для владельцев недвижимости в прибрежных районах. [яхтинг в Турции] Инвестиции в Анталию – это выгодное вложение в динамично развивающийся город с высоким туристическим потенциалом. [инвестиции в Анталию] Квартиры у моря Турция – это мечта многих, ставшая реальностью благодаря доступным ценам и выгодным условиям. [квартиры у моря Турция] Переезд к морю в Турцию – это выбор тех, кто ценит комфорт, спокойствие и красоту природы. [переезд к морю] Недвижимость для ВНЖ в Турции – это инвестиция не только в жилье, но и в будущее, открывая возможности для долгосрочного проживания. [недвижимость для ВНЖ] Зарубежная недвижимость, в частности в Турции, становится все более привлекательной для инвесторов со всего мира. [зарубежная недвижимость] Турецкая недвижимость – это оптимальное соотношение цены и качества, а также возможность получения ВНЖ и гражданства. [турецкая недвижимость] Жилье в Турции – это современный комфорт, доступные цены и теплое гостеприимство. [жилье в Турции] Недвижимость в Анталии цены варьируются в зависимости от района и типа объекта, но всегда остаются конкурентоспособными. [недвижимость в Анталии цены] Фетхие недвижимость – это привлекательные варианты для тех, кто ищет отдых на лоне природы и доступное жилье. [Фетхие недвижимость] Недвижимость Турция 2026 – это прогноз на рост цен и увеличение инвестиционной привлекательности рынка. [недвижимость Турция 2026] Инвестиции в Турцию – это стабильный рост и диверсификация портфеля. [инвестиции в Турцию] Доход от аренды в Турции может стать существенным источником пассивного дохода для владельцев недвижимости. [доход от аренды в Турции] Недвижимость для гражданства Турции – это возможность получить паспорт страны через значительные инвестиции. [недвижимость для гражданства] Квартиры в жилых комплексах Турции – это современный уровень комфорта, безопасности и развитой инфраструктуры. [квартиры в жилых комплексах Турции] INEST HOMES – ваш надежный партнер в мире недвижимости Турции. [INEST HOMES]
https://everycancounts.eu/wp-content/pgs/?zanyatiya_dlya_nog_s_rezinkoy.html
https://followmylive.com/blog/1059/active-melbet-promo-code-2026-wap888-130
https://t.me/trans_irkytsk
https://www.kompster.com/events/melbet-bonus-code-2026-claim-e-130-today?action=submit
I appreciate the smooth flow of ideas in this post because it helps keep the discussion engaging from start to finish.
mejores casinos cuenta rut
Народ, всем привет! Хочу объединить маленькую кухню с гостиной, без официального проекта даже думать нечего начинать, Я уже знатно намучился со всей этой бюрократией, В общем, единственное, что реально работает в наших реалиях — сразу заказать техническое заключение у лицензированной компании, чтобы спать спокойно и не бояться проверок от управляющей.
И в жилищную инспекцию документы подадут Обязательно сохраняйте себе эту полезную информацию: заказать проект перепланировки квартиры [url=https://proekt-pereplanirovki-kvartiry30.ru]https://proekt-pereplanirovki-kvartiry30.ru[/url]. Иначе потом прилетит огромный штраф и суды заставят всё вернуть как было. Обязательно перешлите этот пост тому, кто тоже сейчас затеял ремонт!
Народ, слушайте — когда близкий человек уходит в запой , а просто в тупике. Я сам через это прошёл недавно. Думал, справлюсь сам — хрен там было. Оказалось , без врачей и капельниц не обойтись. Перерыл кучу форумов — сплошной развод . А потом наткнулся на один проверенный вариант. Кому нужно экстренный вывод из запоя под круглосуточным наблюдением — не рискуйте здоровьем человека. У нас в Нижнем, если честно, тоже полно шарлатанов . Вся проверенная информация вот тут : кодировка от алкоголя в нижнем новгороде [url=https://vyvod-iz-zapoya-v-staczionare-nizhnij-novgorod-26.ru]кодировка от алкоголя в нижнем новгороде[/url] Откровенно говоря, после того как почитал , расставил всё по полочкам. Там и про кодирование от алкоголизма подробно расписано , и про условия в стационаре и питание. Плюс анонимность — это важно . Рекомендую не тянуть .
Знаете, бывает — близкий друг не может остановиться, а ты не знаешь что делать . Я через это прошёл пару лет назад. Думаешь, сам справится, но хрен там. Требуется реальная медицина. Обзвонил десяток контор — сплошной развод . Пока не нашёл один нормальный вариант. Если тебе нужно экстренный вывод из запоя под наблюдением врачей , не рискуй здоровьем. У нас в Нижнем, к слову , тоже хватает левых контор. Проверенная информация по ссылке ниже: кодирование от алкоголизма [url=https://vyvod-iz-zapoya-v-staczionare-nizhnij-novgorod-25.ru]кодирование от алкоголизма[/url] Честно говоря , после того как ознакомился, понял свои ошибки. И про кодировку от алкоголя подробно, и про выезд нарколога на дом . И цены адекватные. Рекомендую не откладывать.
Арендовать яхту в Адлере можно для проведения корпоративного мероприятия. Такой формат помогает создать непринужденную атмосферу и подарить участникам яркие эмоции https://yachtkater.ru/
образование Педагогика, интегрированная в этот процесс, направлена на передачу накопленных знаний и развитие у будущих специалистов критического мышления и глубокого понимания истории музыки и искусства.
https://vk.ru/smartquick77
https://skyrexio.com/ru/
wiadomosci Pomorskie
Вот реально ситуация — родственник уходит в запой , а ты не знаешь куда бежать . Я сам через это прошёл года два назад . Думал, справлюсь сам — хрен там было. Оказалось , без медикаментов и капельниц не обойтись. Обзвонил все конторы в городе — сплошной развод . Пока нашёл один проверенный вариант. Кому нужно вывод из запоя в стационаре — не рискуйте здоровьем человека. В Нижнем Новгороде , если честно, тоже полно левых контор без лицензии. Нормальные контакты вот тут : частные наркологические клиники нижний новгород [url=https://vyvod-iz-zapoya-v-staczionare-nizhnij-novgorod-26.ru]частные наркологические клиники нижний новгород[/url] Честно скажу , после того как вник в детали, многое стало понятно . Там и про кодирование от алкоголизма подробно расписано , и про выезд нарколога на дом . И цены адекватные, без разводов. Рекомендую не откладывать в долгий ящик.
Знаете, бывает такое — близкий на грани, а везти в больницу страшно . Моя семья это пережила года два назад . Руки опускаются, а время тикает. Начинаешь обзванивать знакомых , а вокруг одни обещания . Пока случайно не нашел один нормальный проверенный вариант. Требуется немедленная консультация — а ехать куда-то просто нереально, то выход один . Речь конкретно про срочную наркологическую помощь на дому . У нас в столице, если честно, тоже полно шарлатанов . Вся проверенная информация ниже по ссылке: вывод из запоя на дому анонимно [url=https://narkolog-na-dom-moskva-30.ru]вывод из запоя на дому анонимно[/url] Честно говоря , после того как прочитал , понял, как правильно действовать. И про снятие запоя на дому, и про последующее кодирование. Плюс анонимность — это важно . Советую не тянуть .
Слушайте, есть важный вопрос. Нужно немного сдвинуть мокрую зону санузла. без официального проекта даже думать нечего начинать, Я уже знатно намучился со всей этой бюрократией, Короче говоря, единственное, что реально работает в наших реалиях — это доверить подготовку документов профессиональным инженерам, чтобы потом не было проблем со штрафами.
И в жилищную инспекцию документы подадут В общем, кому тоже актуально, проект на перепланировку квартиры заказать [url=https://proekt-pereplanirovki-kvartiry30.ru]https://proekt-pereplanirovki-kvartiry30.ru[/url]. Иначе потом прилетит огромный штраф и суды заставят всё вернуть как было. Обязательно перешлите этот пост тому, кто тоже сейчас затеял ремонт!
Знаете, ситуация — близкий подсел на иглу, а куда бежать — непонятно . Моя семья столкнулась лично . Многие думают, что само пройдет , но хрен там. Требуется реальная помощь . Перерыл весь интернет — одни обещания . Пока не нашел один действительно рабочий вариант. Нужна лечение наркомании в Воронеже — не ведись на дешевые акции . В Воронеже , кстати , хватает левых контор без лицензии. Реальные контакты ниже по ссылке: анонимная скорая наркологическая помощь [url=https://narkologicheskaya-pomoshh-voronezh-11.ru]https://narkologicheskaya-pomoshh-voronezh-11.ru[/url] Честно скажу , после того как прочитал , понял свои ошибки. И про кодирование, и про условия в клинике. И цены адекватные. Рекомендую не тянуть .
Случается, когда уже не до раздумий — человек в запое , а везти в клинику страшно . Я через это прошел пару лет назад . Сидишь, не знаешь что делать . Хватаешься за телефон , а в ответ тишина . Пока случайно не наткнулся на один реально работающий вариант. Если нужна немедленная консультация — а тащить человека сам нет никакой возможности , то нужно вызывать врача на дом. Я про нарколога на дом . У нас в столице, кстати , хватает шарлатанов, которые тянут бабло . Вся проверенная информация ниже по ссылке: нарколог на дому капельница в ночное время [url=https://narkolog-na-dom-moskva-29.ru]нарколог на дому капельница в ночное время[/url] Откровенно говоря, после того как ознакомился с условиями, многое стало на свои места . Там и про капельницы расписано , и про последующее кодирование. Плюс анонимность — это важно . Советую не ждать чуда.
здоров’я
freeroll bitcoin poker [url=http://online-poker-bitcoin.de/]freeroll bitcoin poker[/url] .
888starz logowanie [url=https://www.888starzuz3.com/]https://888starzuz3.com/[/url]
888starz deposit [url=https://www.888starzuz4.com/]https://888starzuz4.com/[/url]
888starz.apk [url=https://www.888starzuz5.com/apk]https://888starzuz5.com/apk/[/url]
https://lebanonhub.app/blogs/982420/Melbet-Promo-Promo-Code-Bonus-2026-130-Registration
Гайды по мобильным играм Гайды по играм
Вот такая беда приключилась — человек в запое , а везти в клинику просто нереально . Я через это прошел совсем недавно. Сидишь, не знаешь что делать . Хватаешься за телефон , а в ответ тишина . Пока кто-то не посоветовал один проверенный вариант. Если нужна немедленная консультация — а ехать куда-то просто физически не можете, то нужно вызывать врача на дом. Я про срочную наркологическую помощь на дому . У нас в столице, кстати , тоже полно левых контор без лицензии. Вся проверенная информация вот тут : нарколог на дом вывод из запоя [url=https://narkolog-na-dom-moskva-29.ru]нарколог на дом вывод из запоя[/url] Честно скажу , после того как прочитал , многое стало на свои места . И про снятие запоя на дому, и про консультацию нарколога . И цены адекватные, без разводов на месте. Рекомендую не тянуть резину .
https://plitkar.com.ua/
https://brewwiki.win/wiki/Post:Xbet_Promo_Code_Ghana_2026_GIFT888_Bonus_up_to_130
уборка квартир в москве
Случается, когда уже не до раздумий — близкий ломается, а куда бежать — совсем не знаешь . Моя семья такое пережила пару лет назад . Сначала кажется, что обойдется , но нет . Требуется профессиональная медицина. Обзвонил десяток контор — только деньги тянут. А потом наткнулся на один действительно рабочий вариант. Если ищешь где получить лечение наркомании в Воронеже — не ведись на дешевые акции . У нас в Воронеже, кстати , хватает шарлатанов . Реальные контакты ниже по ссылке: наркологический диспансер воронеж [url=https://narkologicheskaya-pomoshh-voronezh-12.ru]наркологический диспансер воронеж[/url] Откровенно говоря, после того как прочитал , многое прояснилось . Там и про вывод из запоя , и про реабилитацию . Плюс работают круглосуточно — это важно . Советую не тянуть .
Знаете, бывает такое — родственник в тяжелом запое , а тащить куда-то нет никаких сил. Моя семья это пережила года два назад . Руки опускаются, а время тикает. Лезешь в интернет, а вокруг сплошной развод. Пока кто-то не подсказал один нормальный проверенный вариант. Если нужна немедленная консультация — а ехать куда-то нет физической возможности , то нужно вызывать врача. Я про выезд нарколога круглосуточно. У нас в столице, если честно, хватает шарлатанов . Вся проверенная информация ниже по ссылке: услуги врача нарколога на дому [url=https://narkolog-na-dom-moskva-30.ru]услуги врача нарколога на дому[/url] Честно говоря , после того как вник в детали, понял, как правильно действовать. И про снятие запоя на дому, и про последующее кодирование. Плюс анонимность — это важно . Советую не тянуть .
next-energy.ru
ню фотограф казань Я — фотограф ню для девушек в Казани, создающий снимки с заботой о вашем комфорте. Записывайтесь на консультацию, чтобы обсудить все детали вашей будущей съемки.
как правильно делать йони массаж женщине Казань Мужчина учится йони массажу в Казани — это прекрасный вклад в счастливое будущее отношений. Мы поможем вам освоить все тонкости этого нежного мастерства.
Знаете, бывает ситуация — родственник сорвался , а тащить в больницу страшно . Моя семья такое пережила совсем недавно. Сидишь, не знаешь что делать . Начинаешь обзванивать знакомых, а в ответ тишина . Пока кто-то не посоветовал один проверенный вариант. Если нужна срочная помощь — а тащить человека сам просто физически не можете, то нужно вызывать врача на дом. Речь про срочную наркологическую помощь на дому . У нас в столице, кстати , тоже полно левых контор без лицензии. Нормальные контакты, кто реально приезжает ниже по ссылке: лечение алкоголизма на дому в москве [url=https://narkolog-na-dom-moskva-29.ru]лечение алкоголизма на дому в москве[/url] Честно скажу , после того как прочитал , понял, как действовать правильно. И про снятие запоя на дому, и про консультацию нарколога . И цены адекватные, без разводов на месте. Рекомендую не ждать чуда.
единовременная выплата контракт Выплаты при ранении контрактникам — это важная часть системы социальной защиты. Государство обеспечивает полный цикл реабилитации и денежную компенсацию.
Уборка после ремонта спб
Знаете, ситуация — близкий ломается, а что делать — просто руки опускаются. Я сам через это прошел недавно. Сначала кажется, что обойдется , но нет . Нужна профессиональная медицина. Обзвонил десяток контор — одни обещания . А потом наткнулся на один действительно рабочий вариант. Если ищешь где получить наркологическая помощь — не рискуй здоровьем близкого. У нас в Воронеже, кстати , хватает левых контор без лицензии. Реальные контакты ниже по ссылке: клиника плюс воронеж [url=https://narkologicheskaya-pomoshh-voronezh-12.ru]клиника плюс воронеж[/url] Честно скажу , после того как прочитал , понял свои ошибки. Там и про вывод из запоя , и про реабилитацию . И цены адекватные. Советую не тянуть .
тфп для портфолио казань Если вы модель без опыта Казань, мы готовы предложить обучение и первые тестовые съемки. Сделайте первый шаг к мечте вместе с профессионалами.
читать онлайн
Ситуация форс-мажор — родственник в тяжелом запое , а тащить куда-то просто невозможно . Моя семья это пережила года два назад . Сидишь, не знаешь за что хвататься . Лезешь в интернет, а вокруг одни обещания . Пока случайно не нашел один реально работающий вариант. Требуется немедленная консультация — а ехать куда-то нет физической возможности , то нужно вызывать врача. Речь конкретно про выезд нарколога круглосуточно. У нас в столице, к слову , хватает левых контор без лицензии. Нормальные контакты, кто реально приезжает вот тут : вывод из запоя в москве на дому [url=https://narkolog-na-dom-moskva-30.ru]вывод из запоя в москве на дому[/url] Откровенно скажу, после того как вник в детали, понял, как правильно действовать. И про снятие запоя на дому, и про консультацию нарколога . Плюс анонимность — это важно . Рекомендую не тянуть .
Вот такая беда приключилась — человек в запое , а что делать — совсем не знаешь . Я сам через это прошел пару лет назад . Сначала кажется, что обойдется , но хрен там. Нужна реальная медицина. Перерыл весь интернет — только деньги тянут. Пока не нашел один действительно рабочий вариант. Нужна срочно наркологическая помощь — не ведись на дешевые акции . У нас в Воронеже, кстати , хватает левых контор без лицензии. Реальные контакты ниже по ссылке: анонимная наркологическая клиника [url=https://narkologicheskaya-pomoshh-voronezh-12.ru]https://narkologicheskaya-pomoshh-voronezh-12.ru[/url] Откровенно говоря, после того как прочитал , понял свои ошибки. И про кодирование, и про условия в клинике. Плюс работают круглосуточно — это важно . Советую не тянуть .
Случается, когда уже не до раздумий — родственник сорвался , а везти в клинику просто нереально . Я через это прошел пару лет назад . Руки опускаются, а время идет. Хватаешься за телефон , а в ответ одни отговорки. Пока случайно не наткнулся на один реально работающий вариант. Требуется срочная помощь — а тащить человека сам просто физически не можете, то нужно вызывать врача на дом. Речь про срочную наркологическую помощь на дому . У нас в столице, кстати , хватает шарлатанов, которые тянут бабло . Нормальные контакты, кто реально приезжает ниже по ссылке: нарколог на дом телефон [url=https://narkolog-na-dom-moskva-29.ru]нарколог на дом телефон[/url] Честно скажу , после того как прочитал , понял, как действовать правильно. И про снятие запоя на дому, и про консультацию нарколога . Плюс анонимность — это важно . Рекомендую не тянуть резину .
Знаете, ситуация — человек пропадает , а что делать — просто тупик. Я через это прошел несколько лет назад. Многие думают, что само пройдет , но нет . Требуется профессиональная помощь . Перерыл весь интернет — сплошной развод . Пока не нашел один нормальный вариант. Нужна анонимное лечение алкоголиков — не рискуй здоровьем близкого. У нас в Воронеже, если честно, тоже полно левых контор без лицензии. Реальные контакты тут : помощь наркозависимым [url=https://narkologicheskaya-pomoshh-voronezh-11.ru]https://narkologicheskaya-pomoshh-voronezh-11.ru[/url] Честно скажу , после того как ознакомился, многое прояснилось . Там и про вывод из запоя , и про реабилитацию . Плюс работают круглосуточно — это важно . Рекомендую не откладывать.
https://www.bnbaccess.eu/art/listogibochnyy_press_v_sovremennom_proizvodstve.html
hire IT team freelance marketplace with DevOps support
Вот такая беда приключилась — человек в запое , а что делать — просто руки опускаются. Моя семья такое пережила пару лет назад . Думаешь, сам справится, но нет . Требуется реальная медицина. Обзвонил десяток контор — только деньги тянут. А потом наткнулся на один нормальный вариант. Нужна срочно круглосуточная наркологическая служба — не рискуй здоровьем близкого. В Воронеже , кстати , хватает левых контор без лицензии. Реальные контакты тут : наркологическая клиника телефон [url=https://narkologicheskaya-pomoshh-voronezh-12.ru]наркологическая клиника телефон[/url] Честно скажу , после того как ознакомился, многое прояснилось . Там и про вывод из запоя , и про реабилитацию . Плюс работают круглосуточно — это важно . Советую не тянуть .
Alright listen up because I’m about to save you a massive headache. Then you actually show up to the local office to pick up the car. Plus they freeze a surprise $4500 on your card and say “don’t worry, it’ll drop off in a week or two” right before giving you the keys. Fool me twelve times? That’s just the 305 way, lesson learned. If you are trying to find a legitimate luxury fleet without getting ripped off, do some real digging first and read actual customer reviews. Anyone who’s waited for an Uber in August heat knows the struggle exactly about this city, whether you are doing Coconut Grove brunch, Sunny Isles sunrise cruise, or a spontaneous drive down to the Keys.
I’ve tested maybe 65 rental outfits across Dade, Broward, and Monroe, but I eventually found a service where what you book is exactly what shows up, no surprises, no hidden fine print. If you are looking for the only straight shooter for premium rides across South Florida, check the current details here: car rental near miami beach fl [url=https://luxury-car-rental-miami-12.com]car rental near miami beach fl[/url]. Also, definitely bring quality shades unless you enjoy driving into the sun like a zombie every single evening. Anyway, glad there’s at least one honest operator left in this rental jungle, let me know if you guys have any other clean spots.
Случается, когда уже не до раздумий — близкий в тяжелом состоянии, а везти в клинику просто нереально . Моя семья такое пережила пару лет назад . Сидишь, не знаешь что делать . Начинаешь обзванивать знакомых, а в ответ тишина . Пока случайно не наткнулся на один проверенный вариант. Если нужна немедленная консультация — а ехать куда-то нет никакой возможности , то выход один . Я про срочную наркологическую помощь на дому . У нас в столице, кстати , хватает левых контор без лицензии. Нормальные контакты, кто реально приезжает вот тут : капельница на дому анонимно [url=https://narkolog-na-dom-moskva-29.ru]капельница на дому анонимно[/url] Честно скажу , после того как ознакомился с условиями, понял, как действовать правильно. И про снятие запоя на дому, и про консультацию нарколога . И цены адекватные, без разводов на месте. Советую не тянуть резину .
Знаете, ситуация — человек пропадает , а куда бежать — просто тупик. Я через это прошел несколько лет назад. Многие думают, что само пройдет , но хрен там. Требуется реальная помощь . Обзвонил десяток контор — одни обещания . А потом наткнулся на один нормальный вариант. Если ищешь где получить круглосуточная наркологическая помощь — не рискуй здоровьем близкого. У нас в Воронеже, кстати , тоже полно шарлатанов . Реальные контакты тут : плюс [url=https://narkologicheskaya-pomoshh-voronezh-11.ru]плюс[/url] Честно скажу , после того как прочитал , понял свои ошибки. И про кодирование, и про реабилитацию . Плюс работают круглосуточно — это важно . Советую не тянуть .
one x bet
I was just browsing through some pages today and happened to stumble upon this post, and I must say that the clarity of your writing makes the whole topic incredibly clear to follow for anyone visiting.
adult xxx video porn site xxx sex video
Alright listen up because I’m about to save you a massive headache. You find this amazing listing online — gorgeous spec, fair daily rate, looks perfect. Plus they freeze a surprise $4500 on your card and say “don’t worry, it’ll drop off in a week or two” right before giving you the keys. Fool me twelve times? That’s just the 305 way, lesson learned. If you are trying to find a legitimate luxury fleet without getting ripped off, do some real digging first and read actual customer reviews. Miami without real wheels is basically a nightmare, especially since the AC must be ice cold and unlimited miles non-negotiable.
I’ve tested maybe 65 rental outfits across Dade, Broward, and Monroe, but I eventually found a service where what you book is exactly what shows up, no surprises, no hidden fine print. If you are looking for the only straight shooter for premium rides across South Florida, check the current details here: luxury car rental miami south beach [url=https://luxury-car-rental-miami-12.com]luxury car rental miami south beach[/url]. Also, definitely bring quality shades unless you enjoy driving into the sun like a zombie every single evening. Just drive safe out there and absolutely skip that “windshield protection” upsell — complete waste of money. hope this helps some of you save a few bucks.
Telefonuma güncel sürümü yüklemek istiyordum açıkçası. Herkes farklı bir link atıyordu kime güveneceğimi şaşırdım. Adımları doğru sırayla uyguladıktan sonra erişim sorunsuz açıldı. En sonunda sağlam bir kaynağa ulaştım ve size de tüm detayları aktarmak istedim, güncel bilgilere buradan bakabilirsiniz: 1xbet mobil indir [url=www.1xbet-indir-2.com]1xbet mobil indir[/url]. Yani anlatmak istediğim şu — son sürümü bütün özellikleri eksiksiz sunuyor.
güncellemeleri de düzenli geliyor. Birçok platform denedim ama en iyisi bu çıktı — başka yerde vakit kaybetmeyin yani. Umarım siz de memnun kalırsınız…
1xbe
Вот такая история — родственник в запое , а куда бежать — непонятно . Моя семья столкнулась лично . Пьют успокоительное, но нет . Нужна профессиональная медицина. Обзвонил десяток контор — только деньги тянут. А потом наткнулся на один действительно рабочий вариант. Нужна анонимное лечение алкоголиков — не ведись на дешевые акции . В Воронеже , если честно, хватает левых контор без лицензии. Вся проверенная информация тут : анонимное лечение от алкоголизма [url=https://narkologicheskaya-pomoshh-voronezh-11.ru]https://narkologicheskaya-pomoshh-voronezh-11.ru[/url] Честно скажу , после того как ознакомился, многое прояснилось . И про кодирование, и про условия в клинике. И цены адекватные. Рекомендую не откладывать.
Для тех, кто ищет сочетание престижной локации и современной жилой среды, ЖК Апсайд Мосфильмовская может стать отличным вариантом для долгосрочного проживания: жк upside мосфильмовская
Случается сплошь и рядом — родственник в запое , а что делать — непонятно . Моя семья столкнулась лично . Пьют успокоительное, но нет . Нужна реальная медицина. Обзвонил десяток контор — сплошной развод . Пока не нашел один действительно рабочий вариант. Нужна круглосуточная наркологическая помощь — не рискуй здоровьем близкого. У нас в Воронеже, если честно, хватает шарлатанов . Реальные контакты тут : круглосуточная наркологическая помощь [url=https://narkologicheskaya-pomoshh-voronezh-11.ru]круглосуточная наркологическая помощь[/url] Честно скажу , после того как ознакомился, понял свои ошибки. И про кодирование, и про реабилитацию . И цены адекватные. Рекомендую не откладывать.
telecharger 1xbet
One thing that stands out about this post is how clearly the ideas are presented, because the discussion flows in a way that feels both engaging and clear without becoming too difficult for readers to follow.
Xxx video onlyfans sex video site
Reading through this detailed summary was a great use of my time today. The layout is well organized, the tone is perfectly neutral, and the overall reading experience is outstanding, which makes this page something I will definitely be saving for future reference and review.
zoo porno
support your favorite streamers discover new streamers online
888. [url=https://www.888starz-uz11.com/]https://888starz-uz11.com/[/url]
строительные споры адвокат [url=stroitelnye-spory.ru]строительные споры адвокат[/url]
1xbet télécharger
888starz apk [url=https://u-pack.com.co/kachayte-888starz-na-iphone-i-igrayte-v-onlaynkazino-v-uzbekistane/]888starz apk[/url].
true fortune casino [url=https://www.dreevoo.com/profile.php?pid=1891993/]https://dreevoo.com/profile.php?pid=1891993[/url]
https://dentaliano.com/forums/topic/211572/code-promo-1xbet-tours-gratuits-2026-1xbro200/view/post_id/359426
build MVP for startup MVP development services
крошка из яшмы купить [url=kamennaya-kroshka.ru]крошка из яшмы купить[/url]
maorou_k8m porn maorou_k8m sex
Биметаллические линзы (бифокальные вставки) из стекла и пластика имеют разный коэффициент теплового расширения, поэтому при перепадах температуры могут растрескиваться по границе. Безопаснее цельнопластиковые мультифокальные: ProLens.ru
трипскан зеркало trip75 at
кыздар нет кыздар нет
https://www.deviantart.com/codigoperugh
киздар кыздар нет
tripskan трипскан ссылка
trip75 at tripskan вход
@maorou_k8m nude maorou_k8m porn
Ставки вконтакте Проверенные прогнозисты
https://ustanovka-otopleniya-02.kz/
https://sjdhjha.com/1xbet-промокод-на-фрибет-2026-1x200box/
tripskan вход трипскан ссылка
лучшие онлайн букмекеры [url=snatkina.borda.ru/?1-5-0-00000373-000-0-0]лучшие онлайн букмекеры[/url]
This post creates a very engaging discussion because the ideas are presented in a well-explained and balanced way that makes the content interesting and easy for different readers to follow online.
Watch kids sexual porno video xxx sex
mostbet бонус за регистрацию [url=cah.forum24.ru/?1-9-0-00000040-000-0-0]mostbet бонус за регистрацию[/url]
установка отопительные системы