What’s the best wall tile for a Brooklyn, NYC home and how do you choose one that truly fits your space, style, and lifestyle?
Choosing the right wall tile is more than picking a color or pattern. In Brooklyn homes, where space, light, moisture, and building style all matter, the wrong tile can feel out of place or fail over time. In this detailed guide, you’ll learn how to choose the right wall tile for Brooklyn, NYC homes with confidence. We’ll break down tile types, materials, sizes, finishes, and layouts. You’ll also discover room-by-room tips for kitchens, bathrooms, and accent walls, along with practical advice on installation, maintenance, durability, and cost.
Why Wall Tiles Are Ideal for Brooklyn Homes
Why do so many Brooklyn homeowners keep coming back to wall tile? It handles real-life mess, steam, splashes, and cooking grease, especially in busy kitchens and bathrooms. Tile also holds up well over time because it’s known for durability and moisture resistance on walls. And if you love that classic NYC look, subway tile still feels right at home here because it’s rooted in New York design history and stays easy to refresh with new layouts or grout choices.
What are the Common Wall Tile Materials
When you shop for wall tile, you’ll notice most options fall into a few core material groups. Knowing the material first makes the rest (finish, size, maintenance) much easier.
- Ceramic tile
- Porcelain tile
- Glass tile
- Natural stone tile (marble, travertine, slate)
- Mosaic tile (mesh-mounted sheets)
- Cement / encaustic-style tile
- Metal tile
- Large-format porcelain panels (slab-look)
Benefits of Choosing Wall Tiles
If you’re deciding between paint, panels, or something else, wall tile offers a blend of beauty and practicality. Here are the benefits Brooklyn homeowners love most.
- Moisture protection: Tile works great in bathrooms, showers, and kitchen zones because it helps protect wall surfaces from water and humidity. You’ll feel the difference over time: less staining, fewer swollen walls, and fewer “why is this peeling again?” moments.
- Easy cleanup: Most wall tile surfaces wipe down fast, so daily mess doesn’t turn into a weekend project. And when the grout gets dull, you can clean and refresh it without replacing the whole wall.
- Durability that makes sense for NYC life: Tile is known for durability and resistance to moisture and stains, which is exactly what you want in kitchens and baths. If you cook often or have a high-traffic home, tile tends to stay looking “new” longer than painted drywall.
- Design flexibility (from classic to bold): You can keep it timeless with subway tile or go expressive with patterned, geometric, or textured styles. That means your wall tile can match a brownstone vibe, a modern condo look, or even a commercial space design.
- Great for accents and built-ins: Tile makes niches, feature walls, and backsplash zones look intentional instead of “added later.” It’s a smart way to make small Brooklyn bathrooms or kitchens feel custom without changing the whole layout.
Selecting the Right Tile Finish (Glossy vs. Matte vs. Textured)
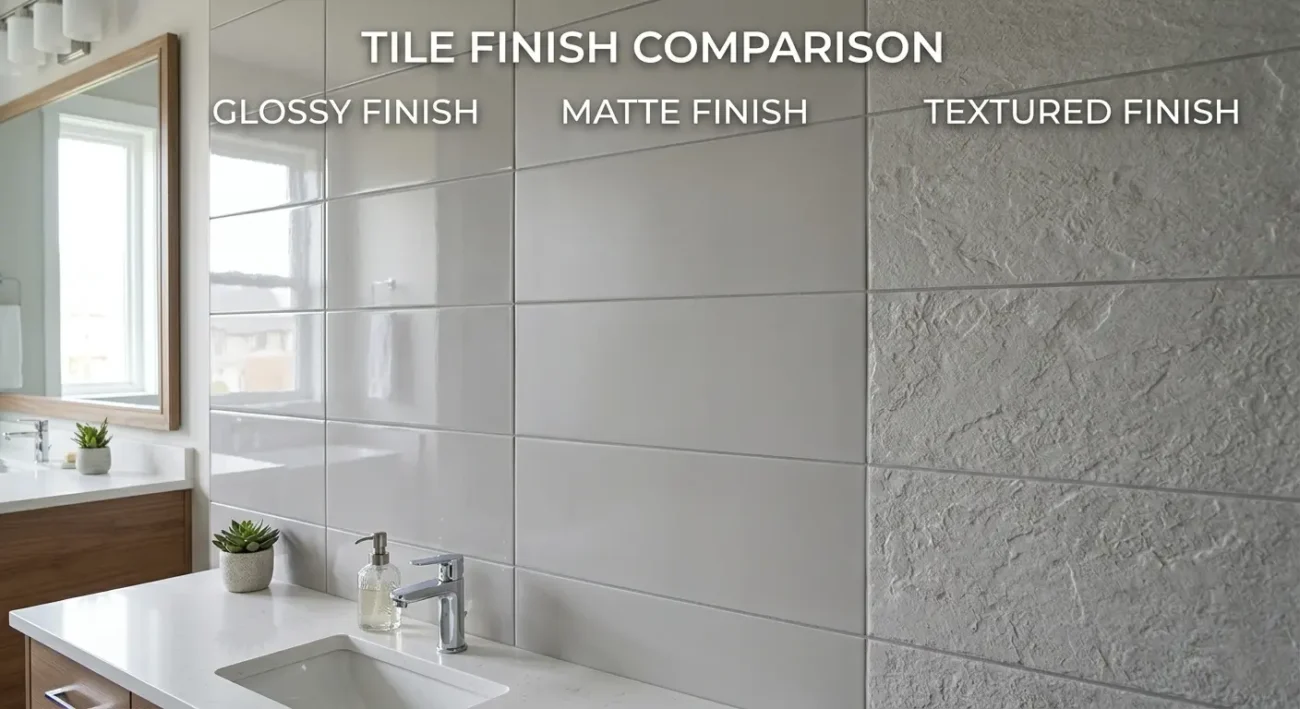
Finish is where your wall tile starts to “feel” right in your space. It affects light, cleaning, and even how much your walls show fingerprints or water spots.
| Finish | Best for | Look & light | Cleaning & upkeep | Watch-outs |
|---|---|---|---|---|
| Glossy | Small bathrooms, brightening a backsplash, feature strips | Reflects more light; feels crisp and clean | Usually wipes down easily | Can show water spots and fingerprints more |
| Matte | Modern kitchens, calm bathrooms, larger wall runs | Softer, more natural look; less glare | Hides smudges better in many cases | Some matte surfaces can hold grime if heavily textured |
| Textured | Accent walls, shower focal walls, “wow” moments | Adds depth and shadow; feels high-end and custom | Great for hiding small wall imperfections | More grooves = more effort to clean in splash zones |
How to choose the Perfect Tile Size and Shape
Picking the right wall tile size and shape is mostly about your room, your light, and how busy you want the wall to look. Let’s keep it simple and make choices that work in real Brooklyn homes.
- Start with the wall area, not the showroom display. Measure the height and width of the wall you’re tiling so you know what “scale” fits your space. A tile that looks perfect in-store can feel too busy once it’s on a full wall.
- Use larger tiles for a cleaner, calmer look. Large-format wall tile can reduce grout lines, which often makes bathrooms feel more open and less “grid-like.” This is especially helpful in smaller NYC bathrooms where every visual break stands out.
- Choose mosaics for curves, niches, and detail zones. Mosaic sheets are great where you need flexibility—like shower niches, borders, or tight corners. They also add texture and personality without redoing the whole room.
- Go with classic rectangles when you want timeless design freedom. Subway-style shapes are easy to style because you can change the vibe by adjusting the layout (stacked, offset, vertical) or the grout color.
- Pick bold shapes when the wall is your “statement piece.” Hexagons, arabesque shapes, and fluted textures work best when given breathing room—like on a vanity wall or a commercial feature wall. When you use them in small doses, they feel intentional instead of overwhelming.
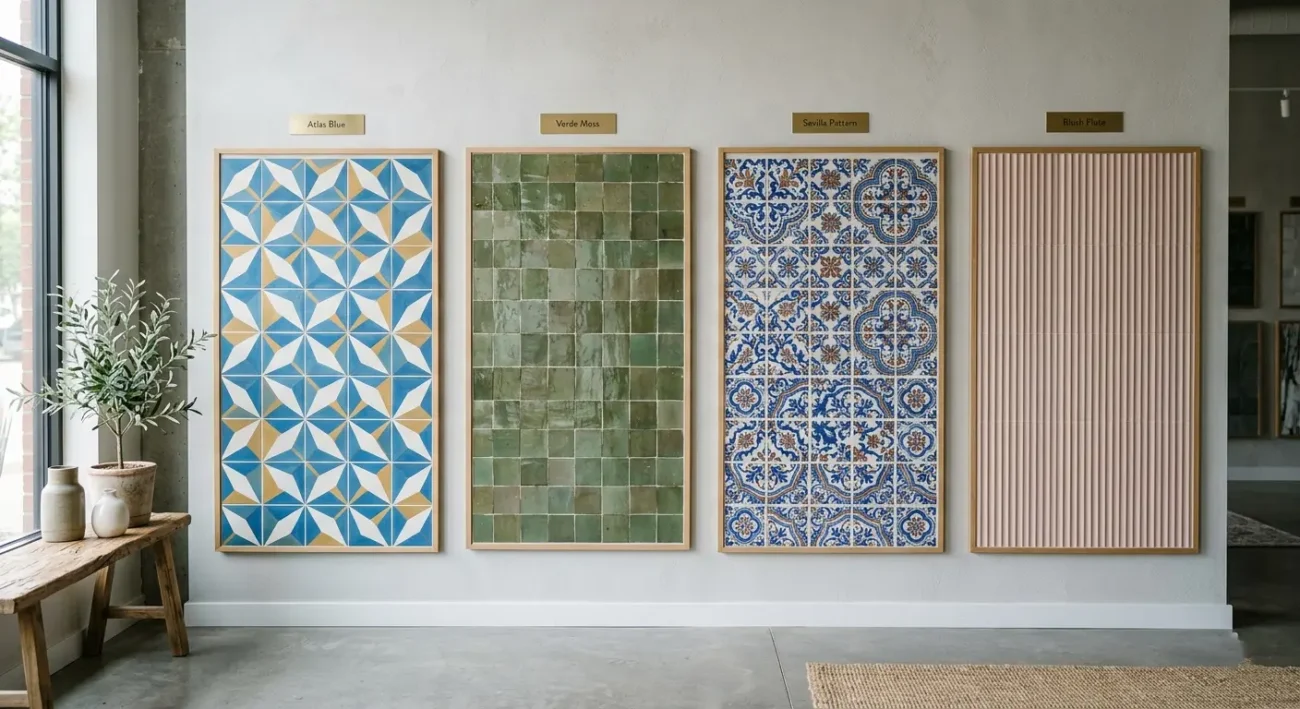
Type of Popular Wall Tile Design in Brooklyn, NYC

If you walk through Brooklyn brownstones and pre-war co-ops, you’ll notice people lean toward tile that looks clean, bright, and easy to live with. Here are the wall tile designs that fit the “Brooklyn home” vibe—classic yet personal.
- Classic white subway tile (offset or stacked layout): Subway tile is basically a NYC icon, so it naturally feels “right” in Brooklyn kitchens and baths. It makes small rooms look bigger by bouncing light rather than absorbing it. You can keep it timeless with white grout or make it pop with a darker grout line.
- Subway tile with a “twist” (vertical stack or oversized subway): If you like the subway look but don’t want it to feel overdone, change the direction. Vertical stacking makes ceilings feel taller, which helps in tighter NYC bathrooms. Oversized subway gives the same vibe with fewer grout lines to scrub.
- Herringbone or chevron statement walls: This pattern instantly makes one wall feel “designed,” even if the rest of the room is simple. It’s especially popular for shower feature walls or behind a stove, where you want a focal point. Just know it takes more cuts and more layout time, so it’s usually pricier to install.
- Zellige (handmade-look tiles with natural variation): Zellige is trending because it doesn’t look flat every tile catches light a little differently. In Brooklyn homes, it’s a favorite for backsplashes and shower walls when you want warmth and character without busy patterns. It also pairs beautifully with older details, such as exposed brick or original wood trim.
- Large-format porcelain for a cleaner, modern look: Bigger tiles can make a wall feel calmer because there are fewer grout joints. This is great in NYC bathrooms, where you want easier cleaning and less visual clutter. The tradeoff is that large tiles demand flatter walls, so prep matters.
- Marble-look porcelain (luxury look, lower stress): You get that upscale “spa” feel without the same level of worry as real stone. People love it in Brooklyn because it photographs well and feels high-end in both rentals and renovations. It’s also easier to maintain than many natural stones.
- Textured / 3D wall tile for accent walls: When you want drama without loud color, texture does the work. These tiles are popular behind a vanity, in an entryway nook, or as a living-room feature wall. Lighting matters a lot here—side light makes the texture look richer.
- Bold color tile (deep greens, blues, terracotta tones): Brooklyn homes often mix old + new, and rich color tile fits that mood perfectly. A colored shower wall or backsplash adds personality without changing the whole room. If you’re nervous, start with one wall or a niche.
Choosing Tiles for Each Room: Kitchens, Bathrooms, and Living Spaces
Kitchen wall tile ideas
- Go practical first: glazed ceramic or porcelain is a smart choice around cooking mess and steam.
- Most-loved Brooklyn look: subway tile (classic), zellige (warm + handmade), or a simple stacked layout for a modern finish.
- Pro-style detail: run tile all the way to the hood or upper cabinets to make the kitchen feel taller and more “built-in.”
Bathroom wall tile ideas
- For shower walls: pick porcelain or other low-absorption tile, then focus on proper waterproof prep.
- Style that lasts: large-format walls for a calm spa feel, or a single feature wall in herringbone/zellige for character.
- Easy upgrade: do a bold niche (pattern or color) while keeping the main walls simple.
Living spaces wall tile ideas
- Fireplace surrounds: marble-look porcelain, textured tile, or handmade-look tile can turn the fireplace into a real centrepiece.
- Entryway / mud zone walls: durable tile wainscoting is great if you deal with strollers, bikes, or wet umbrellas.
- Accent walls: textured/3D tile gives you “wow” without needing artwork to carry the whole wall.
Preparing Walls and Installation Planning
- Check the wall for flatness and fix dips/bumps before you start.
- Repair water damage and stop any leaks first
- Choose the right backer (cement board/wet-area system where needed)
- Measure the tile area and plan your layout (center lines + starting height)
- Decide your edge finish (bullnose, metal trim, or clean return)
- Confirm NYC building rules (work hours, debris removal, noise, insurance if it’s a co-op/condo)
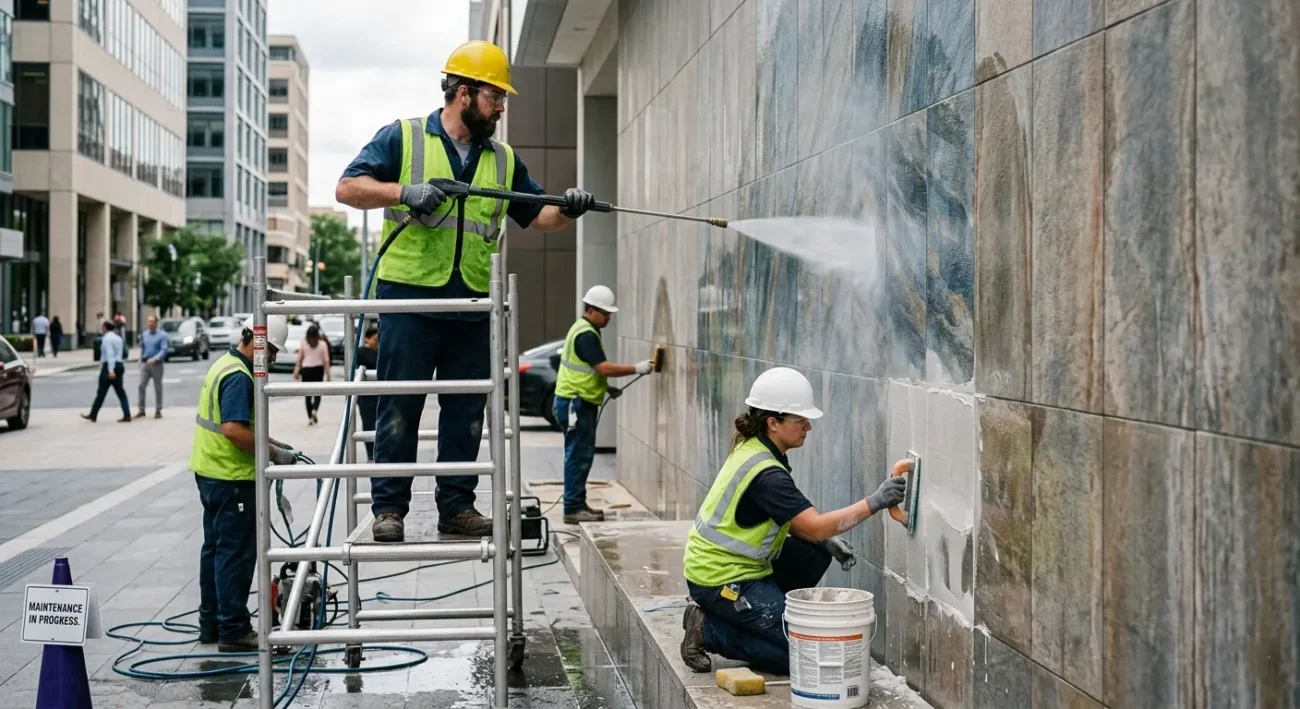
Step-by-Step: How to Properly Install Wall Tile in Your NYC Flat
Wall tile isn’t hard because it’s “mysterious”; it’s hard because small mistakes show forever. If you take it step by step, you’ll get a straight layout, clean grout lines, and fewer cracked tiles later.
- 1) Protect the space and clear the wall: Cover floors, counters, and nearby furniture because thinset dust and grout haze travel. Remove outlet covers, towel bars, and anything that blocks a clean tile run. In a NYC flat, this also keeps cleanup quick when you’re working in a tight space.
- 2) Prep the substrate the right way: Tile needs a solid, stable surface—painted drywall in wet areas is asking for trouble. In kitchens and baths, installers often use cement board/backer systems where appropriate. If the wall isn’t flat, fix it now, because tile won’t “bend” to hide waves.
- 3) Plan the layout before mixing anything: Dry-lay your pattern and decide where cuts will land so you don’t end up with tiny slivers at the edges. Mark level reference lines, and use a ledger board if you need a perfectly straight starting row. This is the step that makes the job look pro even if it’s your first time.
- 4) Apply thinset/adhesive and set tile in sections: Use the correct trowel notch for your tile size, then work in small areas so the adhesive doesn’t skin over. Press tiles firmly and use spacers to keep grout lines consistent. Keep checking level as you go—walls love to “drift” if you don’t watch them.
- 5) Cut tiles cleanly and finish edges: Measure twice and cut once, especially around outlets, pipes, and corners. Use trim pieces or a clean edge detail to prevent the tile from ending abruptly. In NYC kitchens, clean outlet cuts matter a lot because they’re right at eye level.
- 6) Let it cure, then grout and clean: Give the tile time to set before grouting so the tiles don’t shift. Grout the joints, wipe haze in passes, and don’t flood the wall with water while cleaning. If you rush here, the whole wall can look cloudy, even if the tilework is perfect.
- 7) Caulk change-of-plane joints and do final touch-ups: Inside corners and wall-to-counter joints should handle movement, so flexible sealant is commonly used instead of rigid grout. Do one last polish and reinstall plates/fixtures after everything is dry. This is the difference between “installed” and “finished.”
Cost for Wall Tile Installation in Brooklyn, NYC
| Wall tile scope / design | Typical installed cost (Brooklyn planning range) |
|---|---|
| Basic wall tile (straight lay), dry area | ~$11–$21 per sq ft |
| Kitchen backsplash (example: 3" x 6" ceramic) | ~$28–$49 per sq ft |
| Mosaic sheets / small-format feature areas | ~$20–$32+ per sq ft |
| Large-format porcelain wall tile (12"x24" and up) | ~$18–$45 per sq ft |
| Pattern layout (herringbone/chevron) on a wall | Often upper-end of your tile’s range |
| Natural stone wall tile (marble, slate, etc.) | Often higher due to material + sealing |
Maintenance and Cleaning Tips for Wall Tiles
Wall tile is pretty low-stress, but a few smart habits will keep it looking new for years. If you’re in Brooklyn, the biggest enemies are usually steam, soap film, and tired-looking grout.
- Wipe walls after showers (even a quick pass helps). It prevents water spots and soap scum from forming. It also reduces the likelihood of mold and mildew in humid bathrooms.
- Use a pH-neutral cleaner for regular cleaning. It removes daily grime without slowly wearing out grout or dulling the tile surface. Skip harsh acids or “strong” mixes unless a tile pro or manufacturer says it’s safe.
- Avoid bleach, vinegar, and abrasive pads for routine cleanup. These can damage grout over time and may scratch or dull some finishes. A soft sponge or microfiber cloth does the job in most cases.
- Deep-clean grout the gentle way when it starts to darken. A baking-soda and hydrogen-peroxide paste can brighten grout without harsh fumes for many homes. Always spot-test first, especially if your grout is colored.
- Seal grout when needed (especially in wet zones). Sealers help grout resist moisture and staining, which is useful for showers and high-splash areas. Re-sealing schedules vary, but it’s a simple step that can prevent “perma-dingy” grout lines.
Rectified vs. Unrectified Tiles
Neither is “better” for every home—the better choice depends on the look you want. Rectified tiles are cut to tighter, more consistent edges, so they suit modern designs with cleaner lines and tighter grout joints (when installed well). Un-rectified tiles have more natural variation, so they’re great for a softer, handmade, or vintage look, and they’re often more forgiving on older, not-perfectly-flat walls. If you want a crisp “almost seamless” look, go rectified; if you want warmth and character, go unrectified.
Should wall tiles be lighter or darker than my walls?
If your Brooklyn space is small or doesn’t get much daylight, lighter wall tile usually makes the room feel more open by reflecting more light. Dark tile can look amazing, but it works best with good lighting or as a feature wall rather than covering every wall. You can also reduce visual “choppiness” by keeping tile and wall colors in the same family (close shades). If you’re unsure, start light on the main walls and use darker tones in small accents, such as niches or a single focal section.
How do I choose the right color for my wall tiles?
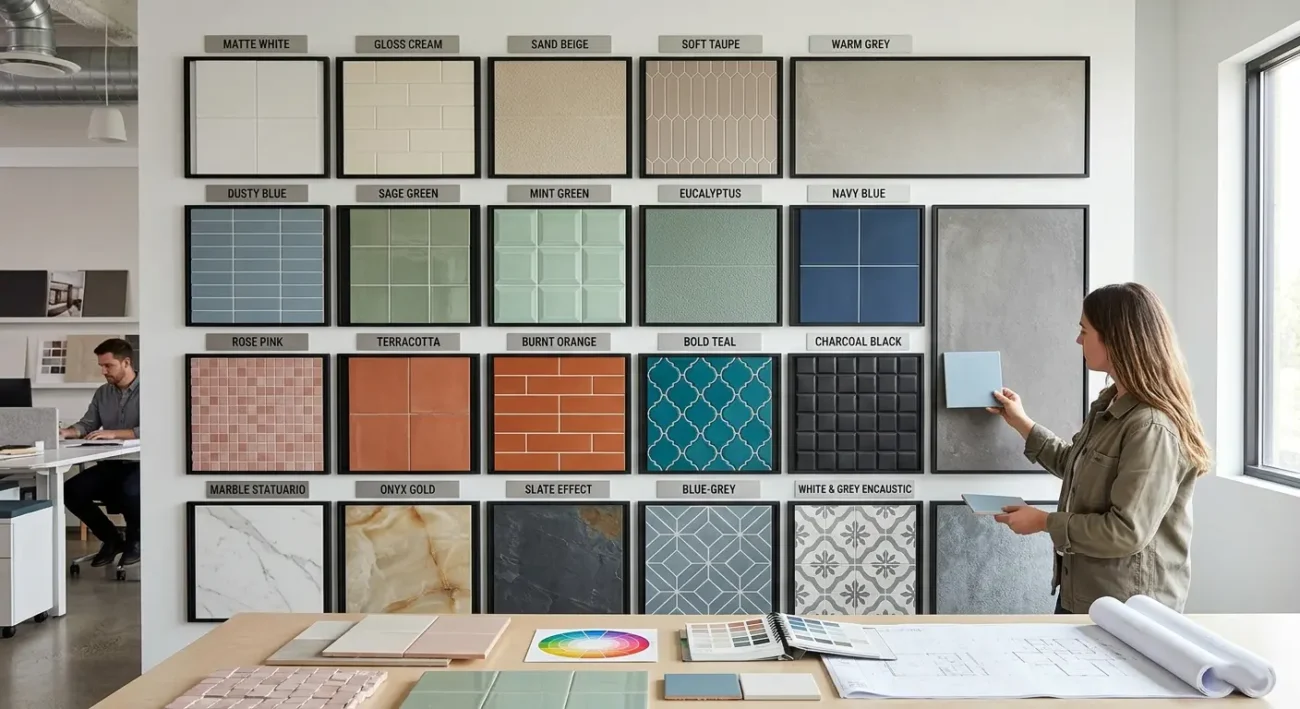
Start with what you can’t easily change—countertops, cabinets, flooring, and fixtures—and choose a tile color that either complements them or cleanly contrasts them. If your countertop or cabinets have a strong pattern, keep the wall tile calmer; if your finishes are simple, you can make the tile the “star.” Always grab a few samples and look at them in your actual lighting (morning, night, and under-cabinet lights), because Brooklyn apartments can change a lot from one room to the next. When in doubt, pick a neutral tile and add personality through layout, texture, or grout color.
How can I calculate how many wall tiles I need
Measure the wall’s width × height to get the total square footage, then subtract big openings like windows. Next, divide that wall area by one tile’s area (tile width × tile height) to get the tile count. Add extra tile for cuts and breakage, about 10% for a straight layout and more for complex patterns like herringbone or lots of corners. If you want the fastest double-check, plug your numbers into a tile calculator and compare it with your manual math.
Where to Find the Best Brooklyn Contractors
Are you looking for an expert contractor in Brooklyn, NYC? SR General Construction has you covered! Our business is located at 8807 Avenue B, Brooklyn, NY 11236, United States, in the Canarsie area.
Additionally, we offer services at Rockaway Parkway and Ralph Avenue, providing fast access to Flatlands, East Flatbush, Bergen Beach, Brownsville, and the Spring Creek section of East New York.
FAQ
1. What’s the one question I should ask before choosing a shower wall tile in Brooklyn?
Ask yourself: “How hard is my water, and how much do I like cleaning?” Hard-water spots and soap scum show up faster on some finishes and grout-heavy designs, so low-absorption tile and fewer grout lines usually feel easier day to day.
2. Is porcelain or ceramic better for bathroom wall tile?
Porcelain is denser and less porous, so it’s often the safer pick for wet, steamy areas like showers. Ceramic can still work great on bathroom walls, especially when your waterproofing is done correctly.
3. Do I need waterproofing behind wall tile in a NYC shower?
Yes—tile and grout aren’t a waterproof system by themselves, so the shower needs a proper waterproofing method behind the tile. TCNA shower methods specifically call for a waterproof membrane covering the backing under the tiled area.
4. Which finish is easier to clean on wall tile: glossy or matte?
Glossy wall tile is often easier to wipe down because soap film doesn’t cling as much to the surface. Matte (especially textured matte) can hide fingerprints better, but it may hold onto grime more in splash zones.
5. Should I use sanded or unsanded grout for wall tile?
Unsanded grout is commonly used for narrow joints and scratch-prone tile, such as some glass or polished stone. Sanded grout is stronger for wider joints, but it can scratch delicate surfaces.
6. How wide should grout lines be on wall tile?
Many installs aim for at least 1/16 inch, but the right size depends on tile size, edge consistency, and wall flatness. With large-format tiles and offset patterns, wider joints (often 1/8 inch or more) can help things look straighter and perform better.