Why does your bathroom still feel unfinished even after a renovation, or why can a simple toilet upgrade make such a big difference in your home or business?
A proper toilet installation ensures long-lasting performance, avoids leaks, and can even improve water efficiency. In this detailed guide, we will walk you through every step of toilet installation and replacement, from gathering tools and removing an old toilet to setting a new one and knowing when to call a licensed plumber right here in Brooklyn. We’ll also touch on specific neighbourhood considerations, including spaces in Park Slope, Williamsburg, and surrounding NYC boroughs.
Why Proper Toilet Installation Matters in Brooklyn, NYC
Have you ever seen a “tiny” toilet leak turn into a ceiling stain downstairs? In Brooklyn; whether you’re in a Park Slope brownstone, a Williamsburg condo, or a small commercial space in Bushwick, bad sealing can quietly damage floors, subfloors, and even a neighbor’s unit. A proper installation compresses a new seal and locks the bowl to a solid flange, helping prevent leaks and sewer gas odors. NYC also takes plumbing work seriously: a like-for-like fixture swap may not require a permit, but any piping changes are regulated and typically require a Licensed Master Plumber (LMP).
Essential Tools and Materials for a DIY Toilet Replacement
Before you start, set yourself up for a smooth job by gathering everything in one spot. This list matches what you’ll see in standard toilet replacement guides from major DIY authorities.
Tools
- Adjustable wrench
- Channel-lock pliers
- Screwdriver
- Putty knife
- Utility knife
- Mini hacksaw
- Tape measure
- Level
- Sponge
- Bucket
- Rubber gloves
- Drop cloth / tarp
Materials
- New toilet
- New wax ring or wax-free toilet seal
- Replacement closet bolts, nuts, and washers
- Toilet bolt caps
- Flexible toilet supply line
- Plumber’s tape
- Toilet shims
- Caulk and caulk gun
Pre-Toilet Installation Checklist
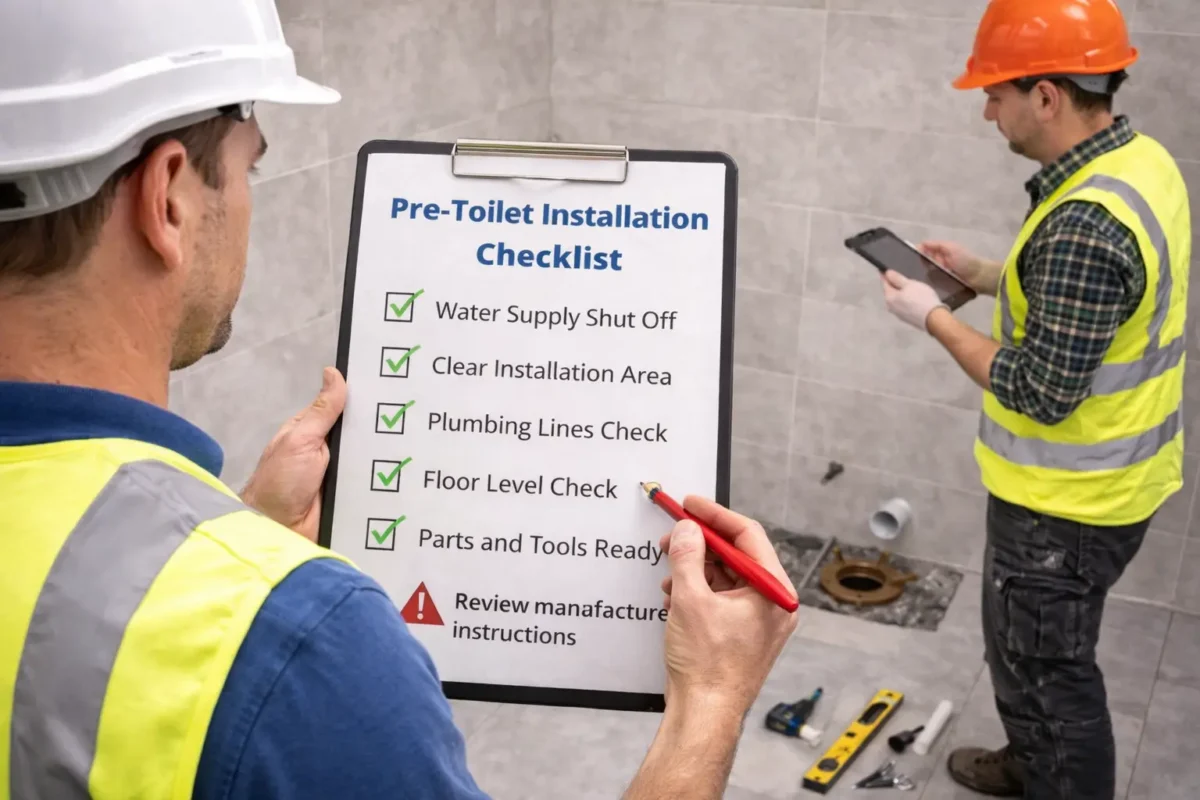
Before you loosen a single nut, take five minutes and run this checklist. In Brooklyn buildings, especially co-ops, condos, and mixed-use properties, prep work saves you from messy delays.
- Confirm your scope and NYC rules first. NYC DOB says a direct replacement of an existing toilet is generally “cosmetic work” and doesn’t require a permit when you’re not altering shutoff valves or the fixture trap. If you’re moving the toilet or changing the piping, plan to use a Licensed Master Plumber because permits/inspections may be required.
- Check building requirements (especially in Park Slope, Brooklyn Heights, and Downtown Brooklyn). Many co-ops/condos require approved work hours and may require paperwork, such as insurance details, before work starts. If you manage a commercial restroom, plan a shutdown window to avoid disrupting tenants, staff, or customers.
- Measure the rough-in so the new toilet actually fits. Measure from the wall (not the baseboard) to the floor bolts—this is your rough-in measurement. Most toilets have a 12-inch rough-in, but 10-inch and 14-inch options are available, so don’t guess.
- Test the shutoff valve and know your backup plan. Turn the shutoff valve clockwise to confirm it fully stops the water before you begin draining anything. If it doesn’t stop the flow, you may need professional help (or shut off the water elsewhere) before you proceed.
- Inspect what you can before removing the floor, wobbles, and smells. A rocking toilet, base leaks, or foul odors can point to flange or seal issues that you’ll need to address during replacement. If the flange is cracked or damaged, plan to repair/replace it before installing the new toilet.
- Protect your floor and set up a “landing zone.” Put down a drop cloth or a piece of plywood to prevent scratching the tile or hardwood when you lift the toilet out. Also, pick a spot to set the old toilet where any leftover water won’t damage anything.
- Stock the “small parts” that stop big leaks. Don’t rely on reusing old parts; grab a new wax ring/seal and consider new closet bolts if yours look rusty. A new flexible supply line is also smart because it’s cheap insurance against drips later.
- Plan disposal the Brooklyn way. NYC311 notes that residential buildings can get free curbside removal of bulk items, and toilets are listed as non‑recyclable bulk items (with limits per collection day). For commercial buildings, you may need a private carting/removal plan instead of DSNY pickup.
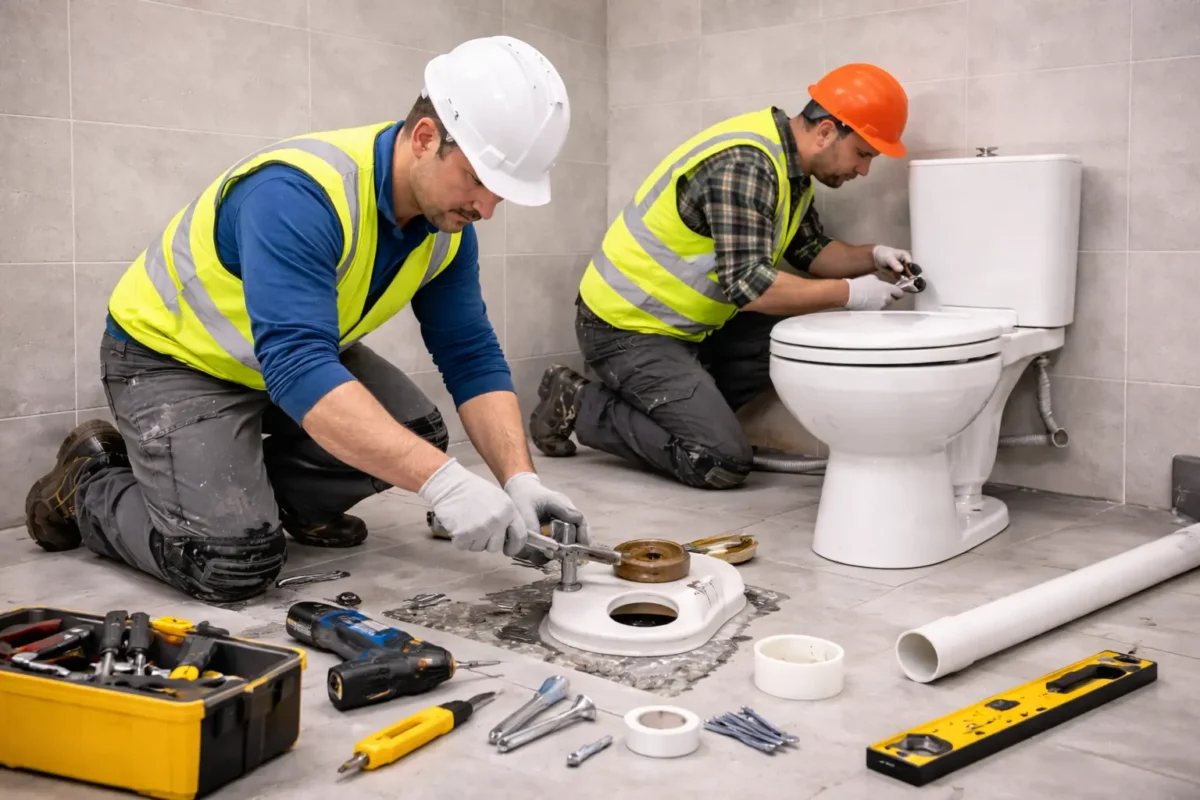
How to Install a New Toilet
Installing a new toilet is basically a careful swap: shut off the water, remove the old toilet, and prep the flange so the new seal can do its job. Then you set the new bowl straight down onto a fresh wax ring (or wax-free seal), tighten the closet bolts evenly, and reconnect the water supply. Finally, you test several flushes and watch closely for leaks at the base and at the tank connection. If the job goes beyond a simple replacement like moving the toilet or changing piping, NYC rules may require a Licensed Master Plumber and a permit process.
Step 1 – Turning Off the Water Supply and Draining the Toilet
- Turn the shutoff valve clockwise until it fully stops.
- Flush the toilet to empty the tank and bowl.
- Use a plunger to push remaining water down the drain.
- Sponge out leftover water from the tank into a bucket.
- Sponge out leftover water from the bowl if needed.
- Disconnect the supply line (keep a towel/bucket handy)
Step 2 – Removing the Old Toilet Fixture Safely
- Pop off the closet bolt caps.
- Loosen and remove nuts and washers from the closet bolts.
- Score/cut any caulk around the base with a utility knife
- Rock the bowl gently to break the wax seal.
- Lift the toilet straight up (don’t twist it)
- Set the toilet on a drop cloth/plywood.
- Stuff a rag into the open drain to block sewer gases.
- If you’re solo, separate the tank from the bowl before lifting.
Step 3 – Inspecting the Bathroom Floor and Flange Condition
- Scrape off all old wax from the flange area with a putty knife.
- Wipe the flange clean and remove debris.
- Check the flange for cracks, corrosion, or movement.
- Look for water damage or soft flooring around the opening.
- Confirm the flange sits flat and is properly aligned.
- Replace a cracked/broken flange before installing the new toilet.
Step 4 – Installing a New Wax Ring or Seal
- Use a brand-new wax ring (or wax-free seal) every time.
- Place the seal on the flange or attach it to the bottom of the bowl (either method works)
- Use a thicker seal if the floor height changed (like thick tile)
- Make sure closet bolts are set in the flange slots and standing upright.
- Lower the bowl straight down and line up the bolt holes.
- Press down to compress the seal.
- Avoid lifting or shifting the toilet after seating; reset with a new seal if you have to reposition
Step 5 – Setting the New Toilet Bowl in Place
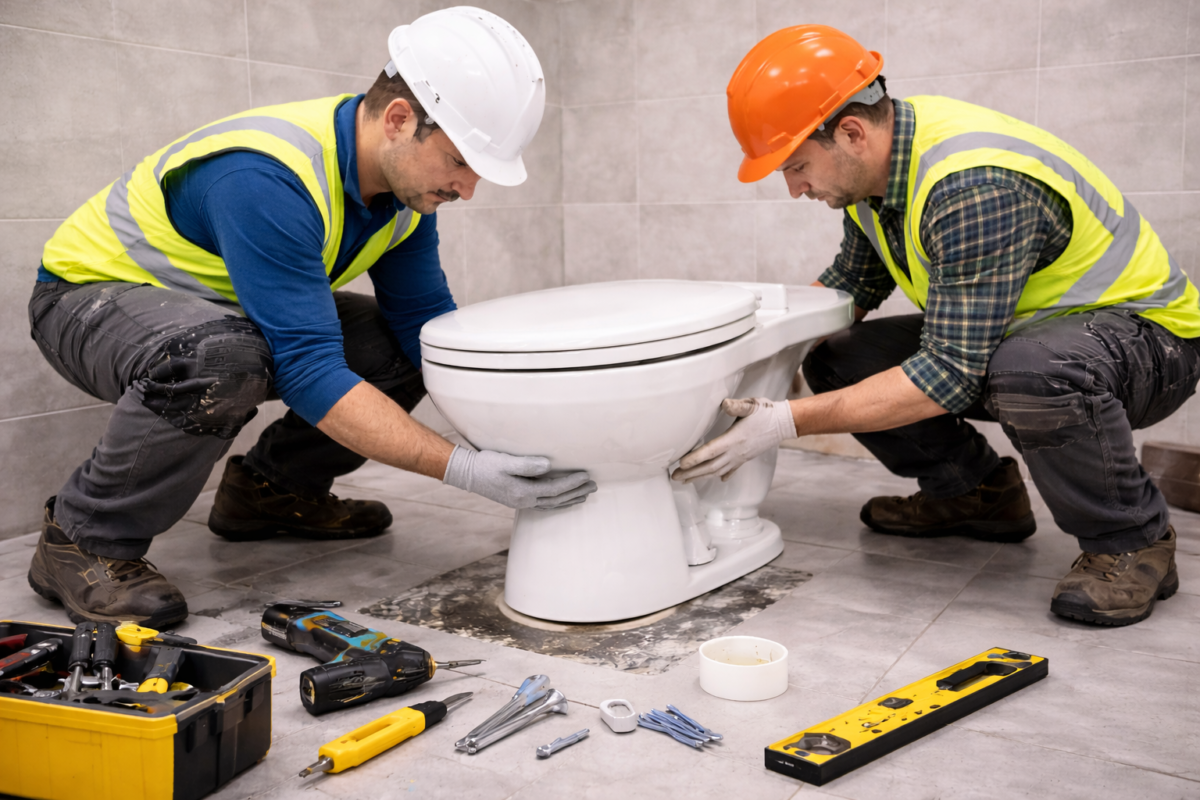
- Double-check that the closet bolts are straight and evenly spaced in the flange slots.
- Lift the bowl by the inside rim (not the tank opening area) for better control.
- Lower the bowl straight down over the bolts, keeping it square to the back wall.
- Align the bolt holes with the bolts without twisting the bowl.
- Press down firmly to compress the wax ring / seal.
- Avoid lifting, sliding, or rocking the bowl once it’s seated (reset with a new seal if you must reposition)
Step 6 – Securing the Toilet (Bolts, Leveling, and Shims)
- Add washers and nuts to both closet bolts.
- Tighten the nuts evenly, alternating sides in small turns.
- Stop when snug—over-tightening can crack the porcelain.
- Check for rocking by gently pressing on opposite sides of the bowl.
- Place a level across the bowl (front-to-back and side-to-side)
- Insert plastic toilet shims into the gaps until the bowl feels solid.
- Trim the shim ends flush with a utility knife.
- Cut excess bolt length with a mini hacksaw if needed.
- Snap on bolt caps for a clean finish.
Step 7 – Attaching the Tank and Internal Components
- Confirm your toilet is a two-piece (skip this step for one-piece units).
- Install the tank-to-bowl gasket onto the flush valve outlet (if not pre-installed).
- Insert tank bolts and washers from inside the tank.
- Set the tank onto the bowl and align the bolt shanks through the bowl holes.
- Tighten the tank bolts evenly, alternating side to side, until the tank sits stably.
- Keep tightening gradually; don’t force it (porcelain can crack).
- Check inside the tank: flapper seats flat, chain isn’t tangled, refill tube is clipped to the overflow tube.
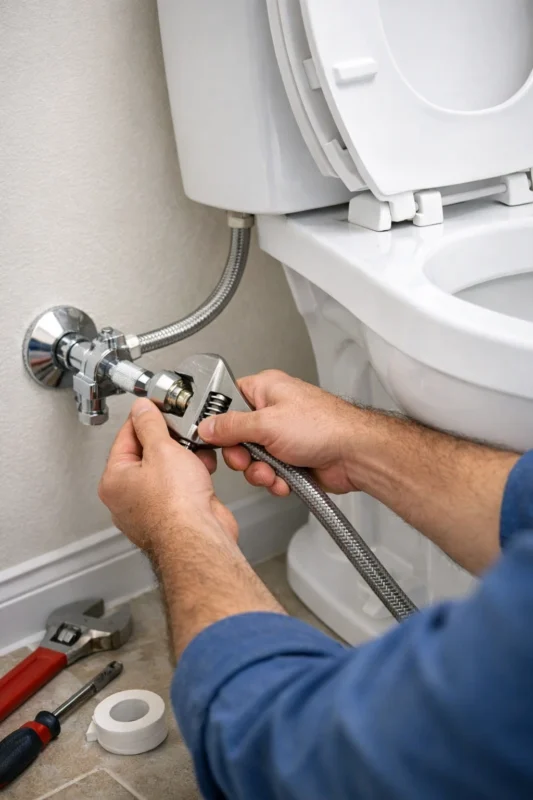
Step 8 – Connecting the Water Supply Line and Valve
- Replace the old flexible supply line if it looks stiff, corroded, or kinked.
- Connect the supply line to the shutoff valve first, then to the fill valve under the tank.
- Hand-tighten, then snug with a wrench (don’t over-tighten).
- Make sure the refill tube is secured to the overflow tube with the clip.
- Turn the shutoff valve on slowly to pressurize the line gently.
Step 9 – Testing for Leaks and Final Adjustments
- Let the tank fill completely while watching the supply connections.
- Flush 2–3 times and watch these spots closely: base, tank-to-bowl seam, supply line joints
- Look for slow seepage (it can take a minute to show up)
- Adjust the fill valve so the water level stops about 1 inch below the top of the overflow tube / fill line mark.
- If the toilet rocks after testing, re-check shims and bolt snugness
Step 10– Finishing Touches – Caulking and Seat Installation

- Install the toilet seat that matches your bowl shape (round vs elongated)
- Tighten the seat hardware snugly so it doesn’t shift side to side.
- Decide on caulk: some guides advise not caulking because it can trap water under the toilet.
- If you do caulk (common to hide shims and keep mop water out), leave a small gap at the back so leaks can show.
- Wipe excess caulk and let it cure before heavy use.
Can I install a toilet myself, or should I hire a professional?
If you’re doing a direct replacement (same location, no valve or trap changes), NYC DOB considers this “cosmetic work” and doesn’t require a permit. But the moment you’re moving the toilet, changing piping, or doing anything beyond a straight swap, DOB says the work must be supervised by a Licensed Master Plumber and may require permits and inspections.
DIY can make sense when:
- You’re swapping an old toilet for a new one in the same spot.
- The shutoff valve works perfectly.
- The flange is solid, and the floor is stable.
Call a pro in Brooklyn when:
- You’re in a co-op/condo (building rules + shared units raise the risk)
- The flange is cracked, the floor feels soft, or the toilet keeps rocking.
- You see leaks at the base or the tank-to-bowl seam after installation.
- You’re working in a commercial restroom where downtime and compliance matter.
- You’re altering piping, relocating the toilet, or changing the trap/shutoffs.
If you’d rather have a licensed team handle it, SR General Construction, NYC, is fully licensed and brings 15+ years of renovation and remodeling experience across Brooklyn. We’ve completed 750+ projects for 500+ satisfied clients, and we offer 24/7 support to help keep your property safe, whether you’re in Park Slope, Williamsburg, Bushwick, Bed-Stuy, or Crown Heights.
How to Remove an Old Toilet
If you’ve never removed a toilet before, don’t worry; this is mostly an “order of operations” job. When you take it step by step, you can keep your Brooklyn bathroom clean and avoid surprise spills.
- Shut off the water at the toilet valve: Turn the shutoff valve clockwise until it stops, so no new water refills the tank. If the valve won’t fully close or feels stuck, pause the DIY and get help—forcing it can create a bigger leak.
- Flush to empty the tank and bowl: Flush once or twice to drain most of the water from the tank into the bowl and down the drain. Hold the handle down for a few seconds to let more water leave the tank.
- Sponge out leftover water: Use a sponge and bucket to remove the remaining water from the tank, then do the same for the bowl. This small step prevents that “oops” splash when you lift the toilet.
- Disconnect the water supply line: Place a towel or bucket under the connection, then loosen the nut that holds the supply line to the tank. A little water may drip out, so keep the towel ready and work slowly.
- Cut the caulk line and remove bolt caps: If the caulk seals the base, score it with a utility knife so the toilet lifts cleanly. Pop off the plastic bolt caps at the base to access the nuts.
- Remove the nuts from the closet bolts: Use a wrench to loosen and remove the nuts and washers on both sides. If the bolts are badly rusted, cutting them is a normal fix—don’t waste an hour fighting them.
- Break the wax seal and lift the toilet straight up: Rock the bowl gently to break the wax seal, then lift straight up (don’t twist) so you don’t smear wax everywhere. Toilets are heavy lifts with your legs, and use a helper if you can.
- Plug the drain opening right away: Stuff a rag into the open drain to block sewer gas while you work. This keeps odor out of the bathroom and makes the work area feel way more comfortable.
- Clean the flange area and scrape off old wax: Scrape the old wax off the flange with a putty knife so the new seal can sit flat and seal correctly. This is also your chance to check for a cracked or loose flange before installing the new toilet.
How to Reconnect the Water Supply
Reconnect the water slowly, and you’ll catch issues before they become leaks. Your goal is simple: snug fittings, steady fill, and dry paper towels around every joint.
- Use a new braided supply line if you can
- A fresh line reduces the risk of hidden wear that could cause a drip later. It’s a small cost compared to the cost of water damage, especially in apartments or commercial spaces.
- Attach the supply line to the toilet fill valve (under the tank): Thread it on by hand first so it doesn’t cross-thread. Then tighten it just a bit more. One common approach is a final small turn with pliers after finger-tightening.
- Connect the other end to the shutoff valve: Again, start by hand so the threads catch cleanly, and you don’t damage the fitting. Snug it gently—over-tightening can pinch washers and actually create leaks.
- Turn the water on slowly and watch the connections: Open the shutoff valve gradually so the line pressurizes without a sudden surge. While the tank fills, look closely at both ends of the supply line for even a tiny bead of water.
- Do a flush test and re-check: Flush once the tank is full, then watch it refill again. If you see moisture, tighten in tiny steps and re-test instead of cranking hard.
Common Toilet Installation Issues
Even when you do everything “right,” a few common issues can pop up—especially in older Brooklyn buildings with uneven floors. The best approach is to test carefully and fix small problems right away.
- Leak at the base of the toilet: This usually points to a sealing problem—like a wax ring that didn’t compress evenly or bolts that aren’t snug. Many guides warn against twisting or rocking the toilet after it seats, as this can break the wax seal.
- Toilet rocks or wobbles: Wobble often happens when the floor isn’t perfectly level, or the bowl isn’t sitting evenly on the seal. Tighten bolts evenly and use shims if needed—don’t “muscle it down,” because porcelain can crack.
- Drip at the supply line connection: A small drip typically means the nut isn’t snug enough or the washer isn’t seated right. A common technique is finger-tight, then one last small tightening turn—then test again.
- Leak between the tank and bowl (two-piece toilets): This can happen when the tank gasket isn’t seated correctly, or the tank bolts aren’t tightened evenly. Tighten side-to-side in small turns so the tank sits level and doesn’t stress the porcelain.
- Toilet keeps running or makes hissing sounds: Running or hissing often ties back to the flapper, chain, or fill valve setting. Adjusting or replacing these parts is a common fix, and it’s worth doing quickly because it wastes water.
- Weak flush: A weak flush can result from the tank water level being set too low or from internal parts not being adjusted correctly. Check that the tank fills to the marked water line (or an appropriate level below the overflow) and test again.
What type of toilet is best for a small NYC apartment bathroom?
For tight bathrooms, a round-front toilet often fits better because it takes less space than an elongated bowl. If you want comfort without losing space, look for compact elongated models designed for smaller footprints (you get more seat comfort without as much projection). A one-piece or wall-hung style can also save visual space and make cleaning easier, but installation can be more involved depending on your setup. No matter what you choose, measure your rough-in and clearances first; buying the wrong size is the easiest way to waste time and money.
Where to Find the Best Brooklyn Contractors
Are you looking for an expert contractor in Brooklyn, NYC? SR General Construction has you covered! Our business is located at 8807 Avenue B, Brooklyn, NY 11236, United States, in the Canarsie area.
Additionally, we offer services at Rockaway Parkway and Ralph Avenue, providing fast access to Flatlands, East Flatbush, Bergen Beach, Brownsville, and the Spring Creek section of East New York.
FAQ
1. Can I install a toilet myself in Brooklyn, NYC?
Yes—if it’s a simple swap in the same spot and everything (valve, flange, floor) is in good shape, many homeowners can handle it. But if the job involves altering, rearranging, relocating, or removing piping, NYC requires supervision by a Licensed Master Plumber (LMP), and permits may be required.
2. When does NYC require a Licensed Master Plumber (LMP) for toilet work?
If you’re changing or relocating any piping, NYC says the work must be supervised by an LMP who pulls permits and arranges inspections. That’s especially common in commercial bathrooms or renovations where layouts change.
3. What is a toilet rough-in, and why does it matter in NYC apartments?
Rough-in is the distance from the finished wall to the center of the drain/bolts, and it determines whether a new toilet will fit your space. NYC bathrooms can be tight, so measuring rough-in (often 10”, 12”, or 14”) prevents returns and rework.
4. Wax ring vs. wax-free seal: which is better?
Wax rings are the classic choice and work well when the flange height is correct, and the toilet seats are clean. Wax-free seals can be nice if you want easier resets, but you still need a solid flange and a stable toilet base for either option to hold.
5. What if the shutoff valve won’t fully turn off?
Stop the project and don’t “fight” the valve—forcing it can snap the stem or start a leak. Shut water at the main (if you can) and call a pro, because a working shutoff is a safety must in any Brooklyn home or business.