Do you know how to utilize kitchen lights to make your space brighter, safer, and more inviting?
Many homeowners focus on cabinets and countertops but forget that kitchen lighting design plays a major role in how a kitchen looks and functions every day. The right lighting helps you cook safely, highlights your kitchen’s style, and creates a warm atmosphere for family and guests.
Why Kitchen Lighting Design Matters in Brooklyn, NYC
In Brooklyn, a lot of kitchens are in brownstones, pre-war apartments, or tight co-ops—so one ceiling light usually leaves you cooking in your own shadow. A smart kitchen lighting design makes prep safer, helps your kitchen feel bigger, and makes finishes (like quartz, tile, and paint) look the way you expected. Layered lighting (ambient + task + accent) is the approach pros use because it lets you switch from “cooking mode” to “hosting mode” in seconds.
How to Plan Your Lighting Layout for Brooklyn, Kitchen
Before you buy fixtures, you need a simple plan; otherwise you’ll end up with glare, dark corners, or lights that fight each other. Let’s map your kitchen the way a designer would, but in plain language.
- Start with your kitchen layout (not the light fixtures). Walk the space and mark your real work zones: sink, stove, main prep counter, and island (if you have one). Most lighting guides stress that your layout should drive the lighting plan, not the other way around.
- Build your “base layer” with ambient light first. Use ceiling lighting to give the whole room even brightness so it never feels gloomy. If you’re doing recessed lights, common guidance is to keep them evenly spaced and not too close to walls or cabinets to avoid weird shadows.
- Add task lighting exactly where your hands work. Put focused light on countertops, the sink, and the cooktop so you can chop and clean without squinting. Under-cabinet lighting is a top pick because it reduces shadows on counters and helps with precise tasks.
- Plan accent lighting to make the kitchen feel finished. Accent light is what makes a Brooklyn kitchen feel warm at night—think toe-kick glow, in-cabinet lighting, or a soft wash above cabinets. This is the layer that adds depth and mood without blasting your eyes.
- Know when NYC rules might apply before you open the ceiling. NYC DOB notes that an electrical permit is required for most electrical work and that it must be done by a DOB-licensed electrical contractor, so it’s worth checking early if you’re rewiring or adding circuits. And if you’re in a landmarked building or an interior landmark, LPC says interior permits can be required when DOB permits are involved (or when the interior is designated).
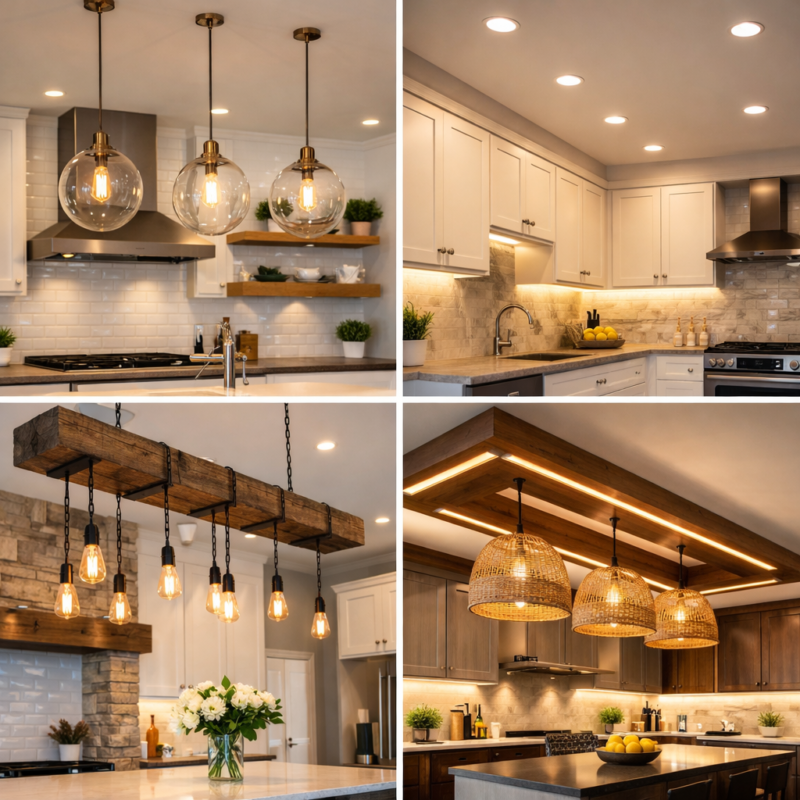
Top Kitchen Lighting Design Ideas
Now for the fun part—ideas that look good and work well in real Brooklyn kitchens. Use these like a menu and pick what fits your space.
- Layer your lighting (ambient + task + accent). This is the number-one “designer” move because each layer has a job and you can control them separately. It also stops that harsh “one bright ceiling light” feeling.
- Under-cabinet LED strips for clean, shadow-free counters. These lights shine right onto the surface where you prepare food, so your body doesn’t block the light. Many guides call this the most practical upgrade because it improves visibility and reduces shadows.
- Pendants over an island or peninsula (hung at the right height). A common guideline is to hang pendants so the bottom sits about 30–36 inches above the countertop, which gives good task light without blocking sightlines. This works especially well in open kitchens where the island doubles as dining space.
- Recessed lights placed to avoid countertop shadows. One practical rule is to keep recessed lights positioned so they light the counter edge instead of sitting behind you, which is how shadows happen. Kitchinsider’s guidance also emphasizes spacing them evenly and not crowding walls/cabinets.
- Toe-kick lighting for that “floating cabinets” look. A soft strip under base cabinets makes late-night kitchen trips easier and adds a high-end feel. It’s subtle, but it instantly makes a kitchen look more custom.
- In-cabinet lighting for glass fronts or open shelves. This turns everyday dishes into décor and adds depth to the room. It’s also a smart way to add glow without adding another ceiling fixture.
- Dimmers everywhere (seriously). Dimmers let you cook in bright light, then drop to a softer level for dinner or a late snack. Design rules consistently recommend dimmers because they make one kitchen work for multiple moods.
- Energy-smart upgrades with local incentives. If you’re switching to efficient LEDs or adding lighting controls, check Con Edison’s rebates/incentives pages and NYSERDA’s lighting and controls programs. If your project is part of a bigger renovation, NYC’s energy code materials also reference lighting schedules and efficacy details in some compliance contexts.
How to Light a Kitchen
If you want a simple “do this, then that” approach, follow these steps. You’ll end up with a kitchen that’s bright where it needs to be and cozy when you want it.
- Step 1: Get even ambient light across the room. Think of this as the foundation so the kitchen never feels dim, even on cloudy Brooklyn afternoons. Many lighting guides recommend starting here, then layering in task and accent after.
- Step 2: Light the countertop edge; not the walkway behind you. Shadows happen when the light is behind your shoulders while you work at the counter. Placement guidance for recessed lighting focuses on avoiding that by positioning lights to serve task zones first.
- Step 3: Add under-cabinet lighting to eliminate “prep shadows.” This is the easiest way to make chopping and reading recipes feel effortless. Under-cabinet lighting is widely recommended because it improves task lighting and reduces shadows on work surfaces.
- Step 4: Treat islands/peninsulas like their own lighting zone. Pendants or a linear suspension can anchor the space and put light exactly where people gather. The common hanging guideline is around 30–36 inches above the countertop as a starting point.
- Step 5: Add accent light for depth and nighttime comfort. Toe-kick and in-cabinet lighting give you a soft glow that feels calm instead of clinical. This is what makes your kitchen look “done,” even when the main lights are dimmed.
- Step 6: Use controls so each layer works on its own. Put ambient, task, and accent on separate switches (and dimmers when possible) so you’re not stuck with one brightness level. Lighting “rules” from design editors repeatedly point to controls as the difference between okay lighting and great lighting.
How to Choose the Right Fixtures
Picking fixtures is where many kitchens go off track; either the lights look great but feel dim, or they’re bright but look harsh. Here’s how you can choose like a pro.
- Choose fixtures that match the job (not just the style). Recessed lights and flush mounts are great for ambient light, while pendants and under-cabinet strips handle task lighting best. This “right tool for the job” approach is the core of layered lighting.
- Use the right hanging and placement measurements. For islands, start with pendants hung about 30–36 inches above the counter, then adjust based on ceiling height and fixture size. For recessed lights, follow placement guidance that avoids putting light behind you at the counter.
- Pick a comfortable color temperature (Kelvin) and keep it consistent. Many designers prefer warmer ranges around 2700K–3000K for a cozy feel, while others like a more neutral look depending on the space. Whatever you choose, keep it consistent across layers so the kitchen doesn’t feel patchy.
- Don’t ignore CRI if you care about how food and finishes look. CRI describes how accurately colors appear under a light source, which matters in kitchens because you’re constantly judging color (food, paint, tile, stone). Some lighting guides recommend aiming for CRI 90+ in kitchens for better color quality.
- Choose diffused light when you have glossy surfaces. Brooklyn kitchens often have shiny tile, stone counters, or glossy cabinets, and bare LEDs can create glare fast. Design advice often suggests diffusers (like frosted glass or diffused LED channels) to soften the light.
- Think about scale in smaller NYC kitchens. If your kitchen is tight or your ceiling is low, a big chandelier can overwhelm the room and block sightlines. In those cases, slim flush mounts, small pendants, and under-cabinet lighting usually look cleaner and feel brighter.
- Make sure your plan fits NYC work rules if you’re changing wiring. NYC DOB states electrical permits are required for most electrical work and that filings go through DOB NOW: Build, which is why many homeowners hire a DOB-licensed electrician early. If landmarks are involved, LPC notes interior permits may be required when DOB permits are needed (or when the interior is an interior landmark).
Light Quality & Bulb Selection
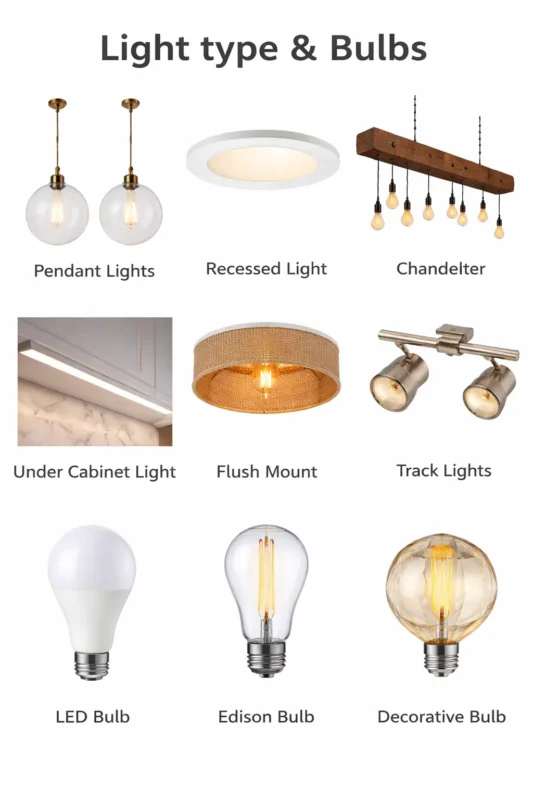
If your kitchen lighting looks “off,” it’s usually not the fixture; it’s the light quality. In Brooklyn kitchens (especially in apartments with limited daylight), the right bulb choices can instantly make the room feel cleaner, warmer, and easier to work in.
- Pick a color temperature (Kelvin) that matches how you use the kitchen. Warm white (around 2700K–3000K) feels cozy for everyday living, while a more neutral white can feel sharper for heavy prep. The key is to keep your main lights and task lights in a similar range so the kitchen doesn’t look patchy.
- Don’t ignore CRI if you care about how food and finishes look. CRI describes how much colors “shift” under a light compared to a reference source, so it affects how your backsplash, paint, and even produce appears. When possible, aim for higher color quality lighting—many shoppers use CRI 90+ as a practical target for kitchens.
- Use lumens to set brightness (not “watts”). Kitchens generally need more brightness than living rooms because you’re doing detailed work, and some guides suggest about 70–80 lumens per square foot in task-heavy areas. If your kitchen feels dim even with the lights on, you usually need more lumens or better placement; not “cooler” bulbs.
- Control glare with diffusion and beam choices. If you have glossy tile, quartz, or shiny cabinet paint, bare bulbs and harsh spot beams can create annoying hotspots. Diffused lenses, frosted glass, and LED channels soften the output so your counters look bright without the glare.
- Make sure your LEDs dim well and avoid bad flicker. Not every LED bulb behaves nicely on a dimmer, so check that the bulb (and driver, if it’s a built-in fixture) is rated for dimming. The U.S. Department of Energy also tracks LED “flicker” (temporal light modulation) because some products can be distracting or uncomfortable, so it’s smart to buy reputable, tested lighting—especially for lights you’ll use daily.
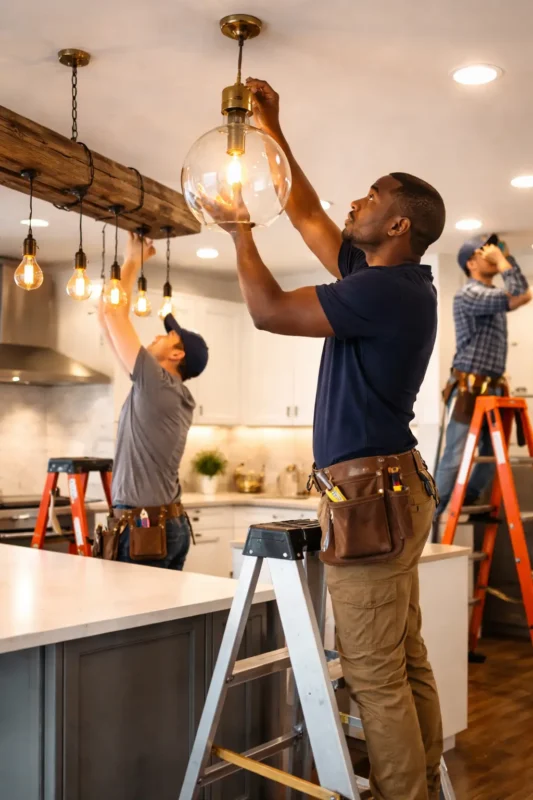
NYC Electrical Codes, Permits & Licensed Electricians
In NYC, an electrical permit is required for most electrical work, including work that involves handling electrical wires in a home or business. DOB also states that electrical installations covered by these permits must be performed by electrical contractors licensed by the NYC Department of Buildings. DOB notes that ED16A electrical filings are submitted in DOB NOW: Build, so permit and filing steps often run through that system.
If your building is landmarked (common in parts of Brooklyn), the Landmarks Preservation Commission says an interior permit is required when the work requires a DOB permit or when the interior is an interior landmark. In plain terms: if you’re doing more than a simple swap, check the rules early and bring in a licensed pro so you don’t get stuck mid-project.
Addressing Small Kitchens & Low Ceilings
Small Brooklyn kitchens can look darker than they are, and low ceilings can make the wrong fixture feel “in your face.” The goal is to keep the ceiling visually clean while putting light exactly where you work.
- Use recessed lights to keep the ceiling uncluttered, since they sit flush and don’t block sightlines.
- Choose flush or semi-flush mounts when recessed lighting isn’t possible, so you still get strong ambient light without hanging down.
- Add under-cabinet lighting to brighten countertops without adding more ceiling fixtures.
- Avoid oversized pendants in tight layouts; use smaller fixtures or a slim linear light where you need focus.
- Use dimmers so the same small kitchen works for cooking (bright) and late-night snacks (soft).
- Add a little accent lighting (like toe-kick or in-cabinet) to create depth so the room feels larger at night.
How to Use wall lights to highlight features
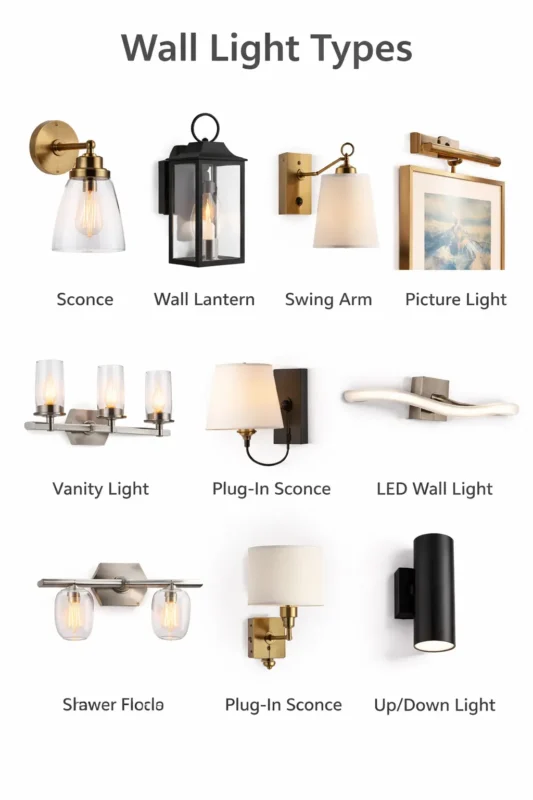
Wall lights are a secret weapon when you want your kitchen to feel styled; not just lit. They work especially well in Brooklyn kitchens where you may have open shelving, art, or a standout tile backsplash.
- Place wall lights near open shelving to draw attention to the items you display and add personality.
- Aim sconces toward a backsplash, artwork, or a textured wall to create a soft “wash” that makes the feature pop.
- Mount sconces around eye level (often described as roughly 5–6 feet from the floor) so the light feels natural, not awkward.
- Use warm bulbs and a dimmer so the wall lights can shift from “feature highlight” to “evening mood.”
- Treat wall lights as part of your lighting layers, not a replacement for under-cabinet task lighting.
How to Highlight Dining Table by Kitchen
If your kitchen includes a dining table (or a small breakfast nook), you want it to feel like a destination—not an afterthought. Good table lighting makes meals feel warmer and also helps define the zone in open-plan Brooklyn spaces.
- Use the “30-inch rule” as a starting point; about 30 inches between the bottom of the pendant/chandelier and the tabletop.
- If you prefer a range, many designers also use roughly 28–36 inches above the table depending on ceiling height and fixture size.
- Aim for comfortable brightness at the table; some guidance suggests about 30–40 lumens per square foot in dining areas.
- Choose a fixture that matches the table scale (often around half to two-thirds of the table width) so it looks balanced.
- Add a dimmer so you can go bright for homework and soft for dinner without changing bulbs.
- If you use multiple pendants, space them evenly so the table gets smooth light instead of bright spots.
What colour temperature (Kelvin) is best for kitchen lighting design?
For most kitchens, 3000K is the sweet spot because it feels warm and welcoming but still looks clean on countertops and tile. If you want a brighter, “crisper” look for heavy cooking and prep, go a bit cooler around 3500K–4000K; especially for task lighting. The important part is consistency: keep your bulbs in the same Kelvin family so your kitchen doesn’t look yellow in one spot and blue in another.
Which lighting fixtures work best for small or low-ceiling kitchens?
For small or low-ceiling kitchens, recessed lights work great because they sit flush and don’t visually “drop” the ceiling. Flush-mount or semi-flush ceiling lights are your next best option when you want strong ambient light without a bulky fixture hanging down. Then add under-cabinet lighting to brighten countertops without needing more ceiling space.
Where to Find the Best Brooklyn Contractors
Are you looking for an expert contractor in Brooklyn, NYC? SR General Construction has you covered! Our business is located at 8807 Avenue B, Brooklyn, NY 11236, United States, in the Canarsie area.
Additionally, we offer services at Rockaway Parkway and Ralph Avenue, providing fast access to Flatlands, East Flatbush, Bergen Beach, Brownsville, and the Spring Creek section of East New York.
FAQ
1. What is layered kitchen lighting (and why do I need it)?
Layered lighting means you use ambient + task + accent lighting so your kitchen works for cooking and relaxing. It also helps you avoid dark corners and harsh “spotlight” vibes.
2. How many lumens do I need in a kitchen?
A practical guideline is about 70–80 lumens per square foot in task areas (like counters), with less needed for general ambient light. If your kitchen still feels dim, you usually need better placement or more lumens; not a cooler Kelvin.
3. Is 3000K or 4000K better for a kitchen?
If you want cozy and flattering light, start around 3000K. If you want a sharper, more “daytime” look for prep, 4000K can feel clearer; just keep it consistent across fixtures.
4. What CRI should I choose for kitchen lights?
Try to buy lights with CRI 90+ if you care about accurate color (food, cabinets, paint, backsplash). It makes reds look like reds and greens look fresh instead of dull.
5. How high should pendant lights hang above a kitchen island?
A common starting point is the 30–36 inch rule (from the countertop to the bottom of the pendant). If your ceilings are taller, you can go slightly higher so the fixture doesn’t feel in your face.
rent a car yerevan armenia
car rental tirana albania
car hire tanger