Do you ever think about how to install a Complex Kitchen Island in your Brooklyn home and worry about where to begin?
Kitchen island Installation can be one of the most rewarding upgrades in your kitchen, but it also comes with many details you shouldn’t overlook. In this guide, we’ll walk you through every major step, from planning the layout to securing the island in place and making sure it flows with your space.
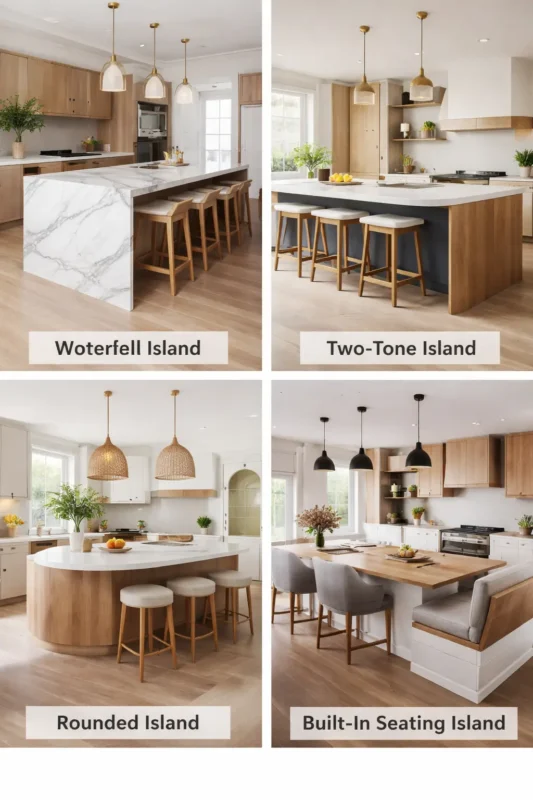
What is Kitchen Island Installation
Kitchen island installation is the step-by-step work of placing an island in the right spot, levelling it, and fixing it so it doesn’t shift when people lean, prep, or sit at it. In most “built-in” installs, you set base cabinets, shim and level them, then secure them; often by fastening the island base to 2×4 blocking anchored to the floor. A good install also follows proven spacing rules, so the island doesn’t choke your workflow (for example, 42 inches for one-cook work aisles and 48 inches for multiple-cook work aisles are common planning targets). Once the base is solid and clearances are right, you finish with panels, countertop templating/installation, and any electrical or plumbing if your island includes them.
N.B. Do you need kitchen Island installation service in Brooklyn? Call SR General Construction NYC for free estimate!
Does an Island Even Fit in Your Brooklyn Kitchen?
Yes, an island fits if you can keep about 42–48 inches between the island and your perimeter counters, because that space lets you cook, pass, and open appliances without constant bumping. You also want at least 36 inches for a simple walkway, and more if this is a busy pass-through path. If you’re adding stools, plan chair clearance too—tight seating zones can turn a “nice island” into a daily traffic jam. If your tape-measure test fails, you’ll get a better result with a slim island, a movable cart, or a peninsula-style layout instead of forcing a full island into a narrow Brooklyn kitchen.
Kitchen Island Installation Tools + Materials Checklist
Before you start, treat this like a “measure twice, drill once” project; your island needs to be level, square, and firmly anchored. Big-box how-to guides also stress planning clearance first, because the best-looking island still fails if it blocks movement.
- Tape measure.
- Pencil/marker.
- Painter’s tape (for floor layout mock-up).
- Long level or laser level.
- Shims (composite or wood).
- Cordless drill/driver + screwdriver bits.
- Wood screws / cabinet screws.
- 2×4 blocking/cleats (common anchoring method).
- L-brackets / angle brackets (as needed for your design)
- Clamps (to hold cabinets/panels flush).
- Utility knife (for trimming shims).
- Circular saw / miter saw (if you’re cutting filler, trim, or blocking).
- Caulk gun + silicone/adhesive (finishing and small gaps).
- Safety gear: eye protection, hearing protection, gloves, respirator/dust mask.
How to Pick the Right Layout for Brooklyn Kitchen

Brooklyn kitchens come in all shapes: galley, railroad, brownstone extensions, and open-plan renos—so the “right” layout is the one that protects your clearances and your daily flow. Start by planning around real spacing targets (like 42–48 inches for a comfortable work aisle) so you don’t install an island that makes cooking feel like a squeeze.
- Choose a true island only if you can keep working clearance on all sides.
- Aim for that 42–48 inch zone between the island and perimeter counters so two people can move without friction. If your oven opens into that aisle, lean toward the larger end of the range so doors and drawers don’t collide with people.
- In narrow galley- or railroad-style kitchens, consider a peninsula or a slim island instead. Peninsulas can work better in smaller kitchens because they extend from existing cabinetry, so you don’t need open access on all four sides like a freestanding island. This often keeps your main “walk lane” clearer while still giving you prep space and seating.
- For U-shaped kitchens, protect the center opening first. NKBA planning guidance calls for about 60 inches minimum between opposing runs in a U-shape, and that’s before you add seating traffic. If your U is tight, a small peninsula or a rolling cart usually beats a fixed island.
- For L-shaped kitchens, place the island where it supports prep—without cutting across the work triangle. NKBA guidance warns against major traffic crossing the core work triangle, so don’t park on the island where everyone walks through while you’re cooking. A centered island can work great here, as long as it doesn’t block your sink-to-stove-to-fridge routes.
- If you want seating, plan “butts and backpacks” space, not just countertop space. Seating needs clearance behind chairs; even general seating guidance often lands around 32–44 inches, depending on foot traffic, and more if people regularly pass behind stools. In Brooklyn apartments, that seating-side clearance is where many islands fail—so measure it early with tape on the floor.
Step-by-Step Kitchen Island Installation Guide
| Step 1 — Measure, Tape It Out, and Mark the Footprint |
| Step 2 — Prep the Floor + Locate What’s Under It |
| Step 3 — Dry-Fit the Cabinets and Lock the Layout |
| Step 4 — Level and Shim Like a Pro |
| Step 5 — Anchor the Island to the Floor Safely |
| Step 6 — Electrical for Islands (Outlets, GFCI, and Clean Routing) |
| Step 7 — Plumbing in an Island (If You’re Adding a Sink) |
| Step 8 — Countertops, Panels, Toe-Kicks, and Final Punch List |
Step 1 — Measure, Tape It Out, and Mark the Footprint
- Measure your open space and set your clearance targets first so the island doesn’t block movement (many guides suggest at least 36 inches, and 42–48 inches feels far more comfortable).
- Mock the island on the floor with painter’s tape (or boxes) so you can “feel” the flow before you commit to holes in the floor.
- Open everything that swings or pulls out (oven door, dishwasher, drawers) while your tape outline is down to confirm nothing collides.
- Mark the island’s centerline and edges clearly so your cabinet placement stays square and symmetrical when you start setting boxes.
- Mark seating zones if you want stools, so you don’t accidentally place seating where your main walkway should be.
Step 2 — Prep the Floor + Locate What’s Under It
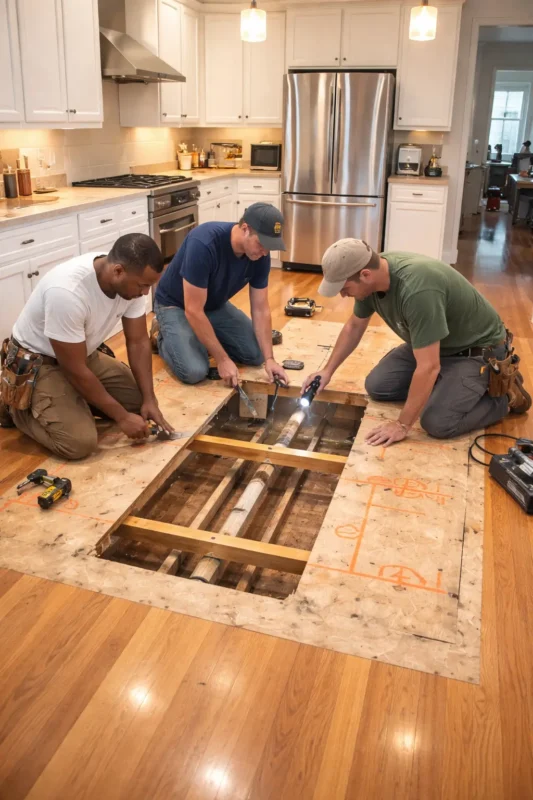
- Find the highest point on the floor and use it as your reference because leveling up with shims is easier than cutting cabinet bases to match a slope.
- Check the floor surface and stability where the island will sit (older Brooklyn floors can dip, so you want a solid, squeak-free base before you anchor anything).
- Scan for hidden electrical before drilling using a detector and safe methods, so you don’t hit a live wire.
- Turn off power to nearby circuits before you drill when you’re unsure, because it reduces risk if anything behind the surface isn’t where you expect it to be.
- Confirm the island won’t land on top of access panels, floor registers, or plumbing routes because “small surprises” under the floor are what derail installs mid-project.
Step 3 — Dry-Fit the Cabinets and Lock the Layout
- Arrange the base cabinet boxes in position (dry-fit) before fastening so you can confirm the island size and alignment one last time.
- Remove doors and drawers while you work because cabinet boxes are easier to level, move, and screw together without the extra weight.
- Clamp the cabinet faces flush and screw the boxes together so the whole island behaves as one rigid unit rather than separate pieces.
- Measure and label the cabinet locations so you can put everything back exactly where it belongs after adjustments.
- Double-check appliance openings (if any) so you don’t end up with a dishwasher or microwave that “almost fits.”
Step 4 — Level and Shim Like a Pro
- Use your “high spot” as the baseline and level from there, so the island ends up flat even if the room isn’t.
- Check the level front-to-back and side-to-side because a countertop can crack or look crooked if the base is twisted.
- Slide shims under low points until the cabinet stops rocking, so the island feels solid when someone leans on it.
- Shim behind the cabinet where there are wall/trim gaps (if needed) so screws don’t pull boxes out of square when you tighten them.
- Trim shims cleanly once everything is level so toe-kicks and panels sit tight and look finished.
Step 5 — Anchor the Island to the Floor Safely
- Fasten 2×4 blocking to the floor where the island will sit because this creates a strong “anchor rail” without needing the cabinet base itself to take all the force.
- Set the cabinets over that blocking so the island locks into position and can’t drift over time.
- Screw through the toe-kick area into the blocking so the fasteners are hidden, but the hold is strong.
- Re-check the level after anchoring because tightening screws can shift the cabinet slightly on older, uneven floors.
- Finish exposed ends with a decorative panel so the island looks built-in (not like cabinets dropped in the middle of the room).
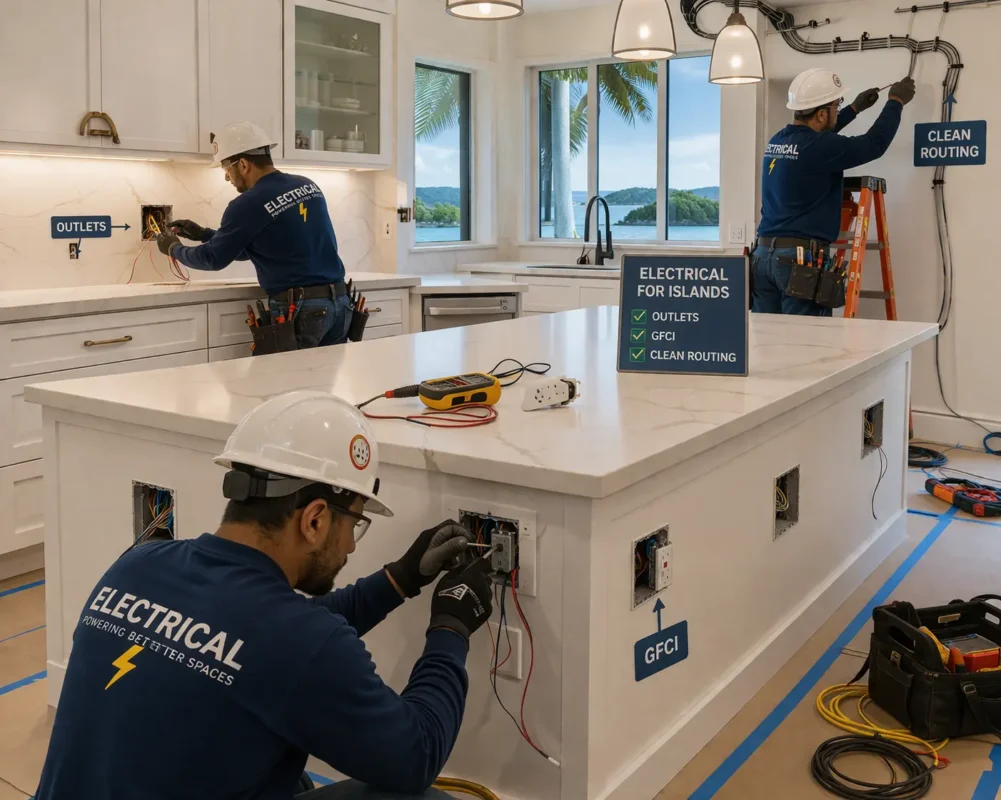
Step 6 — Electrical for Islands (Outlets, GFCI, and Clean Routing)
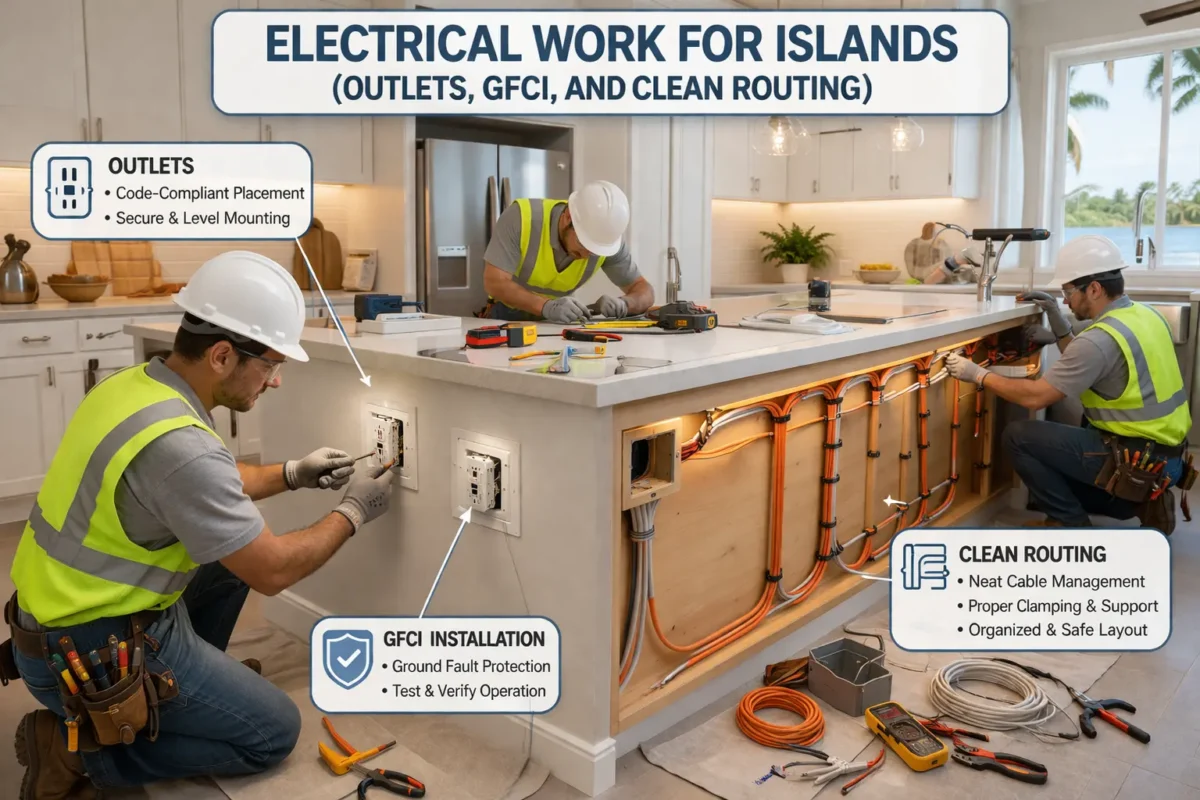
- Decide early whether your island will have a receptacle now or just “future provisions,” because the 2023 NEC offers flexibility but still sets compliance rules.
- Plan GFCI protection for island receptacles, as kitchen receptacles generally require GFCI protection under current code requirements.
- Use approved placement methods (on/above the work surface or listed pop-up assemblies) instead of random side-mounted outlets that look good but can fail inspection.
- Route wiring through a clean chase (inside the cabinet or via a floor conduit/floor box) so cords and cables don’t become exposed or snag-prone in a high-traffic kitchen.
- In Brooklyn/NYC, lean on a licensed electrician for final wiring and code sign-off because local enforcement (AHJ) details matter as much as the national code language.
Step 7 — Plumbing in an Island (If You’re Adding a Sink)
- Confirm your building’s rules first (especially in co-ops/condos), as many NYC buildings enforce “wet-over-dry” limits to reduce leak risk.
- Plan the drain-waste-vent (DWV) path before you open the floor since an island sink can’t vent the same easy way a wall sink does.
- Choose a venting method that your inspector will accept—plumbers commonly use a loop vent or an air admittance valve (AAV), depending on local code and site conditions.
- Map your tie-in point to an existing vent/stack so you’re not guessing once the floor is open and time starts burning.
- Rough-in hot/cold supplies with accessible shutoffs so you can service the island sink without tearing the cabinetry apart later.
- Pressure-test and leak-check before you close anything, because a tiny drip under an island can turn into a big problem fast in NYC apartments.
- Install the sink/faucet and run a “real use” test (fill, drain, disposal if any) so you catch slow drains, gurgling, or vent issues immediately.
Step 8 — Countertops, Panels, Toe-Kicks, and Final Punch List
- Don’t template until the island cabinets are installed, leveled, and fully secured because templating captures exact dimensions and cutouts—and it only works if the base won’t move.
- During templating, confirm sink/cooktop cutouts and seam placement so the fabricator builds the slab around your real-life layout (not your guess).
- Clear an access path for installation day, as large countertop pieces need to move safely through tight Brooklyn doorways and hallways.
- Install and align the end panels (and any waterfall sides) before the final finish work, so the island looks built-in rather than “cabinets dropped in the middle.”
- Fit the toe-kick last—measure along the floor, cut clean, dry-fit, then fasten; so it hides shims and gives you a finished line at the base.
- Caulk tiny gaps and touch up where panels meet the flooring and cabinets so crumbs and moisture don’t collect in the seams.
- Run a final punch list: check door/drawer alignment, confirm the island doesn’t wobble, verify outlet/GFCI function, and make sure every cut edge is sealed where needed.
When does a kitchen island require a licensed electrician in NYC?
In NYC, you typically need a licensed electrical contractor for any island installation that involves new wiring, new outlets, moving circuits, or powering built-in appliances, because most electrical work requires an NYC DOB electrical permit. The NYC DOB states that electrical permits are for installations performed by electrical contractors licensed by the Department of Buildings. If you want this handled safely and cleanly, SR General Construction, NYC, is fully licensed, has 15+ years of renovation/remodeling experience in Brooklyn, has completed 750+ projects for 500+ clients, and offers 24/7 support to help keep your home safe.
Where to Find the Best Brooklyn Contractors
Are you looking for an expert contractor in Brooklyn, NYC? SR General Construction has you covered! Our business is located at 8807 Avenue B, Brooklyn, NY 11236, United States, in the Canarsie area.
Additionally, we offer services at Rockaway Parkway and Ralph Avenue, providing fast access to Flatlands, East Flatbush, Bergen Beach, Brownsville, and the Spring Creek section of East New York.
FAQ
1. What’s the minimum clearance around a kitchen island?
Most planning guidance targets 42 inches for a single cook and 48 inches for multiple cooks to ensure comfortable work aisles. If your kitchen is a main walkway, you’ll want extra breathing room so people can pass while you cook.
2. How do I know if an island will fit in a Brooklyn galley kitchen?
Tape the footprint on the floor and test walking, turning, and opening doors/drawers. If it feels tight, a slim island or peninsula is usually a smarter move.
3. When do I need an electrical permit in NYC for an island?
NYC DOB notes that an electrical permit is required for most electrical work, including handling electrical wiring in homes. If you’re adding island outlets or wiring for appliances, plan on permit-level work.
4. What is an AAV, and can it vent an island sink?
An air admittance valve opens to let air into the drain when needed and closes to block sewer gases. Whether it’s allowed depends on your local code and inspector, so treat it as “verify first.”
5. What’s the biggest mistake people make with island installation?
Skipping the tape-out and clearance test; then discovering too late that doors, drawers, or stools collide. A 20-minute mock-up can save a costly redo.