What makes a bathroom feel both beautiful-and highly functional-at the same time?
One of the biggest answers is the bathroom vanity, a fixture that blends style, storage, and everyday practicality into one essential component of your bathroom design. In this detailed guide, we’ll break down what a bathroom vanity really is, how it works, the types, sizes, materials, and technical details you should know, and how to choose or install the perfect vanity for your space.
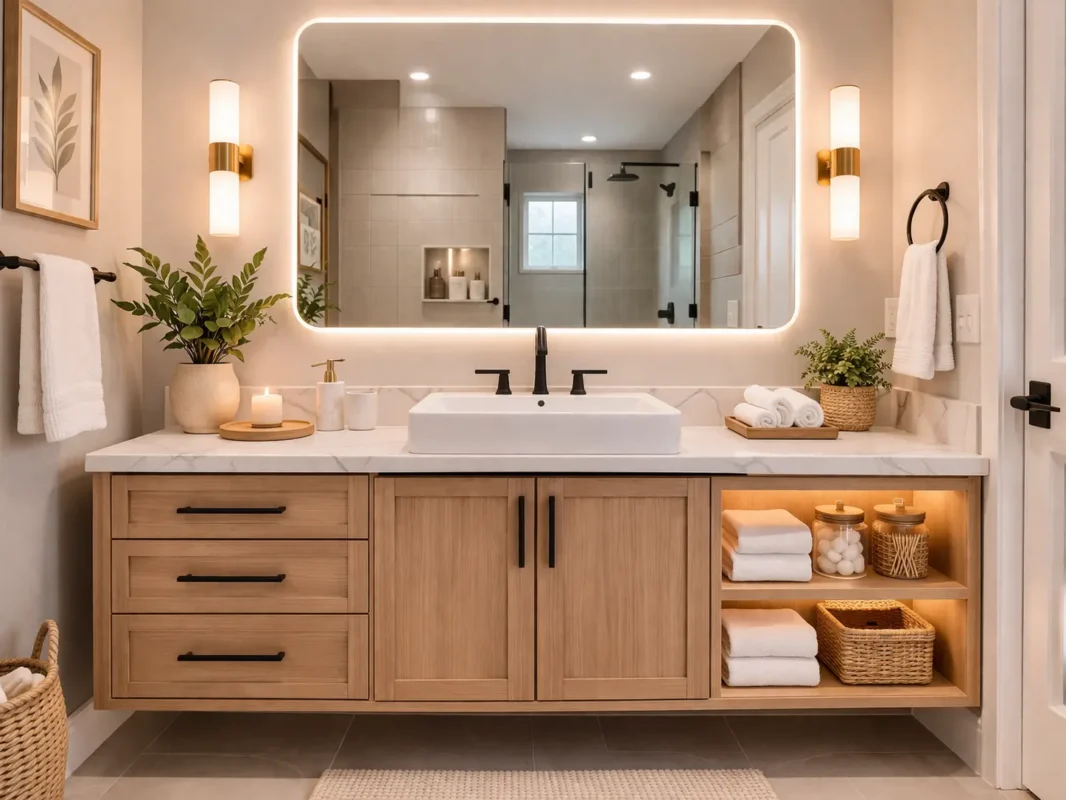
What is a bathroom vanity?
A bathroom vanity is the setup that provides a sink area on top and storage underneath, usually in a cabinet or drawers, so you have a clean place to wash up and a spot to keep daily items like soap, towels, and toiletries. It also helps hide the plumbing, so your bathroom looks finished instead of exposed and messy. Think of it like your bathroom’s “command center”: you use it every day for grooming, washing, and storing the things you don’t want sitting out on the counter.
Key Components of a Bathroom Vanity
Before you buy or install anything, it helps to know what parts you’re actually dealing with. Once you understand the components, choosing the right vanity (and avoiding surprises during install) gets much easier.
- Vanity base (cabinet): This is the “body” of the vanity that sits on the floor or hangs on the wall. It provides storage and covers the plumbing area, keeping the bathroom neat.
- Vanity top (countertop): The top is the surface you see and use every day, and it supports the sink. Some vanities come with the top included, while others are sold without a top so you can customize the material and look.
- Sink (basin): The sink is where water flows and drains, and it can be built into the countertop or installed as a separate unit. Your sink choice affects counter space and how easy it is to clean around the edges.
- Faucet: Controls hot and cold water; must match the number and spacing of holes in your sink/top. During installation, you’ll connect water lines under the sink, so space inside the cabinet matters more than most people expect.
- Drain parts (drain assembly + P-trap): The drain assembly connects your sink to the drain pipe, and the P-trap is the curved piece that traps water to prevent sewer gas from entering your home. When swapping a vanity, you typically disconnect the P-trap, then reconnect it carefully to prevent leaks.
- Shutoff valves + supply lines: Shutoff valves let you turn water off at the vanity instead of shutting down the whole home. Supply lines run from those valves to your faucet, and tightening these connections properly is a big part of leak prevention.
- Backsplash / side splash: These pieces protect your wall from water splashes and help keep moisture from damaging paint or drywall. They also make the vanity area look more “built-in” and finished.
- Hardware (hinges, handles, drawer slides): Hardware affects daily comfort, such as how smoothly drawers open, how doors sit, and how sturdy the vanity feels. If you want a quieter bathroom, features like soft-close hinges are worth considering.
Common Types of Bathroom Vanities
Now let’s talk about the main vanity types you’ll see while shopping. The “best” type usually depends on your bathroom size, how much storage you need, and whether you want an easier install or a more modern look.
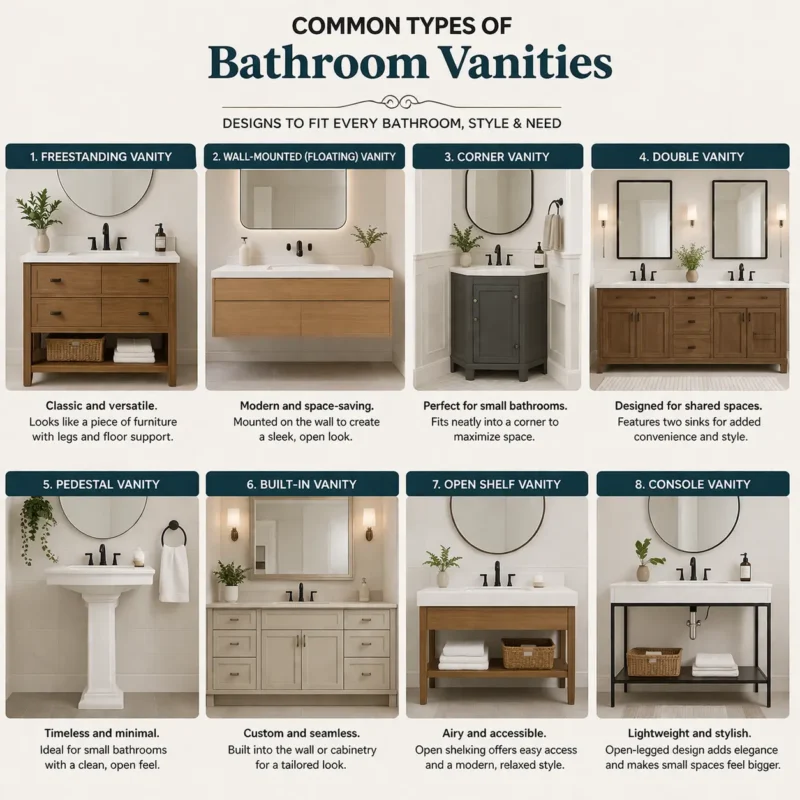
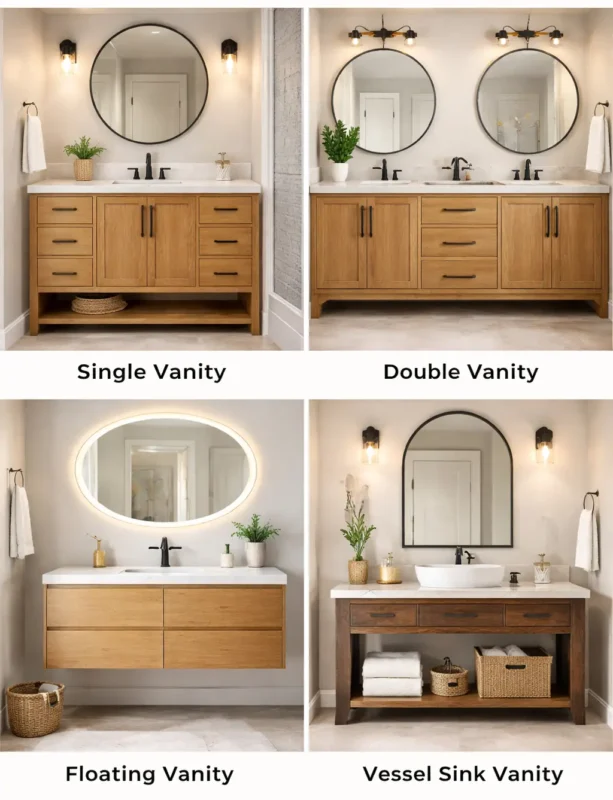
- Freestanding vanity: This is the most common type, which sits on the floor like furniture. It’s often easier to install because the weight is supported by the floor rather than the wall. Lowe’s notes freestanding vanities work well for small spaces and come in many styles.
- Built-in vanity: Built-in vanities are usually larger and designed to feel like they “belong” in the room layout. They often give you more countertop space and storage, which is great if multiple people share the bathroom. Lowe’s describes built-in vanities as a better fit for larger spaces and more storage/countertop needs.
- Floating (wall-mounted) vanity: A floating vanity mounts to the wall and leaves open space under it, which can make a bathroom feel bigger. It’s popular for modern designs and tighter layouts because it shows more floor and makes the room feel lighter. Lowe’s specifically notes that floating vanities can make a bathroom feel more spacious.
- Corner vanity: Corner vanities tuck into a corner, which helps in tiny bathrooms or awkward layouts. You save floor space but usually sacrifice countertop space, so plan where soap, toothbrushes, and daily items will go. Lowe’s calls corner vanities a smart option for tiny bathrooms and notes the limited counter space.
- Double-sink vanity: Double-sink vanities give two people their own space, which is a big win in busy households. The key is careful measurement, because a double vanity needs sufficient width, and the plumbing setup may be more involved. Lowe’s recommends measuring carefully when upgrading from single to double to ensure you have enough room.
What are the standard bathroom vanity sizes?
Bathroom vanity sizing is mostly about width, depth, and height, and then making sure you still have comfortable clearance around it.
Standard vanity width
Common “standard” cabinet widths include 24″, 30″, 36″, 48″, and 60″ (and many stores carry wider options too). Lowe’s also notes that overall vanity widths can range widely (roughly 12″ to 84″) depending on the product line.
Standard vanity depth
A typical vanity depth is 17″ to 24″.
Standard vanity height
Standard vanity height is often 31″ to 35-1/2″ (many people call the taller end “comfort height”).
Proper size calculation (a simple way to measure correctly)
Here’s the method I recommend so you don’t buy the “right vanity” that ends up feeling wrong:
- Measure your available wall space (left to right).
- Check clearance for doors and traffic flow: Open the bathroom door, shower door, and vanity doors/drawers (or imagine them) so nothing collides. Lowe’s explicitly recommends leaving room for door openings and making sure the vanity won’t disrupt traffic flow.
- Protect toilet clearance: Lowe’s notes that for standard building code compliance, allow at least 18 inches from the vanity cabinet edge to the center of the toilet.
- Confirm front clearance (walking space): NKBA recommends 30″ of clear floor space in front of fixtures, and lists 21″ as the minimum code requirement in many cases. This matters because a wall-mounted vanity can still feel cramped when you stand in front of it.
- Don’t forget the countertop overhang: If you’re buying a vanity without a top, Lowe’s notes the vanity top should be about 1 inch wider and 1 inch deeper than the cabinet. So measure with that extra space in mind.
- Check plumbing location before you commit: If your drain and supply lines are staying put, the new vanity needs to work with them—or you’ll increase cost and complexity by moving plumbing. Lowe’s warns that moving plumbing increases costs.
Tools and Materials You’ll Need for Bathroom Vanity Installation
- Power drill/driver + bits
- Stud finder
- Hole saw kit
- Utility knife
- Adjustable wrench
- Basin wrench
- Tape measure
- Level
- Caulk gun
- Bucket + cleaning cloths
- Cleaning gloves + eye protection
- Bathroom vanity (cabinet/base)
- Faucet
- Caulk / silicone
- Plumber’s tape (Teflon tape)
- Plumber’s putty
Popular Bathroom Vanity Styles and Design Options
Style isn’t just about looks; you’re also deciding how the vanity behaves (easy-to-clean finishes, storage layout, visual weight, and how “busy” the room feels). If you pick a style that matches your bathroom’s vibe, the whole space feels more expensive—even if the vanity isn’t.
- Shaker style: Shaker vanities usually feature clean, framed doors that feel timeless rather than trendy. They work in modern, transitional, and even farmhouse-leaning bathrooms because they’re simple and adaptable. If you’re not sure what your bathroom’s style is, ” Shaker” is often the safest bet.
- Modern / contemporary: Modern vanities often feature flat panels, minimal hardware, and clean lines. They pair especially well with floating installs because the “light” visual profile matches the modern look. If you want the bathroom to feel bigger, a modern floating vanity can help visually expand the space.
- Traditional / furniture-style: This look borrows details from furniture—more curves, more decorative doors, sometimes a deeper finish. It can make a basic bathroom feel classic, but it can also visually “fill” a small room faster than simpler styles. When you go traditional, matching your hardware and lighting finishes becomes even more important for a cohesive look.
- Farmhouse / rustic: Farmhouse style often uses natural wood tones, a cozy vibe, and classic fixture shapes. It looks great with warm metals and simple lighting, and it can feel inviting instead of sterile. Just make sure the materials and finish can handle real bathroom humidity.
- Industrial: Industrial style usually mixes strong lines, darker finishes, and a slightly “utility” feel (metal accents, concrete-like tops, or bolder contrasts). It’s a strong look, so it works best when you keep other pieces simpler and consistent. If you want a Brooklyn loft vibe, that is usually what people mean.
- Transitional: Transitional is the middle ground, clean enough to feel current, warm enough to feel comfortable. It’s a great choice when you’re updating one piece (the vanity) but not remodeling the whole bathroom. You can keep the vanity flexible and let mirrors/lighting set the final personality.
When should I hire a professional for Bathroom Vanity Installation?
If your install is a simple “swap the same size vanity in the same spot,” some homeowners can handle it. But the moment the job involves tricky plumbing, wall support, or hidden damage, hiring a pro usually saves money (and stress) in the long run.
Here are the clearest times you should bring in a professional:
- Your plumbing won’t align with the new vanity (drain height, supply lines, trap position), and you’ll need to move or modify the pipes.
- You’re installing a floating vanity because it must be anchored correctly to studs/blocking so it can safely handle weight over time.
- Your shutoff valves are old, stuck, or leaking, or you’re not confident working with water lines (a small mistake can lead to expensive water damage).
- You see signs of moisture issues (soft flooring, swollen baseboards, moldy drywall), and you need repairs before the new vanity goes in.
- You want code-safe, licensed work—especially when the plumbing scope goes beyond reconnecting a faucet and trap.
If you’re in Brooklyn and want it done cleanly the first time, SR General Construction, NYC is a strong option: fully licensed, 15+ years in renovation/remodeling, 750+ projects completed for 500+ satisfied clients, plus 24/7 support to keep your home safe. (If you want, tell me your vanity type; freestanding vs floating, single vs double; and I’ll help you prepare a quick installer checklist to avoid change-orders.)
Bathroom Vanity Accessories: Faucets, Hardware, Mirrors & Lighting
Accessories are where your vanity stops looking like “a cabinet I bought” and starts looking like “a bathroom that was planned.” The best part is that you can often upgrade these pieces without having to rip anything out later.
- Faucets: First, match the faucet to your hole layout—many centerset setups use 3 holes with a 4-inch spread, while widespread setups separate the handles/spout and require more space. Choosing correctly avoids awkward adapters and leaky installs later.
- Hardware (pulls/knobs): If your bathroom already has mixed metals, hardware is the easiest place to “unify” the look. Swapping hardware is also one of the fastest weekend upgrades and can make an older vanity look newer.
- Mirrors: A good rule of thumb is to choose a mirror about 1–2 inches narrower than the vanity top, so it looks balanced rather than oversized. And if you’re hanging it above a vanity, many designers aim for roughly 6–8 inches above the visual line to help protect it from splashes.
- Lighting: You generally want both ambient light and task light, and vanity lighting is a big part of that. Side lights, along with an above-mirror fixture, can reduce harsh shadows, and anything near water should be wet-rated for safety.
How to Install a Bathroom Vanity
A vanity install is part carpentry, part plumbing, and part “patience.” The goal is simple: level cabinet, secure anchor, watertight plumbing, and a clean seal—so you don’t deal with wobble or hidden leaks later.
- Measure, plan, and locate studs: Measure the old vanity and confirm the new one will cover any flooring gaps or discoloration from the previous footprint. Mark stud locations because secure fastening is what keeps a vanity from shifting over time. If you’re changing vanity size or type, double-check door/drawer clearance before you lift anything into place.
- Shut off water and disconnect plumbing: Turn off the hot and cold supply valves and release pressure by opening the faucet. Disconnect the supply lines and remove the P-trap (keep a bucket underneath, since there’s always water). Cut old caulk/sealant so you don’t tear drywall or tile when removing the top.
- Remove the old vanity and prep the wall/floor: Remove the wall fasteners, then carefully pull the vanity away from the wall. Repair the wall as needed (small dings and old caulk lines are common), because a new vanity highlights old damage. This is also the moment to paint or touch up—much easier now than later.
- Dry-fit the new vanity, drill access holes, and level it: Mark plumbing hole locations and cut/drill neatly so pipes don’t force the cabinet out of square. Set the cabinet in place and use shims to get it level; don’t “hope the countertop hides it,” because it won’t. Once it sits level and flush, you’re ready to fasten.
- Secure the vanity to the wall: Drill pilot holes and fasten it to the studs (or use proper anchors where required). This step is what prevents future movement, cracked caulk lines, and stress on plumbing connections. After fastening, re-check the level—tightening screws can shift things slightly.
- Install the top/sink/faucet and reconnect plumbing: Mount the sink and faucet per the manufacturer’s instructions, then set the top with a clean bead of silicone where needed. Connect supply lines, the drain, and the P-trap, then turn water back on and check slowly for leaks. If you’re unsure about plumbing steps, hiring a pro can prevent water damage and code issues.
How much does a bathroom vanity installation cost?
| Vanity style / design (typical size) | Typical installed cost range (vanity + labor) |
|---|---|
| Prefab freestanding single (2.5 ft / ~30″) | $300–$1,500 |
| Prefab freestanding single (4 ft / ~48″) | $600–$1,700 |
| Prefab freestanding single (5 ft / ~60″) | $700–$2,800 |
| Prefab freestanding single (6 ft / ~72″) | $1,000–$3,100 |
| Prefab double-sink vanity (4 ft double) | $750–$2,900 |
| Prefab double-sink vanity (5 ft double) | $800–$3,200 |
| Floating (wall-mounted) vanity (similar sizes) | Often within the same national range: $300–$2,200+ |
| Custom vanity project | Up to ~$4,000+ (varies widely) |
| Labor only (if you already bought the vanity) | $200–$1,000 |
Sustainable and Eco-Friendly Vanities
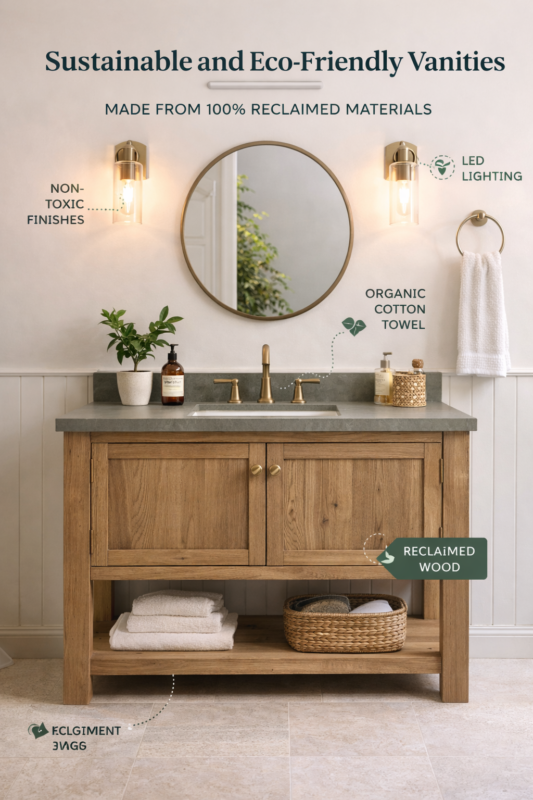
Sustainable vanities usually focus on responsibly sourced materials (such as FSC-certified wood) and finishes that are safer for indoor air quality. If you’re buying composite-wood cabinetry, look for low-emission options (often labeled as compliant with strict formaldehyde standards, such as CARB Phase 2). This matters because chemicals like formaldehyde and VOCs can be released indoors from building materials and finishes.
You can also consider rapidly renewable materials (bamboo is often discussed as a fast-growing renewable resource). In a bathroom, where heat and humidity are constant, choosing better materials and low-emission finishes can support a healthier, longer-lasting space.
What is the difference between a bathroom vanity and a pedestal sink?
A bathroom vanity combines a sink with a cabinet base, so you get storage, and the plumbing stays mostly hidden. A pedestal sink is a sink mounted on a slim pedestal, so it usually has little to no storage and less counter space.
People often choose pedestal sinks for a clean, classic look and for tight bathrooms where every inch matters. Vanities work well when you want your bathroom to feel organized, as they let you store toiletries and towels. Also, switching between the two can sometimes change plumbing needs, so it’s smart to plan the layout before you buy.
Are double sink vanities worth it?
They’re often worth it if two people use the bathroom at the same time, because two sinks can reduce the “morning traffic jam.” You usually get more countertop space, which helps keep daily items from piling up around one sink. But they need enough width, and if the bathroom is tight, a double vanity can make the room feel cramped instead of comfortable. They also tend to cost more (more materials, more plumbing hookups, more cleaning), so they’re best when your space truly supports the upgrade.
Where to Find the Best Brooklyn Contractors
Are you looking for an expert contractor in Brooklyn, NYC? SR General Construction has you covered! Our business is located at 8807 Avenue B, Brooklyn, NY 11236, United States, in the Canarsie area.
Additionally, we offer services at Rockaway Parkway and Ralph Avenue, providing fast access to Flatlands, East Flatbush, Bergen Beach, Brownsville, and the Spring Creek section of East New York.
FAQ
1. What is the difference between a bathroom vanity and a pedestal sink?
A vanity features a cabinet base, providing storage and more counter space. A pedestal sink is slimmer and space-saving, but you usually give up storage.
2. What are the standard bathroom vanity sizes?
Common vanity widths are 24, 30, 36, 48, and 60 inches, and many brands sell in those “standard” jumps. Standard depth is typically 17–24 inches, and height is usually 31–35.5 inches, depending on the model.
3. What vanity size works best for a small bathroom or powder room?
If you’re tight on space, a 24-inch or 30-inch vanity is often the sweet spot because it keeps the walkway clear. Measure your door swing and traffic path so the vanity doesn’t make the room feel cramped.
4. What is “comfort height” for a bathroom vanity?
Comfort height usually means a taller vanity (often up to about 36 inches) that feels easier on your back for daily use. If kids use the bathroom most, a shorter standard height can be more practical.
5. What’s the difference between a centerset and widespread faucet for a vanity?
A centerset faucet typically uses 3 holes with a 4-inch spread on one base/plate. A widespread faucet also uses 3 holes but spreads the parts out more (often 8–16 inches).