Do you know the key differences between kitchen cabinet refacing and refinishing, and which one truly works best for a Brooklyn, NYC kitchen?
If your cabinets look worn or outdated, you don’t always need a full kitchen remodel to get a fresh look. Two popular options, kitchen cabinet refacing vs refinishing, can completely change how your kitchen feels, but they work in very different ways. In this guide, we’ll clearly break down kitchen cabinet refacing vs refinishing in Brooklyn, NYC, using real-world factors that matter locally, such as apartment rules, dust and odor concerns, humidity changes, durability, cost, and timelines.
By the end of this article, you’ll have a simple, practical understanding of which cabinet upgrade fits your Brooklyn kitchen best!!
What is cabinet refacing, and what does it include?
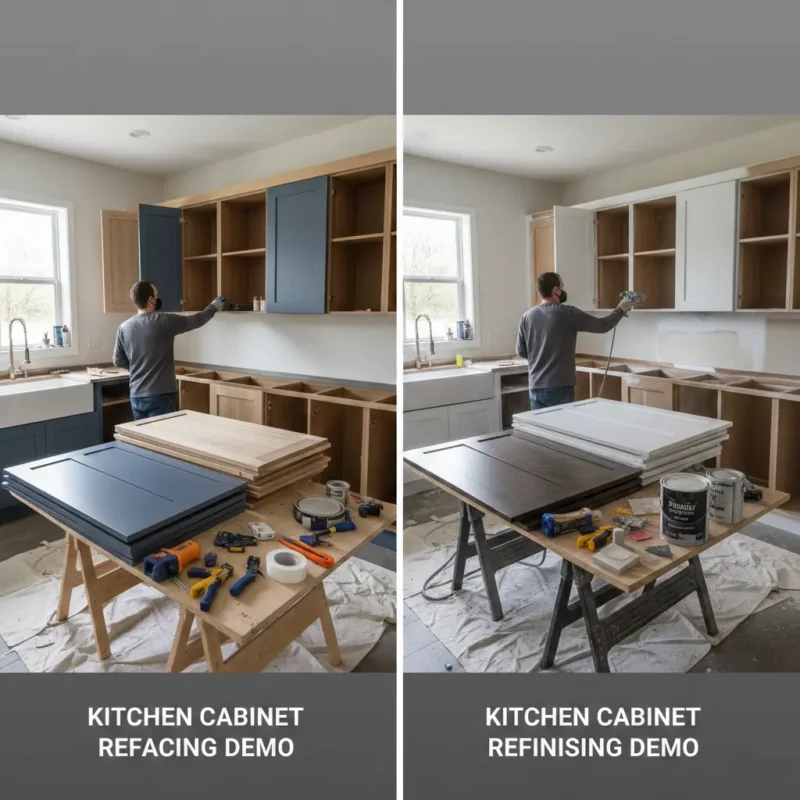
Cabinet refacing is a way to refresh your kitchen cabinets without tearing out the cabinet boxes. You keep the existing cabinet “frames/boxes,” but you replace the parts you see most often. In most projects, refacing means replacing the doors and drawer fronts and covering the visible cabinet framework with a new surface layer.
What it includes
A standard refacing job includes new cabinet doors, new drawer fronts, and a new veneer/finish layer on the cabinet framework (the parts that stay). Many homeowners also update hinges and hardware so everything matches and feels new when you open and close it. Your cabinet boxes stay in place, so the layout usually stays the same.
What is cabinet refinishing, and what does it include?
Cabinet refinishing keeps your existing doors and cabinet parts, but changes how they look. You (or a pro) sand or scuff the existing surfaces, then apply a fresh coating, such as paint, stain, or lacquer. It’s mainly a surface makeover, not a parts replacement.
What it includes
Most refinishing includes removing doors/drawers, cleaning off kitchen grease, and sanding/scuffing so the new finish sticks well. After that, the job typically includes dust removal, then primer (if painting), then paint or stain, and finally re-hanging and adjusting doors. A pro workflow often uses a sand–vac–tack process to control dust and improve adhesion.
Kitchen Cabinet Refacing vs Refinishing (Short overview)

Both options can dramatically improve your Brooklyn kitchen, but they solve different problems. Refacing changes the “parts,” while refinishing changes the “finish,” so your best choice depends on your cabinet condition and your goal.
| Key factor | Refacing | Refinishing | Brooklyn / NYC note |
|---|---|---|---|
| What changes | New doors + drawer fronts, plus new surface on visible frames | Same doors/parts, new paint/stain/lacquer finish | Great for upgrades without a “full gut” schedule |
| Style change | Big (you can change door style: shaker, slab, etc.) | Medium (color/sheens change, door style stays) | Helpful in dated prewar kitchens where doors look tired |
| Best when… | Boxes are solid but doors look outdated or damaged | Doors are in good shape and you want a new color/finish | Common NYC scenario: solid boxes, worn fronts |
| Layout changes | No (you keep the cabinet boxes) | No (it’s cosmetic) | Good for co-ops/condos where layout changes add complexity |
| Timeline | Often faster on-site once doors arrive | Can take longer due to prep + coat + cure time | Building work hours can make “shorter disruption” valuable |
| Dust & mess | Less sanding; more installation/adhesive work | More sanding/scuffing and dust control steps | Apartments benefit from strong containment either way |
| Odor & fumes | Usually lower, but adhesives/finishes can smell | Varies by products; paint/lacquer can be noticeable | Small spaces = plan ventilation and low-odor products |
| Durability risks | Poor edge sealing can lead to veneer lifting | Weak prep can lead to chipping or sticking doors | High-use NYC kitchens demand pro-level prep and fit |
| Budget level | Typically more than refinishing (new parts cost) | Often the lower-cost refresh | Labor + access can drive NYC pricing for both |
| Eco / waste | Less waste than full replacement (boxes stay) | Least material replacement (mostly coatings) | Good “upgrade” options without dumpster-level demo |
Step-by-step cabinet refinishing workflow
Refinishing looks simple on TikTok, but the real win comes from prep and patience. If you want a smooth, durable finish, the process matters more than the paint can.
- Remove and label doors, drawers, and hardware. You’ll save time later if you label each door and its location. This also helps you reinstall everything straight and even.
- Protect the kitchen (floors, counters, appliances). Cover nearby surfaces so dust and drips don’t become your next project. In apartments, protection also helps keep mess from spreading into other rooms.
- Clean and degrease every surface. Kitchen cabinets collect oils that block paint and primer from bonding. You want the surface clean enough that it feels dull—not slick.
- Repair small damage (dings, chips, loose edges). Fill dents and tighten anything that wiggles before you sand. A smooth base is what makes the “after” look expensive.
- Scuff sand for adhesion (don’t skip this). You don’t always need to strip bare wood, but you do need to scuff the full surface so the new finish grips. This Old House calls out sanding to give the surface “tooth.”
- Use the SVT method: sand, vac, and tack. Vacuum the dust, then tack cloth the rest to keep grit out of your finish. This small step makes a big difference in how smooth the final coat looks.
- Prime (especially if painting). Primer helps the topcoat stick and reduces blotchy results. It also helps block old stains from bleeding through.
- Apply your finish (paint/stain/lacquer) in thin, even coats. Thin coats reduce drips and help the finish cure harder. Let each coat dry as directed before the next one.
- Let it cure, then rehang and adjust. “Dry to the touch” is not the same as fully cured, so give it real time before heavy use. Once cured, reinstall the hardware and adjust doors so the reveals look consistent.
Step-by-step cabinet replacing workflow
Cabinet replacement is the biggest change because you’re removing the old boxes and installing new ones. It’s also the most sensitive to “small mistakes,” because a tiny level issue can turn into crooked doors and uneven countertops.
- Measure and plan the layout (before you buy anything). Confirm wall lengths, ceiling height, and appliance sizes so the new cabinets fit the real space. Planning now prevents expensive “almost fits” surprises later.
- Empty cabinets and remove doors first. Cabinets are heavy and awkward, so you want them as light as possible before you pull them down. Removing doors also reduces the risk of the box tipping forward.
- Cut any caulk/paint lines and unscrew cabinets safely. Slice through any seal so you don’t tear drywall paper off with the cabinet. Use an assistant to support wall cabinets as you remove the back screws.
- Repair walls and locate studs. Patch the damage, then mark the stud locations clearly, because your new cabinets need solid anchoring. This step is the difference between “looks fine” and “stays safe for years.”
- Set reference lines and start with the upper cabinets. Installers typically hang uppers first, so base cabinets don’t get in the way. Use level lines so you don’t “follow the floor” if it isn’t perfectly flat.
- Join and level base cabinets before securing. This Old House recommends joining and leveling cabinets, using shims as needed to ensure the faces align cleanly. Once aligned, you can secure them to studs to prevent wobbling.
- Secure cabinets to wall studs and re-check level/plumb. After you fasten them, double-check that everything stays level and plumb. If you rush this, doors won’t line up, and countertops may not sit right.
- Add fillers, panels, and toe kicks. Fillers close gaps near walls and make the installation look built-in rather than “dropped in.” Toe kicks finish the bottom edge and clean up the look.
- Install hardware, then adjust doors and drawers. Adjustments are normal and expected, even on good cabinets. The goal is even revealed, smooth movement, and doors that don’t rub.
Kitchen Cabinet Anatomy
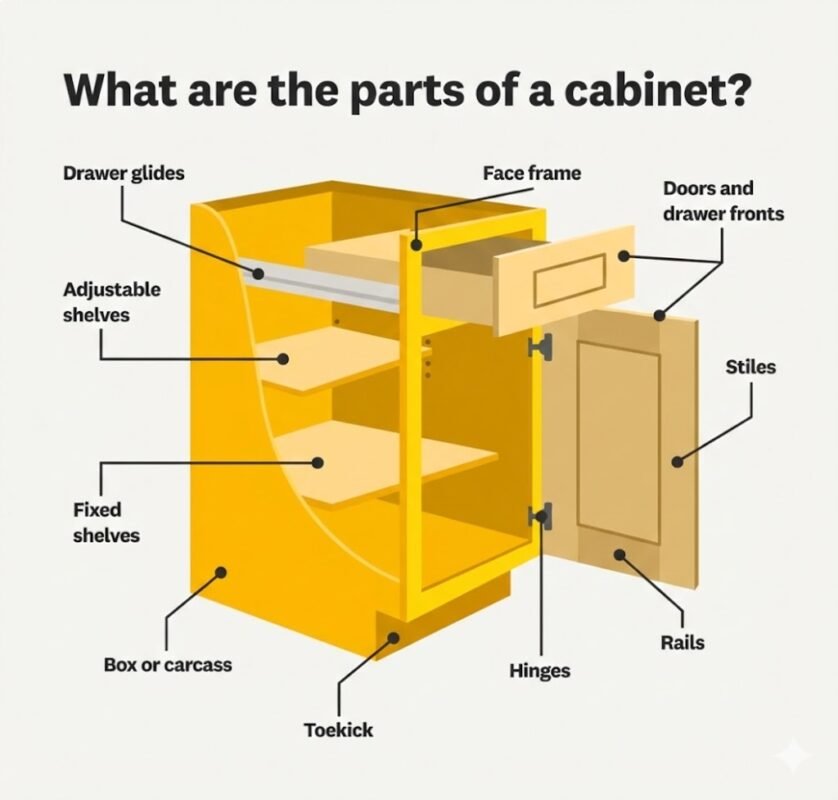
Your kitchen cabinets consist of the cabinet box (carcass) and the visible front structure, which is often a face frame built from vertical stiles and horizontal rails (or “frameless/European-style” boxes that rely on edge banding instead).
On the front, you’ll see the doors and drawer fronts, which attach and move using hinges (many modern kitchens use concealed/European hinges) and drawer slides.
To make everything look finished and fit tight to NYC walls, installers commonly use fillers, finished/end panels, and trim pieces like toe kicks and sometimes crown/light-rail molding.
Finally, the way doors sit on the cabinet matters for both looks and function—common styles include overlay (full or partial) and inset, which changes how much of the frame you see and how “built-in” the cabinets look.
Refacing vs Refinishing: Cost Comparison for Brooklyn, NYC
In Brooklyn, refinishing is usually the lower-cost refresh, while refacing costs more because you’re buying new doors/drawer fronts and covering visible cabinet-box surfaces. National averages put refinishing around $2,000–$4,500 (often $1,500–$5,000 depending on scope), while refacing commonly lands around $4,300–$10,000.
For a more Brooklyn-flavored way to think about it, many local cost reports also price refacing by linear foot (how much cabinet run you have), and in NYC, you can also see an added premium for labor + building logistics. One NYC contractor breakdown notes city-specific cost drivers like tighter access, regulations, and higher labor rates; and lists refacing around $4,000–$10,000 for an “average NYC kitchen.”
Typical cost drivers in Brooklyn (what moves your quote up or down):
- How many doors/drawers do you have (more fronts = more labor + materials)?
- Material choice (laminate vs wood veneer; upgraded hinges; custom doors).
- Condition of existing cabinets (repairs, deep-cleaning, grease, water damage).
- NYC logistics (parking, delivery windows, elevator reservations, co-op/condo rules).
- Pro spraying vs brush/roller (spraying often looks more “factory,” but prep can be heavier).
Refacing vs Refinishing: Timeline Comparison (Start to Finish)
If you want a quick comparison: refacing is fast once materials are ready, and refinishing is “work + dry + cure.” Cabinet refacing commonly takes about 3–5 days for the hands-on install phase.
Refinishing can move quickly in terms of labor, but the finish needs time to harden. You might be “done painting” in a few days, yet the cure time (when the coating reaches real toughness) can be 2–3 weeks for many acrylic/latex paints, and longer systems can take around 21–30 days to reach max hardness; so you’ll want gentle use at first.
Which one is more durable: Refacing vs Refinishing
Refacing usually wins on durability because you’re getting brand-new (often factory-finished) doors and a new surface on the visible cabinet boxes, which tends to hold up better to daily scuffs.
Refinishing can still last a long time if the prep is done right and you use cabinet-grade enamel, but the finish is only as tough as the prep and the full cure period.
If your kitchen gets heavy use (kids, lots of cooking, constant wiping), refacing usually stays “new-looking” longer, while refinishing may need touch-ups sooner in high-traffic areas.
Refacing vs Refinishing: What Materials Work Best in NYC Kitchens?
NYC kitchens deal with tight spaces, heavy cooking, and indoor humidity swings, so stable materials matter; many cabinetmakers recommend keeping humidity in a “safe zone” (roughly 30–55%) to reduce wood movement.
For refacing, high-pressure laminate (HPL) is a strong pick for busy kitchens because it’s built for durability and resists everyday wear and tear, such as scratches and scuffs.
For cabinet boxes, plywood construction is often preferred over cheaper composites in moisture-prone kitchens because it tends to remain more stable and holds fasteners securely over time.
For refinishing, choose a cabinet-grade enamel system (many pros prefer enamel for cabinets because it’s harder and more durable than basic wall paint), and plan for proper cure time.
Bottom line: in Brooklyn kitchens, you’ll usually get the best long-term performance from solid cabinet boxes + durable surfaces + the right finish system, not just a trendy color.
Refacing vs Refinishing: How Much Style Change Do You Get?
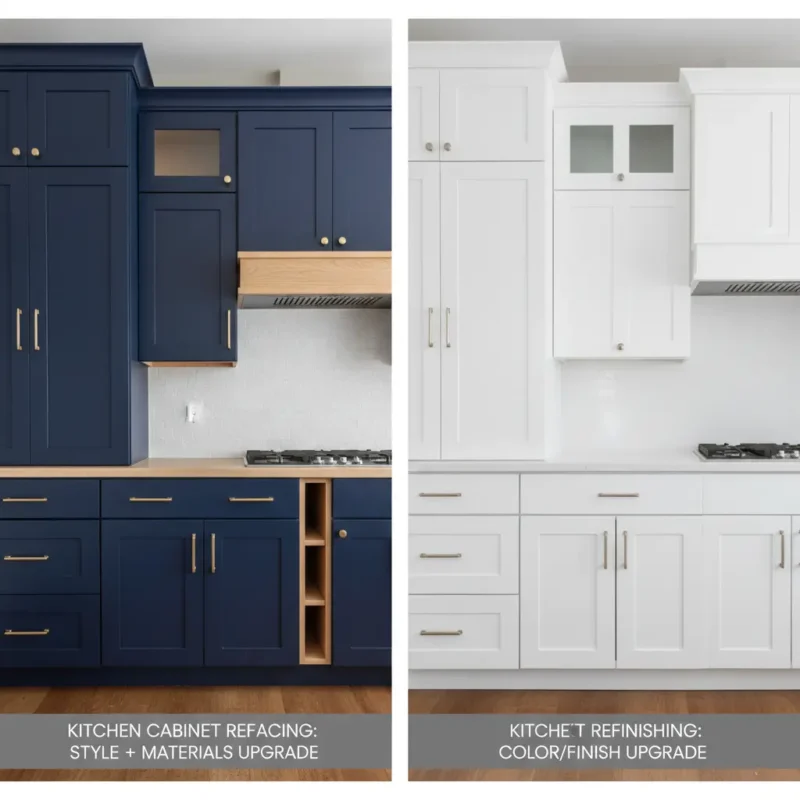
If you want a big visual transformation, refacing gives you more freedom because you can switch door styles (Shaker, slab, raised panel), swap drawer fronts, and add new veneer plus modern hardware for a “new kitchen” look.
Refinishing is more like a makeover for what you already have; you can change the color, sheen, and vibe, but your door profile and layout stay the same.
In practical terms: refacing = style + materials upgrade, while refinishing = color/finish upgrade (and it shines when your cabinet design is still something you like).
Refacing vs Refinishing: Maintenance and Cleaning Long-Term
In the long run, refacing is usually easier to clean because many refaced surfaces are laminate/HPL, which are non-porous and typically wipe down quickly.
Refinishing (painted cabinets) often needs a gentler touch; harsh cleaners and scrubbing can dull or damage the painted finish over time.
If you cook a lot, you’ll notice grease build-up around pulls and near the stove, so quick, regular wipe-downs matter more than “deep cleaning once in a while.”
In plain terms, refacing tends to be “wipe and go,” while refinishing can stay beautiful, but you’ll likely do more careful cleaning and occasional touch-ups.
Refacing vs Refinishing: Sustainability (Waste + Reuse)
Both options beat full replacement on waste because you keep the cabinet boxes, but refinishing is usually the most material-saving since you keep the doors too, and mainly add coatings.
Refacing is still very eco-friendly because you reuse the cabinet framework and replace only the doors/drawer fronts and visible surfaces.
If sustainability is your priority, ask about low-VOC finishes and whether the installer can reuse or donate old doors rather than throw them away.
From a waste standpoint, the more you can reuse (boxes, doors, hardware), the less ends up in the landfill; the EPA calls reuse and salvage a key way to cut construction waste.
So, refinishing usually wins the “lowest waste” trophy, while refacing is a strong second when you need new fronts but want to avoid a full demo.
Refacing vs Refinishing: Which Is Best for Your Kitchen Goals?
- Choose refacing if you want a “new kitchen” look without changing layout; new doors and drawer fronts give the biggest visual upgrade.
- Choose refinishing if your doors are in good shape and you mainly want a color change; it’s usually the lower-cost refresh.
- Choose refacing if your current doors are warped, dated, or peeling (like thermofoil issues); refinishing can’t fix failing door materials.
- Choose refinishing if you’re okay with gentle care and possible touch-ups later; painted finishes can look amazing, but they reward good maintenance habits.
Finish Quality Comparison: Spray vs Brush/Roller (for refinishing)
If you’re refinishing, how you apply the paint matters almost as much as the paint itself. Spray, brush, and roller can all work, but they don’t look (or behave) the same once the kitchen gets real use.
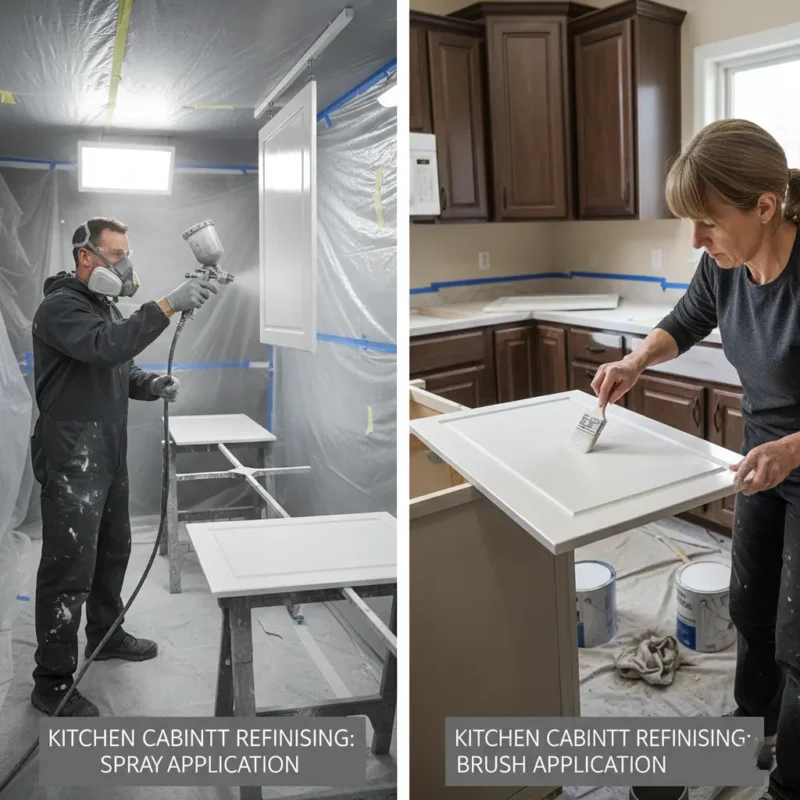
- Look and smoothness: Spraying is often used to get a more factory-like finish with fewer visible marks.
- Speed: A sprayer can cover doors and frames faster, but it also needs more masking and prep to protect the room.
- Control in tight NYC spaces: Brush/roller can feel easier in an apartment because you avoid overspray risk, especially near appliances and open living areas.
- Texture risk: Rollers can leave a slight “orange peel” texture if you use the wrong roller/technique, while brushing can leave stroke marks if you rush.
- Best hybrid approach: Many pros spray doors for the smooth look, then use a small roller and a light brush pass where spraying isn’t practical.
“Is it worth it?” Comparison: Refacing value vs refinishing savings
If you’re deciding with your wallet (and sanity), here’s the simple idea: refinishing saves money upfront, while refacing often buys you a bigger transformation and fewer “finish headaches.” Refacing is commonly described as more substantial than painting, but still cheaper than full replacement.
- Upfront cost: Refinishing is typically cheaper, while refacing costs more because you’re paying for new doors/drawer fronts and new surface materials.
- Long-term feel: Refacing can feel closer to “brand new cabinets” because you’re replacing the most visible and most-touched parts
- Touch-up reality: Painted cabinets can need careful cleaning and occasional touch-ups in high-use zones (around pulls, sink, stove).
- Best value trigger: If your cabinet boxes are solid but the doors are tired, refacing often delivers the biggest “before/after” without the cost of replacement.
So, is it worth it? Yes, if it matches your goal: refinishing is worth it when you want the most affordable refresh, and you’re okay treating the finish gently at first; refacing is worth it when you want a bigger style upgrade and a more “new-cabinet” result without replacing the boxes.
NYC rules that affect cabinet projects (permits + licensing)
In NYC, the Department of Buildings (DOB) says installing new kitchen cabinets does not require a permit in many cases, but most construction work overall still falls under DOB oversight; so it’s smart to confirm your exact scope.
The same DOB guidance also notes that contractors performing these kinds of “home improvements” must be licensed by NYC’s Department of Consumer and Worker Protection (DCWP) as a Home Improvement Contractor (HIC).
NYC311 adds an important detail: for residential home-improvement work over $200, the contractor must have that HIC license.
If your “cabinet project” also includes moving plumbing, gas lines, electrical work, or knocking down walls, that’s when you’re more likely to trigger DOB filings/permits and licensed-trade requirements (so don’t treat it like a simple swap).
And in Brooklyn co-ops/condos, you can still face building rules such as work hours, COI insurance paperwork, and alteration agreements, even if the DOB doesn’t require a permit for the cabinet portion.
When in doubt, ask your contractor to point to the DOB guidance in writing and match it to your exact scope (cabinet-only vs. “kitchen remodel”)
Where to Find the Best Brooklyn Contractors
Are you looking for an expert contractor in Brooklyn, NYC? SR General Construction has you covered! Our business is located at 8807 Avenue B, Brooklyn, NY 11236, United States, in the Canarsie area.
Additionally, we offer services at Rockaway Parkway and Ralph Avenue, providing fast access to Flatlands, East Flatbush, Bergen Beach, Brownsville, and the Spring Creek section of East New York.
FAQ
1) What’s the main difference between cabinet refacing and refinishing?
Refacing replaces your doors/drawer fronts and covers the visible cabinet frames with a new surface. Refinishing keeps everything but changes the look with paint/stain and a new topcoat.
2) Which is cheaper in Brooklyn: refacing or refinishing?
Most of the time, refinishing costs less because you’re not buying new doors. Refacing usually costs more because materials (new fronts + veneers) add up.
3) How long does painted cabinet paint take to cure?
Even if the paint feels dry, the cure time is longer. Sherwin-Williams notes that many acrylic/latex paints take about 2–3 weeks to cure, while oil-based paints can cure faster.
4) I live in a co-op/condo; what approvals might I need?
Even for “simple” cabinet jobs, buildings may require an alteration agreement, insurance/COI, elevator reservations, and approved work hours. It’s normal in NYC, so get building requirements before you schedule anything.
5) Which option gives the biggest “before and after” look?
Refacing usually wins because you can change the door style (e.g., from Shaker to slab) and add new finishes. Refinishing is a strong choice when you like your current door style and want a fresh color.