Do you know how gorgeous bathroom lighting design can illuminate your modern bathroom?
The right lighting does more than brighten the space; it shapes the mood, improves daily routines, and brings out the true beauty of your bathroom design. In this detailed guide, we’ll negotiate how to properly light your bathroom using smart layouts, layered lighting, and design-friendly tips. You’ll learn, step by step, how to create a bathroom lighting design that is both beautiful and practical.
How to Properly Light a Bathroom: Step-by-Step Guide
| Planning Your Bathroom Lighting Layout |
| Layering Light: Ambient, Task & Accent Lighting |
| Ambient Lighting: Illuminating the Entire Bathroom |
| Task Lighting for Vanities and Mirrors |
| Lighting the Shower and Bath Areas |
| Accent & Mood Lighting for Ambiance |
| Choosing Bathroom Light Fixtures |
| Selecting the Right Light Bulbs |
| Installing Dimmer Switches and Smart Controls |
| Maximizing Natural Light in Your Bathroom |
| Creative Lighting Ideas for Small Bathrooms |
| Coordinating Lighting with Bathroom Décor |
Planning Your Bathroom Lighting Layout

A good layout starts with planning lighting around how you use the bathroom, not just where a ceiling box happens to be.
- Walk the room and mark your zones first: vanity/mirror, shower or tub, toilet area, and entry path.
- Start with one “main” light for the whole room, then add a dedicated light at the mirror, then add a small accent light for mood.
- Put each lighting layer on its own switch (or dimmer) so you can control brightness by time of day.
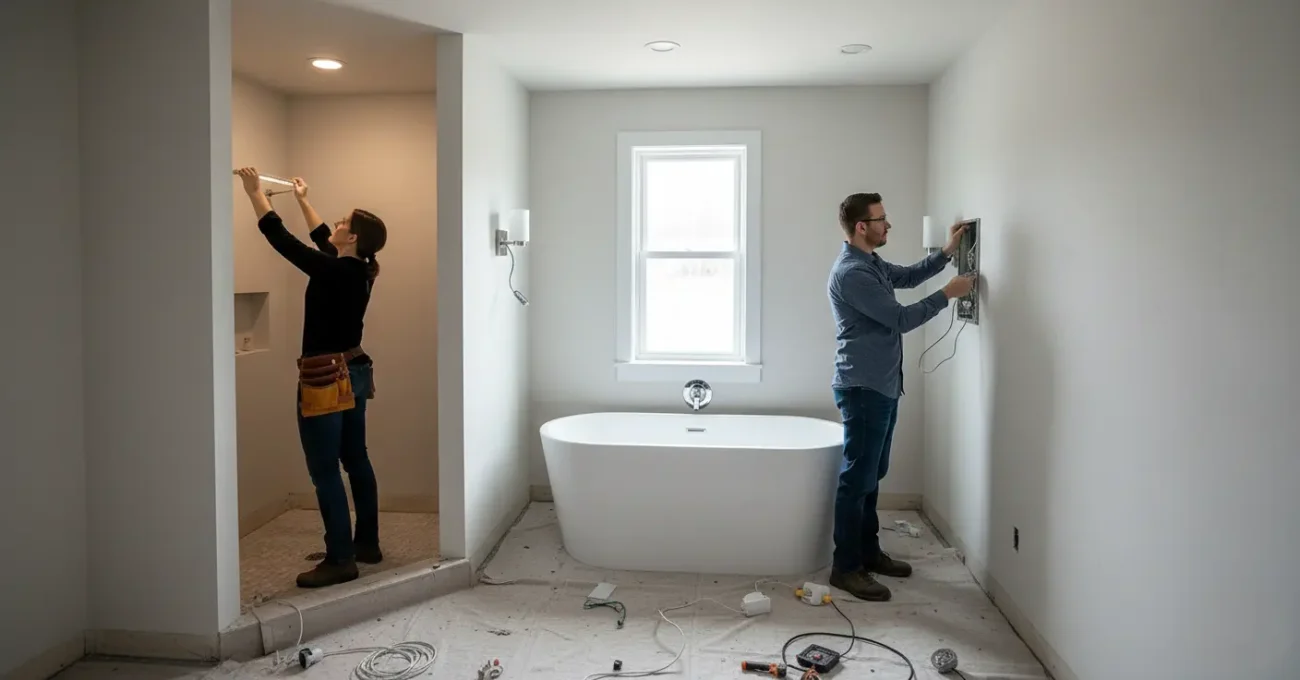
- Check moisture ratings early so you don’t choose fixtures that can’t legally/safely go near a shower or tub.
- If you’re adding new wiring, moving circuits, or installing new recessed lights in Brooklyn, plan for DOB permit rules and use a licensed electrical contractor.
Layering Light: Ambient, Task & Accent Lighting
Layering works when you treat your bathroom like a mini lighting “system,” not a single light source.
- Use ambient lighting to maintain overall brightness and keep the room evenly lit.
- Add task lighting to the mirror so your face is lit clearly without harsh shadows.
- Add accent lighting (like niche or under-vanity glow) to create depth and a spa feel.
- Keep these layers on separate controls so you can go from “get-ready bright” to “wind-down calm” fast.
- In windowless bathrooms, lean more on layered light (especially task + accent) so the space doesn’t feel flat.
Ambient Lighting: Illuminating the Entire Bathroom
Ambient lighting should make the whole bathroom feel bright and safe, without hot spots or dark corners.
- Choose a ceiling-mounted light source (flush, semi-flush, or recessed) to evenly illuminate the room.
- If you use recessed lights, space them evenly instead of clustering them in the middle.
- Aim your ceiling lights toward “working” areas (vanity and walking paths), not empty floor space.
- Add a dimmer so you can soften the room at night without losing visibility.
- Don’t rely on ambient lighting alone; treat it as the base layer you’ll build on.
Task Lighting for Vanities and Mirrors
If you want flattering, practical light at the mirror, focus on where the light hits your face, not the mirror frame.
- Place lights on both sides of the mirror whenever possible to reduce shadows across your face.
- Hang vanity-side lights around eye level, typically about 65–70 inches from the floor for most adults.
- Use diffused light (shaded or frosted) to avoid glare and harsh lines while grooming.
- If you must place a light above the mirror, center it and keep it high enough to avoid casting strong “nose and chin” shadows.
- Don’t depend only on a backlit mirror for daily grooming, because it often lights the wall more than your face.
Lighting the Shower and Bath Areas
Shower-and-tub lighting is all about safety: you need the right placement and the right wet/damp rating.
- Avoid any hanging/cord-suspended fixture near the tub or shower zone (there are clearance rules around this area).
- In the tub/shower footprint up to 8 feet high, use luminaires marked for damp locations, and use wet-location-rated lighting where the shower spray can reach.
- Choose fixtures specifically marked “Suitable for Damp Locations” or “Suitable for Wet Locations,” depending on exposure.
- Recessed overhead lighting is a common, clean solution for showers when it’s properly wet-rated for the spot.
- For any new wiring or changes in this wet zone, use a licensed electrician and follow NYC permit requirements where they apply.
Accent & Mood Lighting for Ambiance
Accent lighting works best when you use it to add depth and calm, not to compete with your main lights.
- Add toe-kick/under-vanity glow on a dimmer so you can move around at night without turning on bright overhead lights.
- Light shower niches or shelves with a small, sealed fixture so your tile details and storage feel intentional.
- Use back-of-mirror lighting (or a lighted mirror) to get a soft halo effect that feels modern and relaxing.
- Keep the accent light warmer (around 2700K–3000K) to make the bathroom feel cozy rather than clinical.
- Choose diffused light (frosted lenses/shades) to avoid harsh reflections on glossy tile and mirrors.
- Put accent lighting on its own switch or scene so you can run “mood mode” without the main lights.
Choosing Bathroom Light Fixtures
You’ll choose fixtures faster (and smarter) when you match each one to the zone, moisture level, and job it needs to do.
- Build your set in layers: ceiling/recessed for ambient, sconces or a vanity bar for task, LED strips/pucks for accent.
- Near a tub/shower, only use fixtures marked damp location (and wet location where the spray can hit).
- If the fixture sits within the tub/shower footprint and is up to 8 ft high, treat it as a moisture zone and select the appropriate rating.
- At the mirror, prefer side sconces because they light your face more evenly than a single overhead light.
- For glare control, choose fixtures with opal/frosted glass or diffusers instead of exposed bulbs.
- Size and placement matter: keep vanity lights proportional to the mirror, and avoid fixtures that extend wider than the mirror/cabinet.
Selecting the Right Light Bulbs
The right bulbs make your bathroom lighting design feel “right” by controlling color, clarity, and comfort.
- For mirror work, choose CRI 90+ so skin tones and colors look true.
- For overall comfort, keep most bathrooms around 2700K–3000K for a flattering, warm look.
- For a sharper grooming light, you can go neutral (around 3500K–4000K) at the vanity if you like a cleaner look.
- Use brightness as a rule of thumb: many pros aim for about 1600 lumens at the vanity (or less with efficient integrated LEDs), then add a dimmer.
- If you plan to dim, buy bulbs clearly labeled dimmable to avoid flicker and drop-outs.
- Keep bulb color consistent across fixtures (same Kelvin range) so the room doesn’t look “mixed” and uneven.
Installing Dimmer Switches and Smart Controls
Controls are the easiest upgrade that makes your lighting feel custom, because you can switch from “task” to “spa” instantly.
- Put ambient, vanity, and accent on separate switches so you’re not stuck with one brightness level.
- Match the dimmer type to your lights, and look for LED compatibility guidance to reduce flicker.
- If smooth dimming matters to you, choose dimmers designed around phase-cut LED compatibility (often referenced via NEMA dimming standards).
- Use preset scenes like “Morning Bright,” “Evening Wind-Down,” and “Night Path” so everyone in the home gets consistent lighting.
- Add motion/occupancy sensing for late-night bathroom visits, especially in family homes.
- Always use a qualified pro for bathroom electrical changes—water + wiring is not the place to guess.
Maximizing Natural Light in Your Bathroom
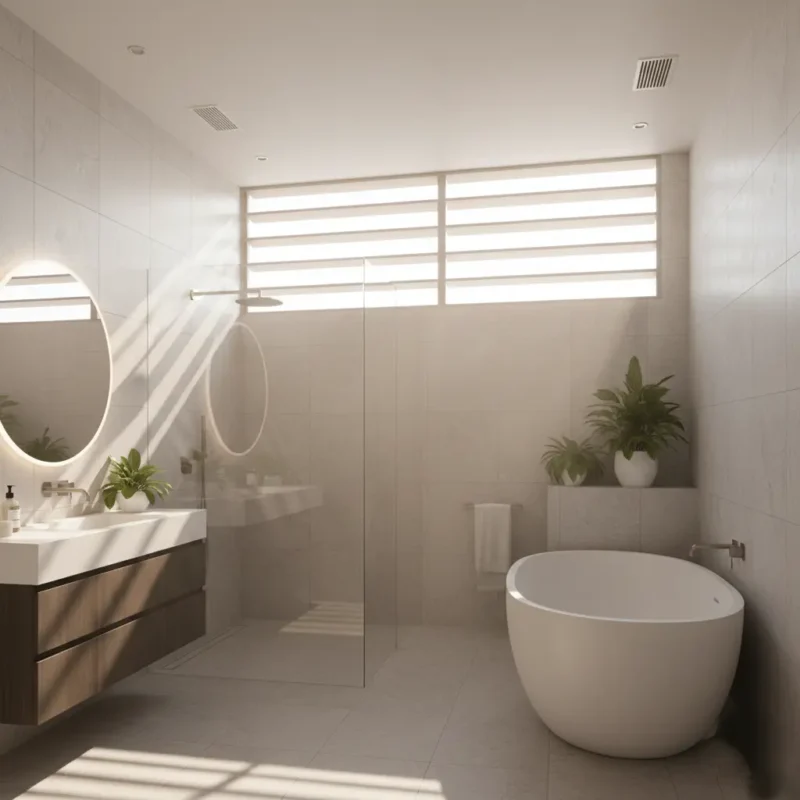
Natural light makes the room feel bigger and cleaner, so you want to capture it and bounce it around the space.
- Place a large mirror opposite or near a window to reflect daylight deeper into the bathroom.
- Use light, glossy surfaces (tile, paint, finishes) so daylight reflects rather than being absorbed.
- Pick privacy solutions that maintain brightness, like frosted or reeded glass, rather than heavy curtains.
- Keep window coverings easy to open fully so you can maximize light during the day.
- Clean the glass and window frame area regularly; simple maintenance can noticeably improve how much light gets through.
- Design your electric lighting as a backup plan for cloudy days (layered lighting matters most in darker bathrooms).
Creative Lighting Ideas for Small Bathrooms
In a small bathroom, you get the best results when you use space-saving fixtures and place light where your eyes (and mirror) need it most.
- Use recessed spotlights (flush to the ceiling) to keep the room bright without adding visual clutter.
- Add a lighted mirror or backlit mirror to boost vanity light without taking up wall space.
- Put sconces at eye level beside the mirror whenever possible, because overhead-only lighting can feel harsh and shadowy.
- Install toe-kick / under-vanity lighting so nighttime trips don’t require blasting the main lights.
- Choose lighter shades and reflective surfaces (mirror size matters) to bounce light and make the room feel bigger.
- Keep lighting flexible with dimmers so the same small space can feel “bright and clean” or “soft and calm.”
Coordinating Lighting with Bathroom Décor
Your lighting looks “designed” when you treat it like part of the décor plan; style, finish, and scale all work together.
- Match the fixture style to the room’s vibe (modern, classic, industrial) so lighting doesn’t feel like an afterthought.
- Choose a finish strategy: all matching or intentionally mixed metals (not random).
- Keep vanity lighting proportional to the mirror so it feels balanced and not crowded.
- Repeat shapes (round mirror + round globe lights, or sharp mirror + linear bar) to create visual harmony.
- Stick to a consistent color temperature across the room so the lighting doesn’t look mismatched.
- Use diffused shades or frosted glass when you have glossy tile—your eyes will thank you for the softer glare.
What are the Types of Bathroom Lighting
Bathroom lighting design gets easier when you stop thinking “one fixture” and start thinking “lighting jobs.” Most great bathrooms use a mix of types so you can see clearly, feel comfortable, and still enjoy the space’s look.
- Ambient (General) Lighting: This is your base light that fills the whole bathroom, so nothing feels dark or unsafe. Ceiling fixtures and evenly spaced recessed lights usually handle this job.
- Task Lighting: Task lighting focuses on areas where you need detail—mainly the vanity and mirror for shaving, skincare, and makeup. Sconces beside the mirror are popular because they light your face more evenly than a single overhead light.
- Accent Lighting: Accent lighting adds depth and mood by highlighting features like niches, shelves, or the space under a floating vanity. It’s also your best friend for a soft “night path” effect.
- Decorative Lighting: Decorative lighting is the statement piece—think a pretty pendant or a stylish sconce that doubles as décor. It should still respect bathroom safety zones and moisture exposure.
Bathroom Lighting Design Ideas
If you want a bathroom that looks great and works great, start with smart placement and simple rules, not random fixtures. These ideas are the ones designers and top guides repeat because they reliably improve both function and style.
- Build a layered lighting plan (ambient, task, and accent): Layered lighting prevents the “flat and shadowy” look that can occur with a single ceiling fixture. It also lets you change the mood without changing the bathroom.
- Use side sconces at the mirror (when wall space allows): Side lighting helps reduce harsh face shadows by illuminating both sides evenly. Designers often call this the most flattering vanity setup.
- Add a backlit mirror for a modern glow: It can soften the room and make a small space feel more open. It’s especially useful in bathrooms with limited wall space for big fixtures.
- Use recessed lights for clean ceilings and small bathrooms: Recessed lighting keeps the ceiling visually quiet, which helps cramped bathrooms feel bigger. It also offers flexible placement for general and shower lighting (provided they are rated appropriately).
- Create a “night mode” with toe-kick or under-vanity lighting: This lets you navigate safely without waking yourself up with bright overhead light. It’s one of those small upgrades that feels luxurious fast.
- Go bold with a decorative fixture in a powder room (not over a tub): A powder room is the safest place to get dramatic because moisture and splash zones are usually less intense. Designers also warn against risky placement near bathtubs and wet areas.
- Keep your lighting temperature consistent across the room: Mixing “yellow” and “blue” lights in one bathroom can make finishes look strange. A consistent temperature reads cleaner and more intentional.
How To Choose the Right Light Bulbs for the Bathroom
Bulbs matter more than people think because they control brightness, color, and how you look in the mirror. The goal is simple: pick bulbs that match your tasks (grooming vs relaxing) and work smoothly with your fixtures and controls.
- Start with brightness: buy lumens, not watts: Lumens tell you how much light you’re actually getting, so it’s the best way to compare bulbs. The U.S. The Department of Energy specifically recommends shopping by lumens and using labels to compare brightness and other specs.
- Choose the right color temperature (Kelvin) for the job: Warm light (roughly 2500K–3000K) feels relaxing, while cooler light (around 5000K) helps with makeup and detailed grooming. Many good bathrooms use both: a warm overhead and a cooler vanity, so you can switch based on what you’re doing.
- Prioritize high CRI at the vanity (aim for 90+): CRI measures how accurately a light shows color compared with natural light. For the mirror area, high-CRI bulbs (90+) help skin tones and makeup colors look more true.
- Confirm the bulb shape and base fit your fixture: Most bathrooms use common bulb shapes like A19, and vanity fixtures often use globe shapes like G25, but you should match the shape and base your fixture is designed for. Checking the base type (like E26) prevents the annoying “it doesn’t fit” moment.
- If you want dimming, only buy bulbs labeled dimmable: Not all LEDs dim well, and the wrong combo can flicker or buzz. Bulbs that are clearly marked dimmable are the easiest way to avoid that headache.
- Stick with LED for efficiency and long life: LEDs typically deliver strong light with less energy use and less heat, which is especially helpful in smaller bathrooms. That’s a big reason many guides now recommend LED as the default bulb type.
Energy-Efficient Lighting Solutions for Bathrooms
If you want an energy-smart bathroom, start by switching most of your lighting to LED, which delivers strong brightness with far less energy than older bulb types.
Next, look for ENERGY STAR–certified downlights/fixtures where it makes sense, since that label is built around efficiency and performance, not just marketing. When you shop for bulbs, buy by lumens (brightness) and check the Lighting Facts label instead of guessing with watts. Add dimmers, sensors, or smart schedules so lights aren’t running at full blast when you don’t need them. And if your project is commercial/multifamily, it’s worth checking Con Edison and NYSERDA lighting/controls incentives, because those programs can lower upgrade costs.
Common Bathroom Lighting Mistakes to Avoid
Most bathroom lighting problems stem from two reasons: people use too few light sources, or they place lights based on “symmetry” rather than where the light is actually needed. Avoid these mistakes and your bathroom lighting design will look better, feel better, and work better every day.
- Relying on one overhead light: A single ceiling light often creates harsh shadows on your face and leaves corners dim. Designers consistently recommend layering lights rather than relying on a single fixture.
- Placing mirror lighting only above the mirror: Over-mirror lighting can cast shadows under the eyes and chin, making grooming more difficult. Side lighting (sconces on both sides) is a more even, face-friendly setup.
- Using the wrong moisture rating near the shower or tub: Bathrooms are humid, and wet zones need fixtures rated for the right exposure level. Choose fixtures clearly marked for damp or wet locations based on placement.
- Ignoring IP ratings / safety guidance: This is one of the most common “oops” problems pros call out, especially during remodels. If you’re anywhere near splash zones, follow rating guidance and don’t guess.
- Mixing color temperatures in the same bathroom: When one light is warm, and another is cool, your tile and paint can look “off,” and the room can feel mismatched. Pick a consistent range, then use dimmers to shift the mood instead of swapping colors.
- Choosing bulbs by watts instead of lumens: Watts tell you energy use, not brightness, so it’s easy to end up with a bathroom that’s dim or overly harsh. Compare lumens and use the Lighting Facts label to match brightness to your space.
- Installing dimmers without checking LED compatibility: Incompatible dimmers and “dimmable” LEDs can still flicker or buzz. Use LED-rated dimmers and follow compatibility guidance for smoother dimming.
- Skipping permits or using non-licensed electrical work in NYC: In Brooklyn/NYC, many electrical jobs need a DOB electrical permit and must be done by a DOB-licensed electrical contractor. If you’re adding new wiring or new lighting circuits, treat permits as part of the plan, not an afterthought.
Where to Find the Best Brooklyn Contractors
Are you looking for an expert contractor in Brooklyn, NYC? SR General Construction has you covered! Our business is located at 8807 Avenue B, Brooklyn, NY 11236, United States, in the Canarsie area.
Additionally, we offer services at Rockaway Parkway and Ralph Avenue, providing fast access to Flatlands, East Flatbush, Bergen Beach, Brownsville, and the Spring Creek section of East New York.
FAQ
1. What’s the best bathroom lighting design approach for most homes?
Use layered lighting: one source for overall brightness, one for the mirror, and one for mood. This “system” approach is what most top guides recommend because it solves both function and comfort.
2. Is warm white or daylight better for bathrooms?
Warm white usually feels more flattering and relaxing for most bathrooms. Daylight can be useful in bathrooms with limited natural light or for detailed grooming zones.
3. How many lumens do I need at the bathroom vanity?
Many lighting guides land around “bright enough for grooming,” often roughly in the 1,000–1,600 lumen range for a typical single vanity, then you fine-tune with a dimmer. If your finishes are dark or your bathroom has no window, you may need more.
4. Should I buy bulbs based on watts or lumens?
Buy lumens, because lumens measure brightness. The Lighting Facts label helps you quickly compare brightness, color, and energy cost.
5. What CRI should I choose for a bathroom?
For the vanity area, a higher CRI is better because it shows color more accurately. If you do makeup or shaving at the mirror, aim for high-CRI lighting there.