What is shower installation, and why are so many Brooklyn homeowners choosing it right now?
If you live in Brooklyn, you’ve probably noticed a growing trend: old bathtubs are being replaced with modern, functional shower systems. Shower installation means building or upgrading a complete shower system. This doesn’t just involve installing a shower-head. It includes plumbing rough-ins, shower valves, waterproofing, shower pans, walls, drains, and fixtures, all working together as one system.
What are the Types of Showers
If you’re planning a shower installation in Brooklyn, the “type of shower” you choose usually comes down to how it controls temperature, how many outlets it runs (rain head, handheld, body sprays), and how “smart” you want it to be. Let’s break it down in a simple, real-world way so you can pick what fits your bathroom and your building.
- Pressure-balancing (anti-scald) shower: This is the most common setup in NYC apartments because it helps prevent sudden temperature swings when someone else uses water in the home. It balances pressure between hot and cold lines to keep the mix safer and steadier.
- Thermostatic shower: A thermostatic valve is built to hold a set water temperature more precisely, so you don’t keep “chasing” the perfect warm setting. Many people love it because you can dial in comfort, and the valve does the steadying for you.
- Digital/smart shower: This type uses a digital interface to control temperature and may include presets, timers, or warm-up features. It’s popular in higher-end Brooklyn remodels where people want a clean look and easy repeatable settings.
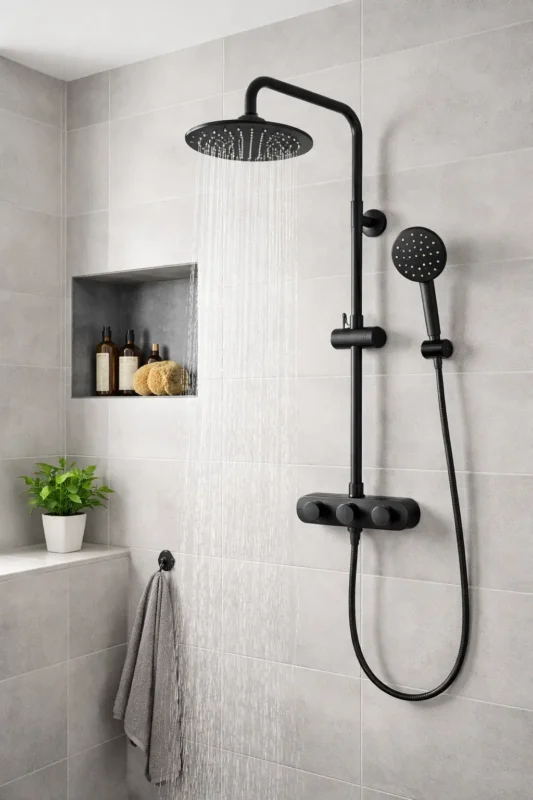
- Shower system combo (overhead + handheld + thermostatic control): This is a “complete shower package” style in which the overhead shower and hand shower work together with a single control. It’s great when you want an everyday overhead shower but still want handheld control for rinsing, cleaning, or kids.
- Multi-outlet shower (diverter setup: rain head + handheld + body sprays): This type uses a diverter to send water to different outlets, such as a rain head, handheld, or body jets. It feels spa-like, but it also needs smarter planning because more outlets can mean more plumbing work and flow planning.
- Shower panel/tower system: A shower panel mounts to the wall and often includes a rainhead, handheld, and body jets in a single vertical unit. People like it when they want a “big upgrade feel” without doing as much behind-the-wall custom layout, but you still need careful connections and solid mounting.
- Walk-in or curbless shower (layout type): This is a design choice more than a valve style, but it’s very popular in Brooklyn because it looks modern and can make small bathrooms feel bigger. Just remember: a walk-in build lives or dies by correct slope, drain placement, and waterproofing details.
Step by Step Shower Installation Guide
| Planning Your Shower Installation Project |
| Gathering the Necessary Tools and Materials |
| Preparing the Bathroom (Removing Old Fixtures and Surface Prep) |
| Shutting Off Water Supply and Ensuring Safety |
| Rough-In Plumbing and Drainage Setup |
| Installing the Shower Base or Pan |
| Waterproofing Walls and Floors |
| Installing Shower Walls or Surround |
| Installing the Shower Door or Enclosure |
| Installing Shower Fixtures (Valve Controls, Showerhead & Accessories) |
| Sealing the Joints and Edges |
| Testing the New Shower System for Leaks and Functionality |
Planning Your Shower Installation Project
- Start by confirming your building rules and NYC requirements.
- Pick the shower layout first, not the fixtures.
- Choose your control type early: pressure-balancing, thermostatic, or digital.
- Map out your outlets and flow plan (rain head, handheld, body sprays).
- Check your water pressure and hot water capacity before you commit.
- Plan waterproofing and wall build-up as part of the system.
- Decide your access strategy for future repairs.
- Set a budget and timeline that matches real Brooklyn reality.
N.B. Hire a professional team for secure and the best results
Gathering the Necessary Tools and Materials
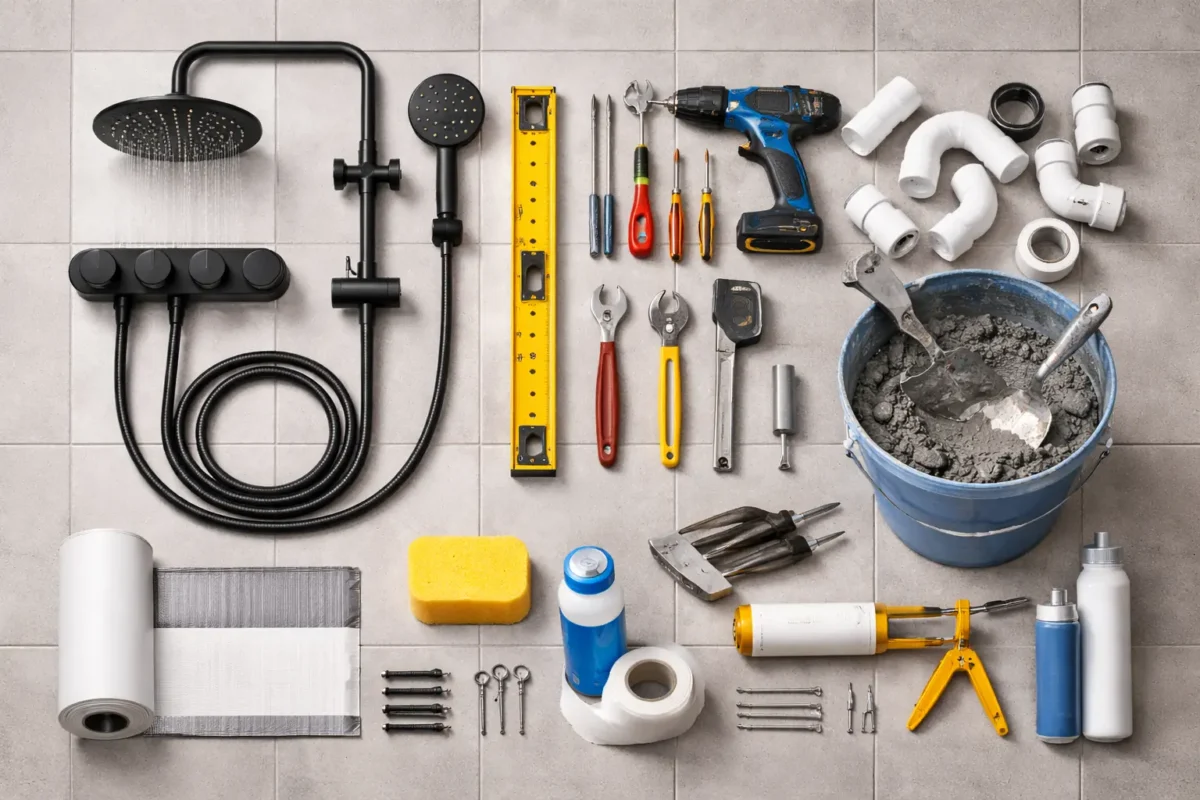
- Start with the full shower “system list,” not just the trim kit: For a full build, you need the valve rough-in, diverter (if any), outlets, drain, pan, backer board, waterproofing, and finish materials. Buying system parts together reduces mismatches in threads, finishes, and valve compatibility.
- Get the right plumbing connection tools for your pipe type: PEX needs the correct crimp/clamp tool for your fitting system, while copper needs proper cutting and joining tools. Match tools to the actual pipe you have in the walls, not what you wish you had.
- Keep sealing supplies ready for every threaded connection: PTFE tape (and/or approved thread sealant) is essential for threaded shower arms and some fittings. Small drips become big problems once the tile and walls are closed.
- Include waterproofing products as “core materials.”: Your membrane system, corners/bands, and compatible thin-set (if required) are what protect the structure behind the shower. Waterproofing isn’t optional—Brooklyn bathrooms are exposed to daily water and have tight ventilation.
- Add test supplies for quality control: A drain test plug and a way to mark water level support a proper water test before tile. Schluter, for example, recommends waiting at least 24 hours after setting KERDI before water testing.
- Choose a showerhead that won’t disappoint: WaterSense-labeled showerheads are independently certified for efficiency and performance, with a maximum flow rate of 2.0 gpm. This helps you balance comfort and water use without having to guess.
Preparing the Bathroom (Removing Old Fixtures and Surface Prep)
- Protect the work zone before demolition starts: Cover floors and nearby fixtures to prevent debris from scratching finishes or clogging drains. This matters in NYC apartments where you often have only one path in and out.
- Remove old trim and fixtures in a clean order: Remove handles, trim plates, the showerhead, and accessories before opening walls. Bag and label parts so you don’t lose screws and small pieces.
- Open walls intentionally to access studs, valves, and drain areas: For a full rebuild, you usually need studs exposed for new plumbing and backer board. Cut clean edges so patching and waterproofing go smoother.
- Inspect framing and subfloor for hidden water damage: If you find rot, mold, or soft wood, repair it before continuing. New tile over damaged framing is one of the fastest paths to leaks later.
- Add blocking where fixtures and glass will mount: Install solid wood backing for the valve area, shower arm drop-ear, grab bars (if planned), and door hinges. Proper blocking prevents wobble and long-term loosening.
- Dry-fit the pan, drain, and valve depth before closing anything: Make sure the drain aligns, and the valve sits at the correct depth for your final wall thickness. Fixing depth errors after waterproofing is expensive and messy.
Shutting Off Water Supply and Ensuring Safety
- Shut off water the right way for your building type: In a house, you often use the main shutoff; in many Brooklyn apartments, you may need a building shutoff scheduled with management. Don’t start a demo until you know you can fully stop water.
- Relieve pressure at the shower before disconnecting anything: After shutoff, open the shower valve to drain remaining water and pressure. This reduces spraying when you loosen fittings.
- Confirm the water is truly off before you remove valves or pipes: Test the shower and nearby faucets to confirm no flow. This simple check prevents flooding and damage to neighbors below.
- Keep the workspace dry and stable while using tools: Wet floors and power tools don’t mix, so wipe spills fast and use solid lighting. Wear eye protection during the demo because tile shards and metal clips can fly.
- Treat anti-scald features as required safety steps, not upgrades: Pressure-balancing valves are designed to keep the temperature steadier when water use changes elsewhere in the home. Many systems also include an adjustable limit stop to prevent the handle from overheating by accident.
- If your work changes piping, plan for NYC permit + licensed supervision:
- NYC DOB states plumbing work involving alteration/relocation/removal of piping must be supervised by an LMP, who pulls permits and arranges inspections. That’s not “extra”; it’s how you avoid compliance and insurance headaches later.
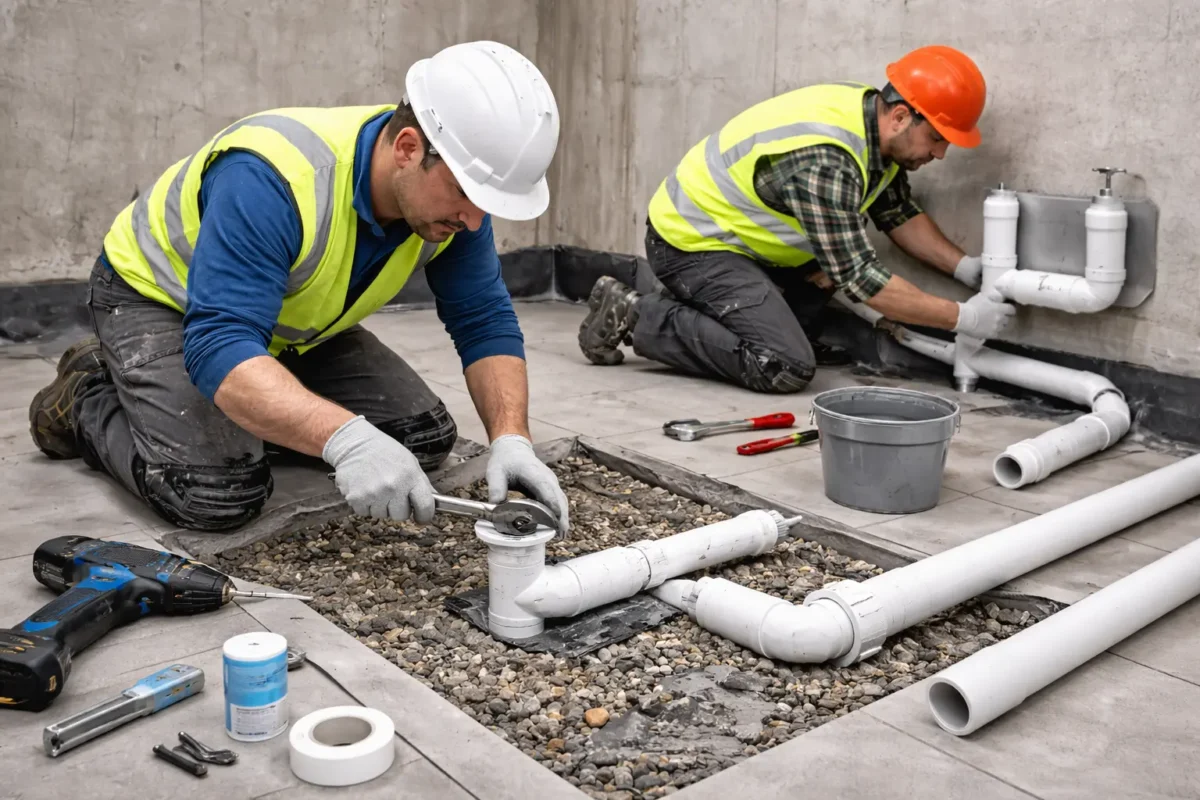
Rough-In Plumbing and Drainage Setup
- Mark valve centerline, showerhead height, and outlet locations on open studs using the shower system’s rough-in dimensions.
- Set the rough-in valve so the finished wall surface will land flush with the front of the plasterguard (± 1/4″) as specified in Delta’s rough-in instructions.
- Keep the plaster ground/guard installed during rough-in so the trim depth stays correct once tile and wallboard are added (the flush-to-finished-wall reference is standard in valve instructions).
- Add solid blocking behind the valve body and drop-ear elbow, so the valve and shower arm stay rigid during trim-out.
- Cap all outlets and run a pressure/leak test on the rough plumbing before closing any wall cavities.
- Confirm the cartridge retainer clip is seated before turning on the water, as the manufacturer warns that water pressure can force the cartridge out if the clip is missing or loose.
- Clean and flush the valve body before installing a new cartridge/trim to remove debris that can damage the cartridge or restrict flow.
- Size the shower waste outlet to at least 2 inches for NYC compliance.
- Pitch horizontal drainage piping to code minimums (e.g., 1/4 inch per foot for 2½-inch and smaller per IPC Table 704.1).
Installing the Shower Base or Pan
- Build a level subfloor that can fully support the base, and avoid rim-only support per manufacturer guidance.
- Frame a plumb, square pocket for the base so the flange sits correctly, and the wallboards finish cleanly.
- Install the drain to the shower base and confirm a watertight seal before permanently setting the base.
- Set the base in position and verify the level in all directions before moving forward.
- Support the base as required by the product (some acrylic bases require full-bottom mortar/grout bedding and are not self-supporting).
- Connect the drain pipe only after the base is stable, level, and properly supported to avoid stressing the drain joint.
Waterproofing Walls and Floors
- Choose one complete waterproofing system (sheet or liquid) and follow that system’s approved steps and components.
- Use a wet-area-approved wall substrate with a waterproofing membrane rather than relying on tile and grout for waterproofing.
- Seal every seam, corner, and penetration (valve, shower arm, niches) according to the membrane manufacturer’s detailing method.
- Perform a water test before tiling as a quality-control step on the shower waterproofing.
- Wait at least 24 hours after setting KERDI before starting a water test, per Schluter’s guidance.
Installing Shower Walls or Surround
- Shim or fur framing so the wallboard sits flush over flanges and finishes flat.
- Install water-resistant wallboard/backer board intended for wet areas, then apply the chosen waterproofing membrane system.
- Dry-lay tile or panels to plan clean cuts around the valve trim and corners before thinset or adhesive goes on.
- Keep changes of plane (wall-to-wall and wall-to-floor corners) as movement joints because industry standards require movement accommodation where surfaces change direction.
- Fill movement joints with an appropriate flexible sealant (not hard grout) to reduce corner cracking and leaks over time.
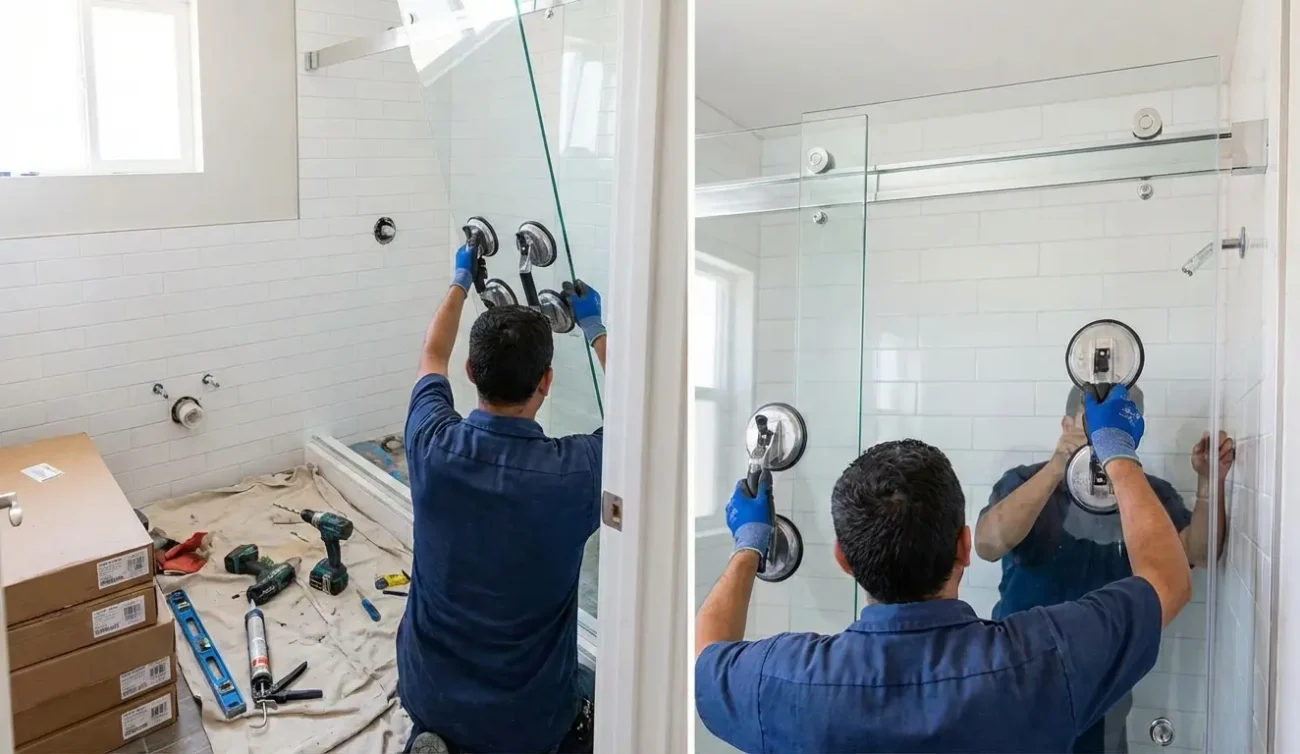
Installing the Shower Door or Enclosure
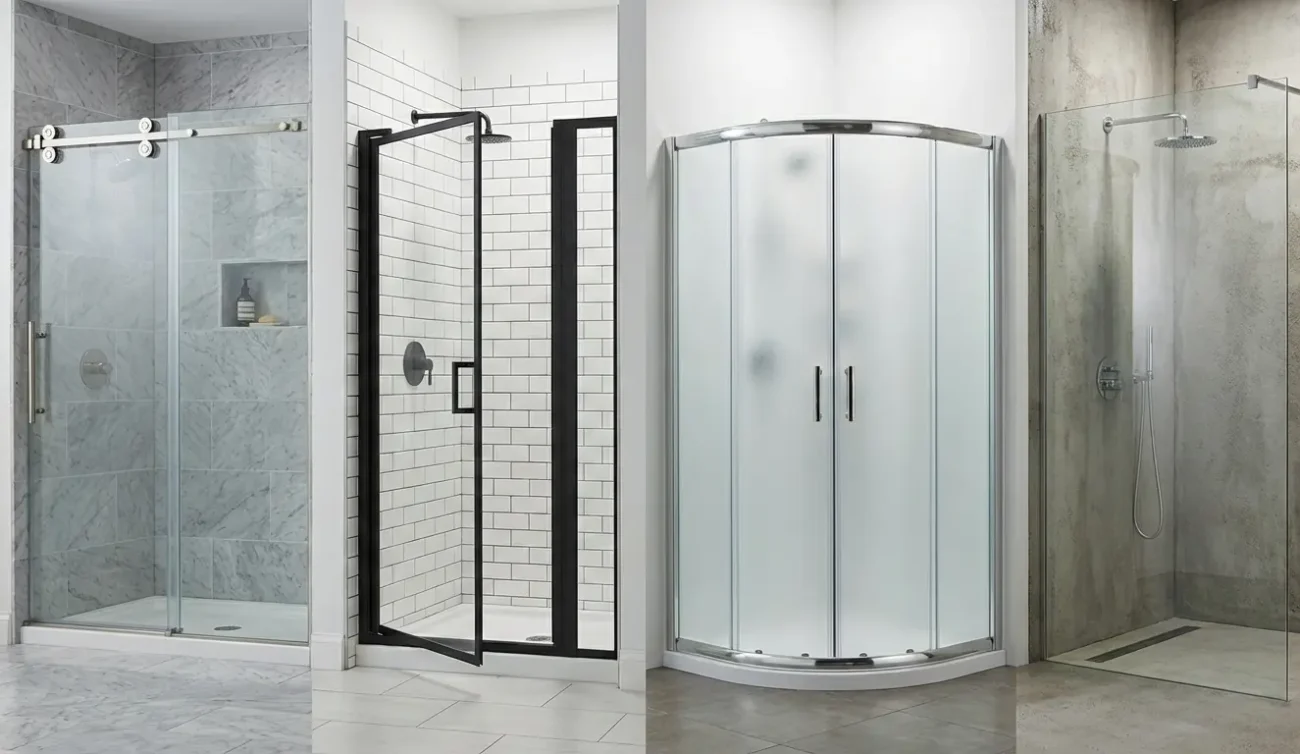
- Install the shower base and finished walls before starting the door/enclosure, as required in Kohler installation instructions.
- Verify walls are within 3/8″ (10 mm) of plumb, or door alignment and sealing can fail.
- Cover the drain with tape to prevent small parts from falling down the drain during installation.
- Set wall jambs/rails plumb and square before hanging glass so the door closes correctly.
- Apply 100% silicone only where the manufacturer indicates, as sealing other areas can cause leaks.
- Use two people to handle and set glass panels/doors, as manufacturers explicitly require a two-person installation.
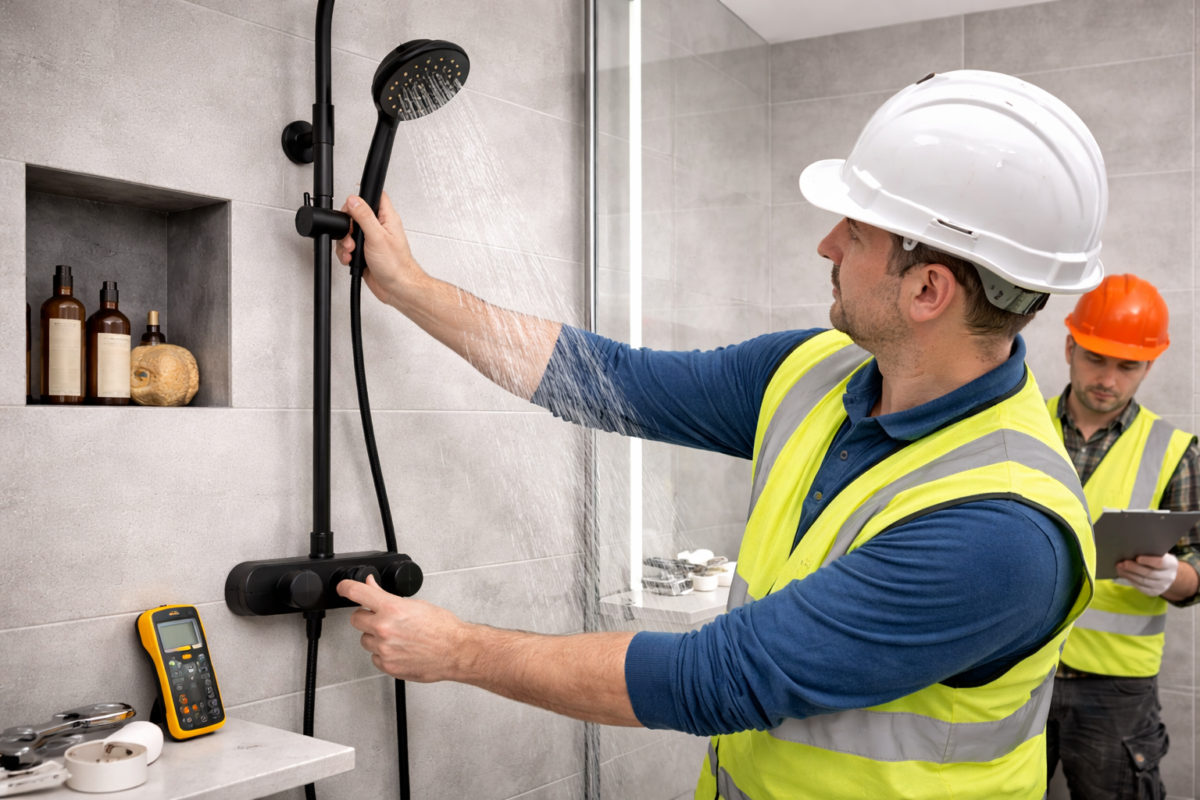
Installing Shower Fixtures (Valve Controls, Showerhead & Accessories)
- Remove the plaster guard and confirm the trim kit matches the exact valve series already installed in the wall.
- Flush and clean the valve body before installing a new cartridge or final trim to prevent debris from damaging parts or restricting flow.
- Install the valve stem adapter/trim plate exactly per the manufacturer’s sequence so the handle sits straight and operates smoothly.
- Apply sealant or plumber’s putty under escutcheons only when the manufacturer instructs it (common on some diverter trims).
- Apply thread sealant tape and install the shower arm to the shower elbow, tightening carefully with a strap wrench to avoid scratching finishes.
- Run hot and cold water through the shower arm to flush out dirt and debris before threading on the showerhead.
- Apply thread-seal tape to the shower arm threads, then hand-thread the showerhead on and snug it without over-tightening.
- Set the maximum water temperature during trim-out and keep it at or below 120°F (49°C) using a thermometer and the valve’s limit-stop procedure.
Sealing the Joints and Edges
- Fill all tile “changes of plane” (wall-to-wall and wall-to-floor corners) with flexible sealant as a movement joint instead of hard grout.
- Seal the shower base-to-wall joint with mildew-resistant 100% silicone after the wall finish is complete and dry.
- Seal around plumbing penetrations (shower arm, valve opening, body spray holes), so water can’t migrate behind the finished surface.
- Follow the shower door manufacturer’s silicone placement rules and curing instructions to prevent leaks at jambs, track corners, and thresholds.
- Apply 100% silicone along the wall jambs and at the corners where the jambs meet the bottom track, as required by the enclosure instructions.
Testing the New Shower System for Leaks and Functionality
- Turn the water supply back on and inspect every accessible connection for leaks before closing walls or access panels.
- Flush hot and cold water through the shower arm before the final showerhead use to clear debris from the line.
- Verify cartridge/trim operation and confirm smooth handle travel from cold to hot without sticking.
- Measure the hottest setting with a thermometer and set the limit stop so the maximum stays ≤ 120°F (49°C) for scald safety.
- Test the diverter through every outlet (rain head, handheld, body sprays) to confirm full flow and clean switching.
- Run the shower for several minutes and confirm the drain clears quickly without pooling, gurgling, or slow draw-down.
- Keep the shower door/enclosure dry until the silicone cures for the full time stated by the manufacturer.
What type of shower system is best for Brooklyn, NYC
For most Brooklyn bathrooms, especially in older buildings with pressure changes, a pressure-balancing (anti-scald) valve or a thermostatic valve is usually the smartest choice because it helps keep shower temperature steadier during everyday water use.
Pair that valve with a Water-sense-labelled shower-head for reliable performance at 2.0 gpm max, which helps balance comfort and water use in NYC homes. For “modern” comfort without over-complicating the plumbing, a dual-outlet setup (rain head + handheld with a diverter) often fits Brooklyn layouts better than multi-jet systems that demand more flow. Whatever the style, prioritize a valve that can limit the maximum temperature and be adjusted during trim-out for safety.
When to Call a Professional
Call a pro when the job involves moving the drain, changing or relocating piping, or any work that needs a DOB permit or inspection in NYC. NYC DOB states that plumbing work involving alteration/relocation/removal of piping must be supervised by a Licensed Master Plumber, and the plumber pulls permits and arranges inspections. A professional also makes sense when the building is a co-op/condo, where shutoffs, approvals, and tight schedules can turn a “simple” project into a headache.
SR General Construction, NYC, is fully licensed and has 15+ years of renovation and remodeling experience in Brooklyn. We’ve completed 750+ projects for 500+ satisfied clients, and we offer 24/7 support to help keep your home safe.
Common Installation Mistakes to Avoid
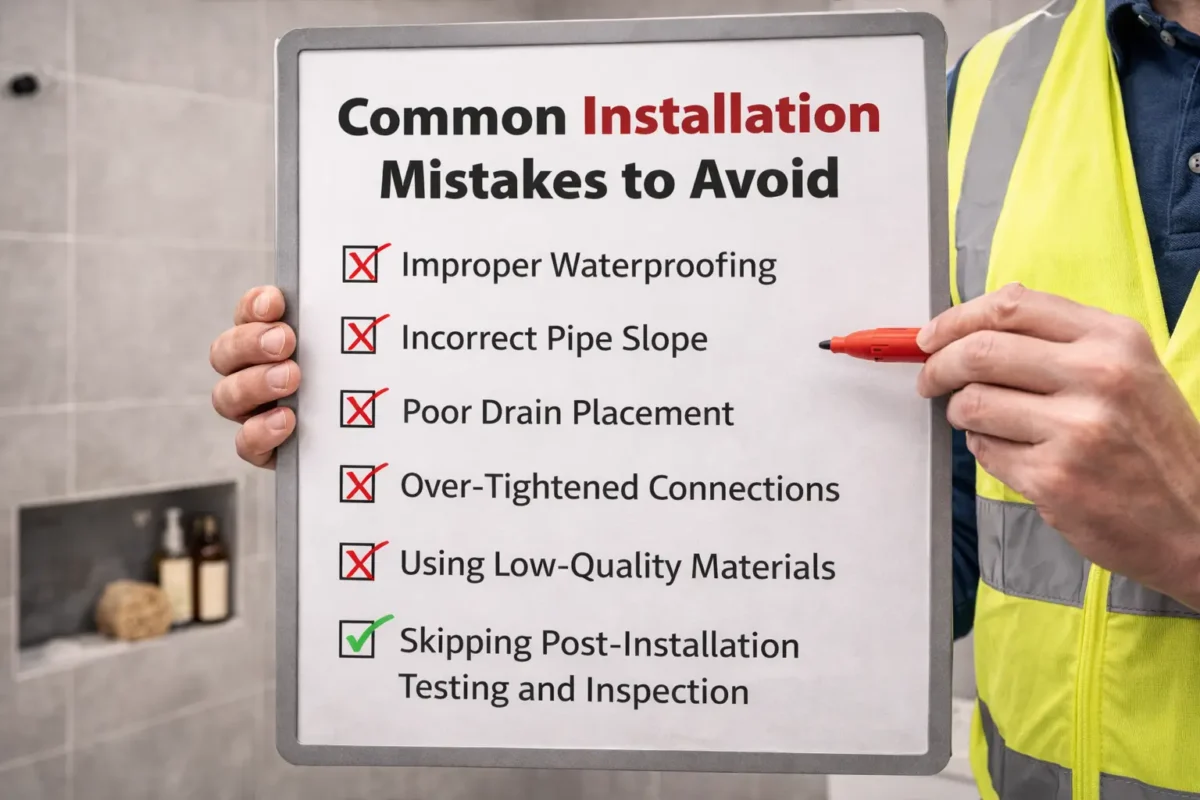
Most shower failures don’t happen on day one; they show up later as slow leaks, loose fixtures, or cracked corners. Avoid these common mistakes, and the shower will last longer and be easier to maintain.
- Skipping permits or using the wrong type of plumber for NYC work: Plumbing work that alters or relocates piping isn’t just a “DIY choice” in NYC; DOB rules tie permits and inspections to a Licensed Master Plumber. Skipping that step can create problems during inspections, resale, or insurance claims.
- Not setting the valve’s maximum temperature limit: NYC plumbing rules require shower and tub/shower valves to include a method to limit the maximum setting to 120°F (49°C), which can be adjusted in the field per manufacturer instructions. Leaving that limit unchecked raises scald risk and can put the install out of compliance.
- Closing the walls before a proper waterproofing test: A shower can look perfect and still leak behind the scenes if waterproofing wasn’t verified. Schluter describes a water test as a quality-control step performed before tile installation, and notes that 24 hours is typical for the test duration.
- Grouting corners instead of using a movement joint: Tile and walls move slightly over time, and corners are where stress builds up. Industry guidance emphasizes movement joints at changes in plane, which is why flexible sealant is used instead of hard grout in those joints.
- Installing the shower door on out-of-plumb walls (or rushed alignment): Even a great door can leak if the opening isn’t close to plumb and square. Kohler’s door troubleshooting guidance specifically calls out checking whether walls are within 3/8 inch of plumb, because alignment affects sealing.
How much does it cost to install a shower in Brooklyn or NYC?
In New York, shower installation costs commonly range from around $800 for basic walk-in setups to several thousand for tile-heavy builds, with Angi noting tiled walk-in showers can reach about $9,365 depending on materials and complexity.
Costs rise fast when the project includes moving plumbing/drains, upgrading waterproofing, or adding premium fixtures and glass. Brooklyn projects often land above national averages because labor, building logistics, and approvals (especially in co-ops/condos) add time and coordination requirements.
NYC Building Codes and Permit Requirements
NYC construction rules are set by the NYC Construction Codes, including the Plumbing Code. NYC DOB states that plumbing work involving the alteration, rearrangement, relocation, or permanent removal of piping must be supervised by a Licensed Master Plumber (LMP). DOB also states that permits for plumbing work are issued only to an LMP (or LFSC for fire suppression), and that the license holder arranges the required tests and inspections. For shower safety, the NYC Plumbing Code requires that individual shower valves include a means to limit the maximum temperature to 120°F (49°C) and to field-adjust it per manufacturer instructions.
Where to Find the Best Brooklyn Contractors
Are you looking for an expert contractor in Brooklyn, NYC? SR General Construction has you covered! Our business is located at 8807 Avenue B, Brooklyn, NY 11236, United States, in the Canarsie area.
Additionally, we offer services at Rock-away Parkway and Ralph Avenue, providing fast access to Flatland’s, East Flat-bush, Bergen Beach, Brownsville, and the Spring Creek section of East New York.
FAQ
1. Can a homeowner do shower plumbing work in NYC without a license?
Minor maintenance, like swapping a showerhead, is often treated differently from altering piping. Once the work involves changes to piping systems, NYC DOB guidance indicates LMP supervision and permitting are required.
2. What’s the safest maximum shower water temperature?
NYC’s plumbing code requires shower/tub-shower valves to have a means to limit the maximum setting to 120°F (49°C) and to field-adjust it per the manufacturer’s instructions. This is one of the simplest safety steps to reduce scald risk.
3. What size drain line is typically required for a shower in NYC?
In practice, many shower installations use a 2-inch waste outlet, and flood-test guidance often references a test plug sized for a 2-inch drain pipe. Confirm the exact requirements for the specific build and existing plumbing configuration before closing walls.
4. How long does a full shower system installation usually take in Brooklyn?
A full build (demo + plumbing + waterproofing + tile + glass) often takes several days to multiple weeks, depending on drying/curing times and building logistics. Co-op/condo approvals and scheduled water shutoffs can extend the timeline.
5. How long should a shower flood test last?
A common approach is to fill the pan and check that the water level holds for 24 hours; some installers test for longer, depending on the system and local practice. The goal is simple: confirm there is no leakage before the tile goes in.