Why does bathroom floor installation often feel more complicated than any other room in your home?
A bathroom floor must handle water, humidity, daily foot traffic, and tight spaces; all at the same time. One wrong step can lead to loose tiles, water leaks, or long-term damage under the surface. In this detailed guide, we’ll explain the complete bathroom floor installation process, from choosing the right flooring to preparing the sub-floor and installing it correctly. You’ll learn how to install different materials like tile and vinyl, which tools you actually need, and which steps matter most for durability.
What is Bathroom Floor Installation
Bathroom floor installation is the full process of removing the old floor, levelling the base (sub-floor), and installing a new surface like tile or vinyl. In a bathroom, the goal isn’t just “looks”, it’s moisture control and a floor that won’t move or crack over time. Many installs also include a layer, such as cement backer board or a tile membrane, to help protect the subfloor and reduce cracking.
How to Install Bathroom Floor: Step-by-Step Guide
| Planning Your Bathroom Floor Installation |
| Choosing the Best Bathroom Flooring Material |
| Tools and Materials Needed for Installation |
| Removing Old Bathroom Flooring and Trim |
| Inspecting & Repairing the Sub-floor |
| Installing Underlayment or Cement Backer Board |
| Step-by-Step: Installing a Ceramic or Porcelain Tile Floor |
| Step-by-Step: Installing a Vinyl Plank or Sheet Flooring |
| Cutting Flooring Around Obstacles (Toilet, Vanity, Vents) |
| Grouting and Sealing the Floor (Waterproofing Steps) |
| Reinstalling Bathroom Fixtures and Baseboards. |
Planning Your Bathroom Floor Installation
Before you touch a single tile or plank, you want a simple plan—because bathrooms have tight corners, fixtures, and zero tolerance for water mistakes. If you plan well, the install feels controlled instead of stressful.
- Measure the room and note obstacles (toilet base, vanity, tub edge, vent).
- Decide on your flooring type (tile, vinyl plank, sheet vinyl, or stone) and check the installation method.
- Plan the layout so cuts land in less noticeable spots (usually along the far wall or under the vanity).
- Think through fixture steps: shutting off water, removing the toilet, and reinstalling it with a new seal.
- If you’re in Brooklyn/NYC, check building rules and whether your scope needs DOB plans/permits (especially in co-ops/condos).
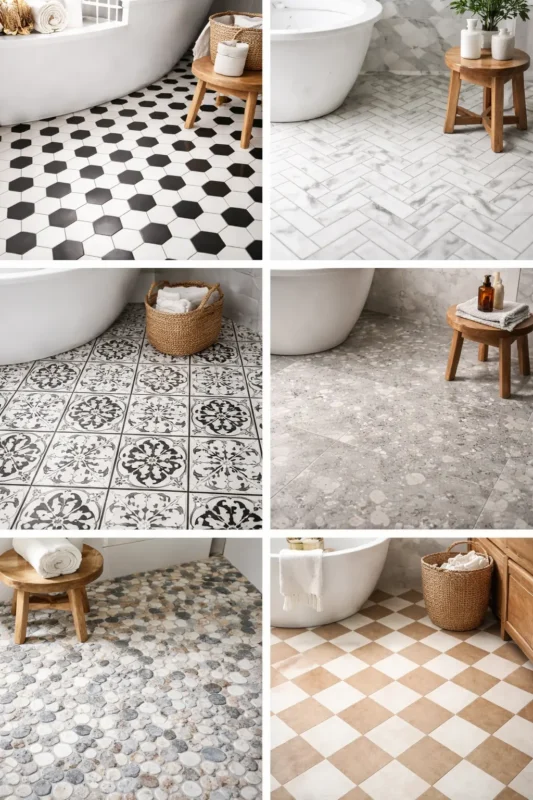
Choosing the Best Bathroom Flooring Material
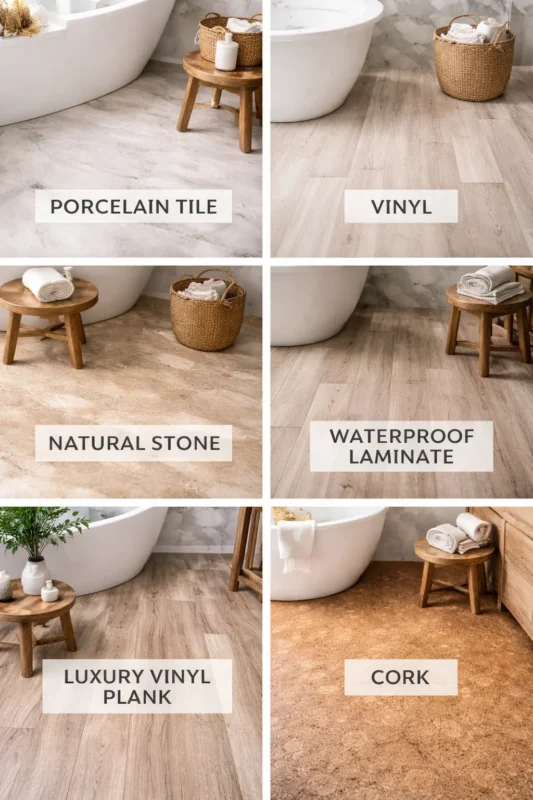
Your bathroom floor has one job: stay stable and safe even with daily water and humidity. Pick a material that matches your budget, your cleaning style, and how “wet” your bathroom gets.
- Porcelain tile
- Ceramic tile
- Natural stone tile (slate, marble, travertine)
- Luxury vinyl plank (LVP) / luxury vinyl tile (LVT)
- Sheet vinyl
- Waterproof laminate (bath-rated)
- Sealed concrete / microcement / epoxy flooring
Removing Old Bathroom Flooring and Trim
- Protect the room first: Hang plastic at the door, cover vents if needed, and wear eye protection and a mask. Bathrooms trap dust, so basic dust control keeps cleanup manageable.
- Remove trim and transitions carefully: Pop off baseboards and any threshold strip so you can run the new floor cleanly to the wall line. Label pieces you plan to reuse, and pull nails so they don’t tear the new floor later.
- Handle the toilet if the floor runs underneath it: Shut off the water, drain the tank, and remove the toilet so you can install flooring properly without awkward cuts. Many floor failures start with “we tried to tile around the toilet base.”
- For vinyl/sheet goods: Score into manageable strips with a utility knife, then peel and scrape. Go in sections so you don’t fight a whole sheet at once.
- For tile: Break a starter area, lift the tiles, then scrape the old thinset down as flat as you can. This is loud work—plan for neighbor-friendly hours if you’re in an apartment.
- Remove adhesive the smart way: A heavy-duty floor scraper is the usual first move; heat can soften stubborn glue, and adhesive removers may help on some subfloors. The goal is a clean, flat surface, as leftover glue can prevent new flooring from bonding well.
Inspecting & Repairing the Subfloor
- Check for water damage in the usual hotspots: Look closely around the toilet flange area and along the tub/shower edge for soft wood, swelling, or dark staining. If the subfloor feels spongy, don’t cover it; replace that section.
- Stop movement first: Walk the floor and listen for squeaks or flex; add screws to tighten the subfloor to the joists where it moves. Tile especially hates flexing, and even vinyl can separate if the base shifts.
- Fix dips and humps (don’t “hope it’s fine”): Use a straightedge to find low spots and high spots, then mark them clearly. A flatter floor means fewer lippage problems with tile and fewer bumps showing through vinyl.
- Use leveling products correctly: Many self-leveling products require primer to bond well and to reduce surface defects like pinholes. Pick the primer based on your subfloor type (porous vs. non-porous) and follow the product limits.
- Keep it dry and clean: Remove dust and debris before any mortar, primer, or adhesive work—dust kills bonding. Also, make sure the area is dry; trapped moisture under the flooring can cause long-term problems.
- Do a final “flat + solid” check: Before underlayment goes down, re-walk the floor and re-check with a straightedge. If it feels solid now, it will usually stay solid after the finished floor goes in.
Installing Underlayment or Cement Backer Board
- Choose the right underlayment for your goal: Cement board provides a solid, tile-friendly surface, while uncoupling membranes help manage movement and can add waterproofing when seams are sealed. Schluter notes DITRA’s functions include uncoupling and waterproofing (when installed as a system).
- Bed cement board in mortar (don’t skip this): HardieBacker’s instructions call for a supporting bed of dry-set or modified thinset over plywood using a 1/4″ square-notched trowel. This fills voids so the board is fully supported.
- Fasten it in a real pattern: HardieBacker specifies fastening over the entire surface every 8 inches, and keeping fasteners set back from edges and corners to avoid cracking the board. This pattern is what keeps the layer stiff and quiet.
- Stagger seams and respect gaps: Don’t line up seams with subfloor seams, and don’t let four corners meet. Leave the manufacturer-recommended gaps so boards don’t push into each other when the building moves.
- Treat joints like they matter: Use alkali-resistant mesh tape and thinset over seams so the boards work together as one surface, not separate panels. This is a common pro move that DIYers skip.
- If you want waterproofing, seal the seams and edges: For systems like DITRA, waterproof integrity depends on how you treat seams and transitions; Schluter specifies KERDI-BAND overlapping seams and transitions by at least 2 inches. That seam work is what turns “water-resistant” into “water-managed.”
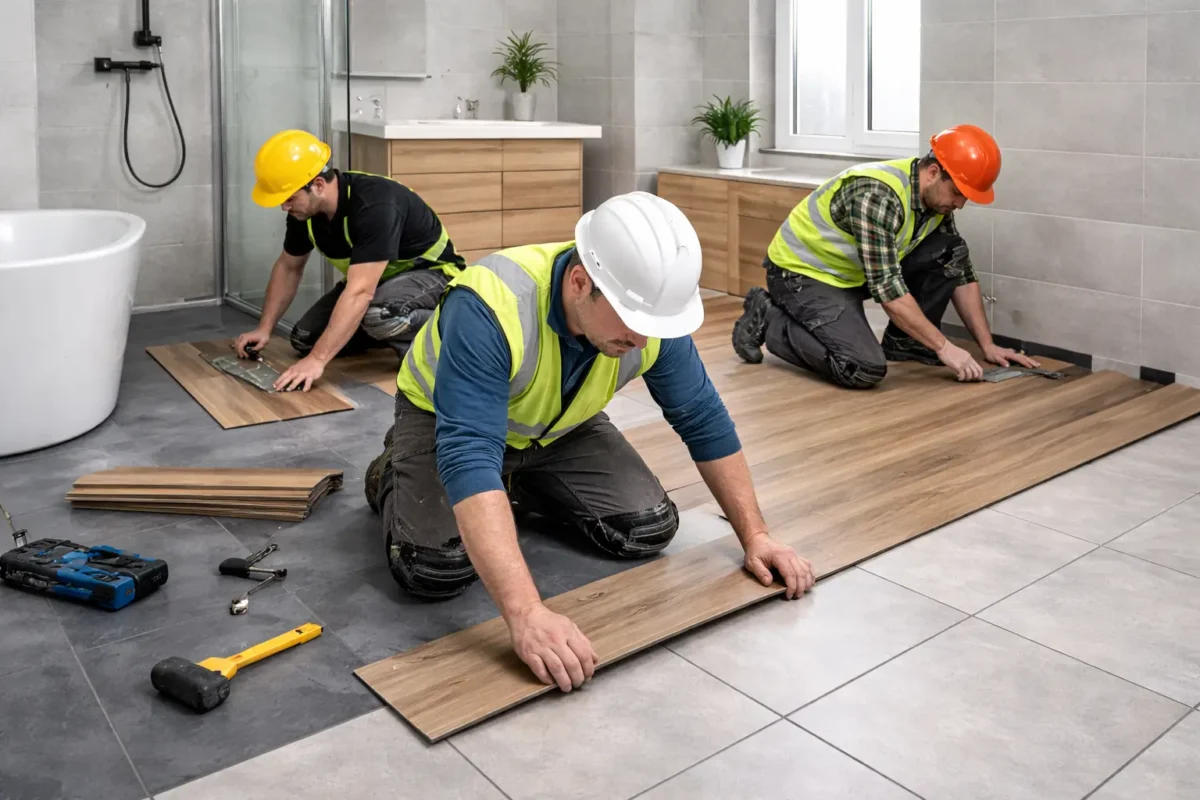
Step-by-Step: Installing a Ceramic or Porcelain Tile Floor
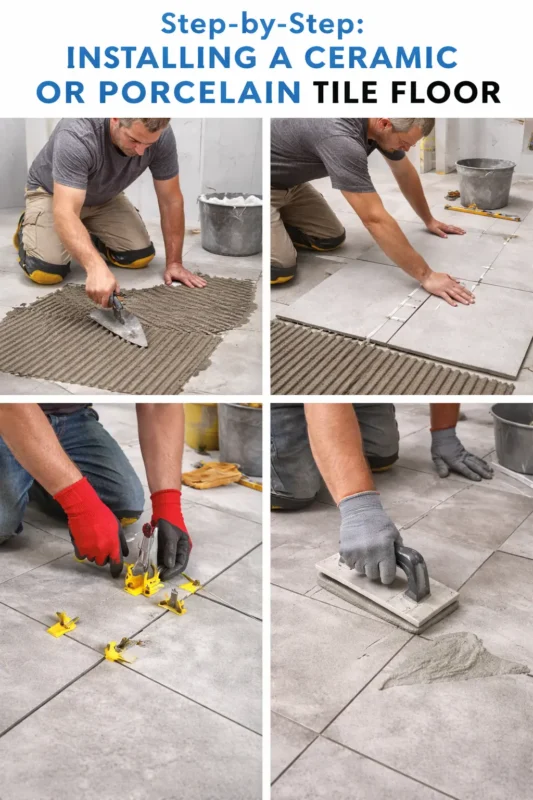
- Dry-lay and lock your layout: Place a few tiles with spacers to see how cuts land at walls, the tub edge, and the doorway. Adjust now so you avoid tiny slivers and awkward cuts later.
- Mix thinset correctly and work in small zones: Mix to the texture the bag calls for and only spread what you can tile before it skins over. Working in small sections helps you keep strong bonding and reduces “rushed” tile placement.
- Trowel for real coverage (this is where installs fail): Use the recommended notched trowel and comb thinset in straight ridges so the tile can collapse ridges evenly when you press it in. The Ceramic Tile Education Foundation emphasizes proper troweling to create a stronger bond and reduce issues such as lippage and breakage.
- Set tiles, keep joints consistent, and check flatness often: Press tiles in, use spacers, and lift the occasional tile to confirm you’re getting good mortar contact. Poor coverage leaves weak spots under the tile that can crack later.
- Cut cleanly around obstacles and edges: Use a wet saw for straight cuts and nippers/diamond blade for tricky curves near pipes. Dry-fit cuts before you spread more thinset, so you don’t waste working time.
- Cure, grout, and finish like a pro: Let thinset cure per the product instructions before grouting (many installs wait at least a day), then grout, clean haze, and caulk movement zones (like perimeter and tub edge). When reinstalling the toilet, use a new wax ring and set the bowl straight down to avoid leaks.
Step-by-Step: Installing a Vinyl Plank or Sheet Flooring
- Condition the room and the flooring first: Keep the bathroom in a normal indoor range (no freezing temps, no blasting heat), and let the vinyl acclimate before you install it; some manufacturers recommend about 48 hours at room temperature.
- Make the sub-floor really flat (vinyl shows everything): A “good enough” sub-floor for tile can still telegraph bumps through vinyl. For example, Manning-ton’s rigid vinyl guidance calls for flatness around 3/16″ in 10 ft and 1/32″ in 12″ that’s the level of smoothness you’re aiming for.
- Decide whether you’re installing floating or glue-down (follow your product): Many vinyl planks are floating (click-lock), while others are glue-down. Shaw notes that both methods exist, depending on the product and installation guidelines.
- Install vinyl planks like a system (floating click-lock): Leave the required expansion gap (often ~1/4″), undercut door jambs, and don’t nail trim into the planks attach baseboards to the wall so the floor can move. Shaw’s instructions also warn not to place cabinets or fixed objects on top of a floating floor.
- Install sheet vinyl by method (loose-lay vs full spread): Armstrong outlines residential sheet vinyl methods, such as a modified loose-lay (tape/adhesive at seams) or full-spread adhesive, depending on the product and subfloor.
- Treat seams like “water entry points” on sheet vinyl: Armstrong’s guidance includes double-cutting seams and sealing them with seam adhesive (they describe applying a small bead along the seam edge). This is the step that helps keep moisture from creeping under the sheet over time.
Cutting Flooring Around Obstacles (Toilet, Vanity, Vents)
- Plan the toilet area the smart way: If your toilet sits on top of flooring (most modern installs), you’ll get a cleaner finish and fewer leak risks than cutting around the base. When you remove a toilet, plan to replace the wax ring during reinstall.
- Respect the toilet flange height: Oatey’s flange instructions say the flange should be set flush with or on top of the finished floor, which is why flooring thickness and flange height matter before you reset the toilet.
- Use templates for odd shapes: For curved cuts (toilet flange area, pipe penetrations), make a quick paper/cardboard template first, then transfer it to your tile/vinyl. This reduces “cut twice because the first one was wrong.”
- Undercut door jamb edges for cleaner edges: Instead of trying to notch the flooring around the trim, undercut the jamb so the flooring slides underneath. Shaw’s vinyl guidance specifically mentions undercutting doorjambs.
- Cut around vanity bases correctly for your floor type: If you’re installing floating vinyl, don’t trap it under heavy fixed cabinets unless your manufacturer allows it; some guidelines warn that heavy fixed objects should not sit on top of a floating vinyl floor.
- Handle vents and floor penetrations neatly: Remove the vent cover, cut the opening carefully, and keep required gaps where the product needs movement. The goal is a clean cut that the vent cover hides without pinching the floor.
Grouting and Sealing the Floor (Waterproofing Steps)
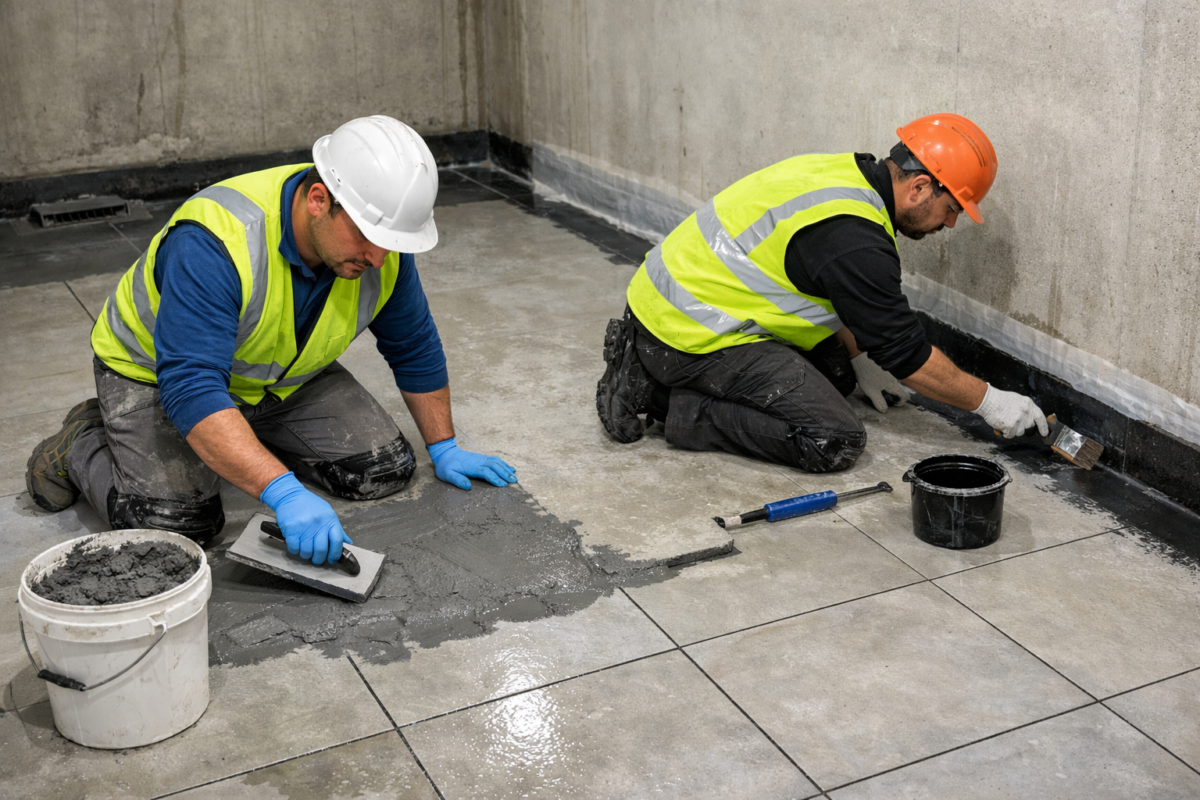
- Pick the grout type that matches your bathroom reality: Cement grout is common, but epoxy grout generally offers stronger performance in moisture-prone, high-traffic areas (it also resists staining better). MAPEI’s guidance compares cement vs epoxy performance and why epoxy often wins in wet or busy spaces.
- Grout only after the tile is stable: Let your thinset cure per the bag instructions, then grout in sections you can manage. Keep a second bucket of clean water so you don’t smear grout haze everywhere.
- Use sealant (not grout) at changes of plane: Where the floor meets the wall, tub, or shower curb, the industry treats these as movement areas. Tile movement joint guidance in EJ171 emphasizes movement joints at terminations/changes of plane, and typically uses backer rod and sealant.
- Waterproof before tile if you’re in a true wet zone: If your bathroom has frequent splashing (kids, walk-in shower nearby, wet-room style), a waterproofing membrane under tile is a strong upgrade. RedGard is designed to create a waterproof membrane barrier and reduce crack transmission.
- Know your membrane options (liquid vs sheet): HYDRO BAN (liquid) is described as a flexible, seamless waterproofing/crack isolation membrane, and HYDRO BAN Sheet Membrane is installed with thin-set for waterproofing assemblies. Either route can work when you follow the system details.
- Seal cement grout at the right time (and with the right product): Many cement grouts need time to cure before sealing; Custom Building Products notes that cementitious grouts often need about three days before you apply a grout sealer. A penetrating sealer like Sealer’s Choice Gold is marketed for tile & grout sealing and stain protection.
Reinstalling Bathroom Fixtures and Baseboards.
- Reset the toilet with a new seal: A wax ring’s job is to create a watertight and airtight seal between the toilet base and the floor flange, so don’t reuse an old one. Oatey explains that the wax ring prevents leaks and sewer gas from escaping; it is a cheap part that protects an expensive floor.
- Confirm the flange and toilet sit level: Oatey flags that an uneven flange can cause rocking and can stress the wax seal. If the toilet rocks, fix the cause (leveling/shimming) before you call the job “done.”
- Install baseboards the right way for floating floors: If you installed floating vinyl planks, don’t nail the trim into the planks. Shaw’s guidance warns not to fasten moldings/transition strips to floating planks because it restricts movement.
- Use the right transitions at the doorway: Bathrooms often meet hallway flooring, so add a proper transition strip/threshold to protect edges and make the height change feel smooth. (This also looks cleaner than leaving raw edges.)
- Seal edges where water loves to sneak in: Use a bathroom-rated sealant at the tub edge and any splash-prone perimeter detail (especially if you have kids or a tight shower). This helps prevent water from wicking under the floor.
- Do a final “walk test” and cleanup: Walk every spot. If you feel a hollow tile, a moving plank edge, or a soft seam, fix it now—small fixes are easy today and painful later.
Common Mistakes & Smart Fixes
Most bathroom floor problems come from the same few mistakes: rushing prep, skipping the “boring” steps, and trapping a floor that needs room to move. Here are the issues I see most often, along with quick, practical fixes.
- Mistake: Skipping acclimation for vinyl. Fix: Let the planks/sheet sit in the room for the manufacturer’s acclimation window (often around 48 hours) so it doesn’t shrink, gap, or buckle later.
- Mistake: Installing vinyl over a bumpy subfloor. Fix: Patch and level until you hit the flatness tolerance your product expects (for rigid vinyl, some guides call for about 3/16″ in 10 ft).
- Mistake: Pinning a floating floor under cabinets/vanities. Fix: Don’t install heavy fixed objects on top of floating vinyl unless your manufacturer allows it, or switch to a glue-down method where required.
- Mistake: No expansion gap on click vinyl. Fix: Leave the required gap (Shaw commonly references ~1/4″) and cover it with trim attached to the wall, not the floor.
- Mistake: Not undercutting jambs, then “carving” ugly notches. Fix: Undercut doorjambs and slide the flooring under for a clean edge.
- Mistake: Weak sheet vinyl seams. Fix: Double-cut seams and use the correct seam adhesive procedure (Armstrong describes applying a bead of seam adhesive along the seam edge).
NYC Code and Waterproofing
In NYC, bathroom flooring work can quickly cross into “regulated work,” so don’t assume every project is permit-free. The NYC Department of Buildings says kitchen and bathroom renovations may require construction plans and permits, depending on the scope of work. If plans/permits are required, you must hire a NYS-licensed P.E. or a registered architect (R.A.). A simple floor swap is very different from moving plumbing, adding electric heat, or rebuilding a shower; those changes can trigger DOB filings and inspections under NYC’s construction codes. On waterproofing: NYC’s Plumbing Code requires shower floors/receptors to be built from impervious, waterproof materials. Even outside the shower area, smart Brooklyn installs treat waterproofing as “cheap insurance”—use a proper membrane in splash zones and seal edges/penetrations so water can’t creep into the subfloor.
What is the easiest bathroom flooring to install for DIYers
For most DIYers, click-lock vinyl plank (LVP) is the easiest because it’s designed to go down as a floating floor with simple locking joints. Sheet vinyl can also be DIY-friendly and works well in bathrooms, but the “easy part” depends on your patience with templates, seams, and tight cuts around fixtures. If you want the fastest cosmetic refresh, peel-and-stick vinyl tiles are quick to apply, but they may not be the best long-term choice for bathrooms that stay very wet. Tile can look amazing, but it’s usually harder for beginners because it demands stronger subfloor prep and includes mortar/grout cure time.
How long does it take to install a bathroom floor?
In many small bathrooms, click-lock vinyl can often be finished in a day (prep + install), while DIY may take a day or two if you’re learning as you go. Tile usually takes longer because you’re working in stages and waiting for curing; one common mortar datasheet recommends protecting the install for about 16–24 hours before foot traffic and grouting. Subfloor repairs, leveling, waterproofing, and toilet removal/reset are the big “schedule stretchers,” so plan extra time if any of those are on your list.
Is it better to DIY or hire a professional for a bathroom floor installation?
DIY is a good fit when your bathroom is small, your subfloor is solid and flat, and you’re installing something forgiving like click-lock vinyl or a simple tile pattern.
Hiring a pro is usually smarter when you see water damage, dips in the floor, tricky cuts around plumbing, or when NYC building rules/permits/insurance paperwork could slow you down. If you want it handled end-to-end, SR General Construction, NYC is fully licensed and has over 15 years’ experience in renovation and remodeling work in Brooklyn, with 750+ completed projects for 500+ satisfied clients, plus 24/7 support to help keep your home safe.
How much does it cost on average to install a new bathroom floor in Brooklyn?
Bathroom flooring cost in Brooklyn depends heavily on the material, how much prep the subfloor needs, and whether you’re paying for demo and disposal.
As a rough installed range, vinyl often lands around $9–$14 per sq ft in common cost calculators, though broader pricing sources show it can vary widely by product and labor conditions. For tile, a common estimate range is about $16–$20 per sq ft installed, and it can climb with premium tile, patterns, waterproofing systems, or heavy leveling.
For a typical Brooklyn bathroom (about 40–80 sq ft), that’s often roughly $400–$1,100 for vinyl or $650–$1,600 for tile before any major repairs, shower rebuild work, or permit-related costs.
Where to Find the Best Brooklyn Contractors
Are you looking for an expert contractor in Brooklyn, NYC? SR General Construction has you covered! Our business is located at 8807 Avenue B, Brooklyn, NY 11236, United States, in the Canarsie area.
Additionally, we offer services at Rockaway Parkway and Ralph Avenue, providing fast access to Flatlands, East Flatbush, Bergen Beach, Brownsville, and the Spring Creek section of East New York.
FAQ
1. Can I install vinyl plank flooring in a bathroom with a toilet and vanity?
Yes, but treat it like a floating system: install permanent cabinets/vanity first, then run the floor around them so the planks can move. Leave the required expansion space and use the correct sealant detail at the edges where your manufacturer requires it.
2. Do vinyl planks really need an expansion gap in a bathroom?
Yes, manufacturers commonly call for an expansion gap around the perimeter so the floor can expand and contract. A common example is about 1/4 inch at walls and fixed objects, but follow the exact guide for your product.
3. Should a toilet flange sit on top of the finished floor?
Yes, best practice is to have the flange sit on top of (or even with) the finished floor so the seal works correctly. When the flange is too low or too high, you raise the risk of leaks or a rocking toilet.
4. Do I need a new wax ring when reinstalling a toilet?
Yes, wax rings are single-use, so once you compress one, you should replace it. Swapping the bolts at the same time also helps you avoid rusted hardware headaches later.
5. How long should I wait before walking on tile or grouting it?
A common rule is 24–48 hours before grouting or heavy foot traffic on standard thinset, but your product label is the real boss here. If you rush this step, you can weaken the bond and lock moisture where you don’t want it.