What if your overlooked Brooklyn basement could become your favorite place to relax, work, or entertain? A well-planned basement renovation adds comfort, style, and real value to your home. With smart design, that dark, unused area can turn into a cozy lounge, a stylish office, or even a valuable guest suite.
In this detailed guide, you’ll learn how to plan a basement renovation design that works for Brooklyn homes. We’ll cover smart layout ideas, cost-saving tips, and the most important NYC building rules you need to know. You’ll also discover how insulation, lighting, and local permits play a role in a successful remodel. By the end, you’ll feel confident about turning your basement into a bright, functional space that fits your lifestyle and adds lasting value.
Why Basement Renovation Is Beneficial in Brooklyn, NYC
In a city where space is tight and every square foot is valuable, basement renovation is a practical solution for Brooklyn homeowners. It creates livable space without expanding your home’s footprint. Finishing your basement can increase your home’s value, potential rental income, or provide your family with extra room. Many Brooklyn homes; especially townhouses and brownstones; have untapped basements that, with good design, can become some of your home’s most functional spaces.
Overview of Basement Renovation Design
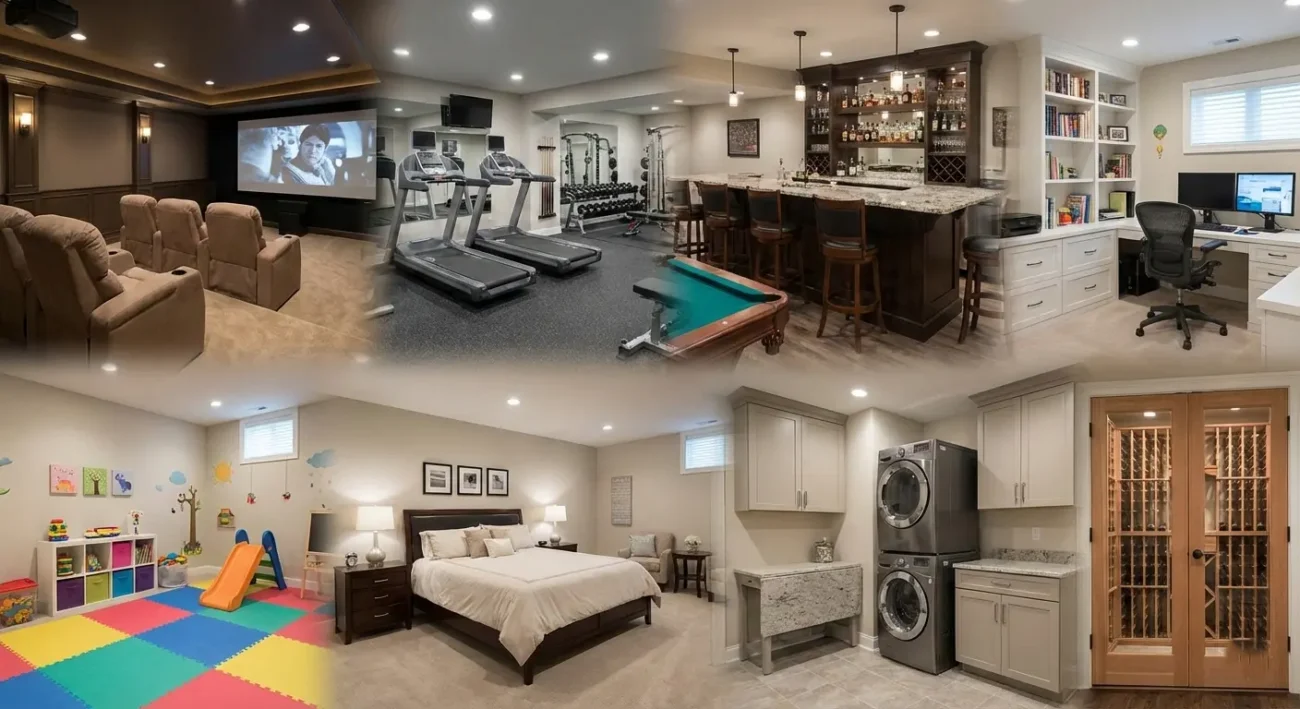
| 1. Create a Cozy Family Room |
| 2. Design a Home Office |
| 3. Build a Guest Suite |
| 4. Create a Home Gym |
| 5. Install a Home Theater |
| 6. Design a Playroom for Kids |
| 7. Create a Wine Cellar or Bar |
| 8. Incorporate a Multifunctional Space |
| 9. Creating Sports Bar |
| 10. Creating Home Office |
Create a Cozy Family Room
Transforming an unused space into a cozy family room provides everyone with a place to relax and connect. The key is to focus on comfort and personal touches that make the space warm and inviting.
- Comfortable Seating (Cost Range: $500–$2,000): Cozy seating is the heart of a family room, with options from plush sofas to spacious sectionals. Depending on the size and quality, you might spend a few hundred to a couple of thousand dollars on a good couch or a set of chairs. Choose durable, soft fabrics and add throw pillows to create a spot where everyone wants to snuggle up together.
- Layered Lighting (Cost Range: $100–$500): Good lighting sets a relaxing mood in a family room. Combine floor lamps, table lamps, and dimmable overhead lights to adjust the brightness for movie nights or reading. Spending a couple of hundred dollars on warm-toned bulbs and fixtures can make the room feel cozy and welcoming.
- Entertainment Hub (Cost Range: $300–$1,500): A family room often doubles as an entertainment space with a TV or gaming setup. You can mount a big-screen TV or set up a streaming device without breaking the bank. High-end systems can cost up to a couple of thousand dollars, but even an affordable setup with organized cables and a media console will keep the room fun and clutter-free.
- Soft Textiles and Decor (Cost Range: $100–$500): Adding a plush rug, curtains, and numerous throw blankets makes the room feel warm and inviting. These soft elements don’t have to be expensive. You can find comfortable rugs or pillows at affordable prices, often starting around $100, and use family photos or artwork to add character without incurring much cost.
- Storage and Organization (Cost Range: $150–$600): To keep the family room tidy, consider adding shelves or cabinets for storing games, books, and electronics. You might invest a few hundred dollars in a nice entertainment center or built-in shelving, depending on your needs.
Design a Home Office
A well-designed home office can boost your productivity and comfort when working from home. It’s essential to create a workspace that is both functional and tailored to your specific needs, allowing you to stay focused throughout the day.
- Ergonomic Furniture (Cost Range: $200–$1,000): Expect a quality office chair to cost $200–$600, with desks ranging from $100–$400. Total outlay depends on chosen brands and features like adjustability or solid wood.
- Adequate Lighting (Cost Range: $50–$200): Proper lighting reduces eye strain and keeps you alert. A bright desk lamp or a few LED bulbs for the room can cost under $200. Setting up your desk near a window to take advantage of natural light is also a great, free way to boost your mood and energy during the workday.
- Technology Setup (Cost Range: $300–$1,500): Equip your home office with the necessary technology for seamless work. This might include a high-resolution monitor, a faster computer, or better Wi-Fi equipment, which can range from a few hundred to over a thousand dollars, depending on your requirements. Reliable technology ensures you can work efficiently without frustrating interruptions.
- Storage and Organization (Cost Range: $100–$300): A clutter-free workspace facilitates concentration. Consider adding shelves ($30–$100), a filing cabinet ($50–$150), or desk organizers ($20–$50) to keep your papers and supplies in order. Most options fall within the $100–$300 range, allowing you to organize affordably and efficiently.
- Personal Touches and Separation (Cost Range: $50–$250): Enhance your office with personal touches, such as plants or artwork, to create a more inviting space. These items don’t have to be expensive – even a small potted plant or a framed photo can brighten your mood without breaking the budget. If your office is part of another room, consider using a room divider or noise-canceling headphones (which can cost a couple of hundred dollars) to create a sense of separation between work and home life.
Build a Guest Suite
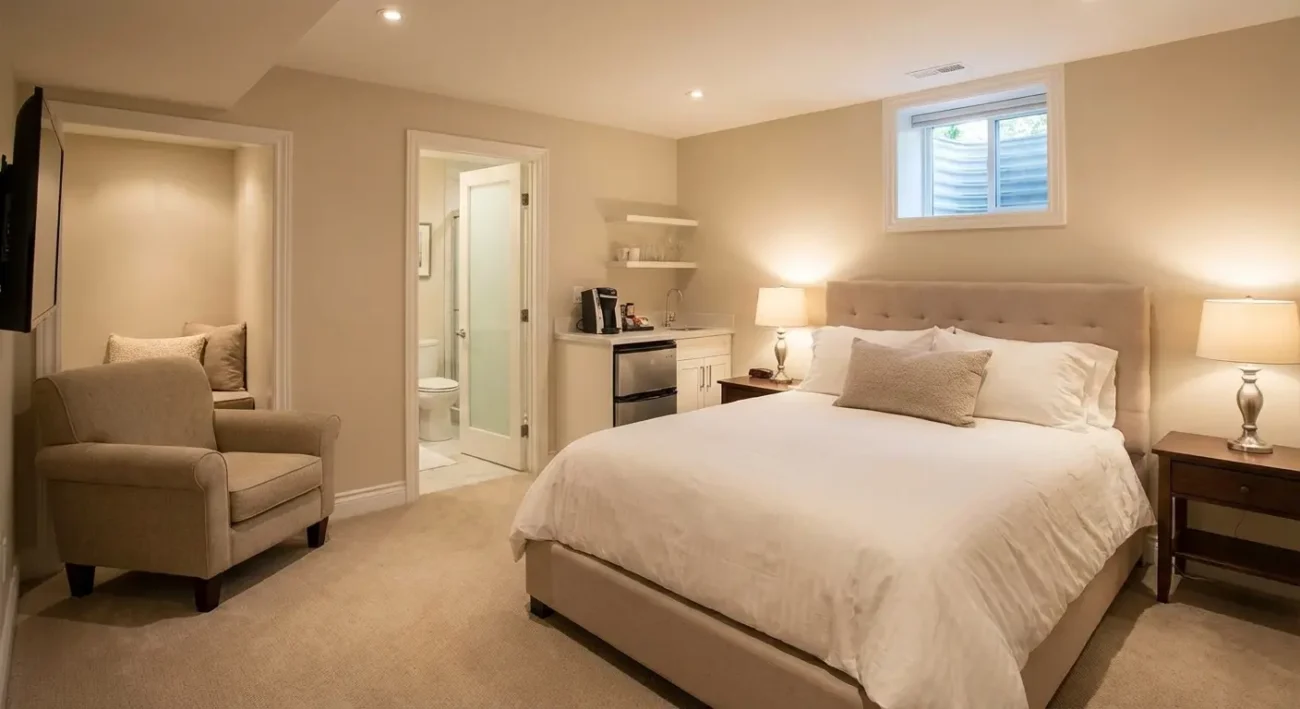
Creating a guest suite in your home gives visitors a comfortable and private place to stay. With a well-planned guest area, friends and family will feel like they have their own retreat when they visit.
- Comfortable Bed and Linens (Cost Range: $500–$1,500): Budget $500–$1,000 for a queen mattress and bed frame, with quality linens and pillows adding $50–$500. Splurging on extra plush bedding raises the total.
- Private Bathroom or En-suite (Cost Range: $3,000–$10,000): Having a dedicated bathroom for your guest suite is a significant advantage. Building a new bathroom from scratch can cost several thousand dollars due to the expenses of plumbing and fixtures, so it’s something to budget for if you plan to add one. If an en-suite isn’t possible, at least make sure guests have easy access to a clean, well-stocked bathroom nearby with plenty of towels and toiletries.
- Storage and Closet Space (Cost Range: $200–$800): Provide your guests with a place to unpack by incorporating storage furniture. You can add a dresser or clear out a section of the closet, and even a simple folding luggage rack gives visitors a spot for their suitcase. An affordable dresser or wardrobe might only cost a few hundred dollars, and it makes it easy for guests to settle in while keeping the room tidy.
- Privacy and Comfort Features (Cost Range: $100–$1,000): Little touches can add privacy and a luxurious feel to your guest suite. Consider installing a door lock or even creating a separate entrance if possible – adding a new exterior door could cost up to a thousand dollars, but it offers guests extra independence.
- Extra Amenities (Cost Range: $100–$500): Consider hotel-like extras that make a stay truly special. You can add a small coffee maker, a mini-fridge stocked with drinks and snacks, or even a TV with streaming access for a few hundred dollars or less. These thoughtful touches let guests relax and enjoy their stay without needing to ask for every little thing.
Create a Home Gym
A home gym makes it easier to stay fit without leaving the house. With a dedicated workout area, you can exercise on your own schedule and tailor the setup to fit your fitness goals.
- Basic Equipment Setup (Cost Range: $300–$3,000): Start with the exercise equipment you’ll use most often. This could be as simple as a set of dumbbells and a yoga mat for a few hundred dollars, or as advanced as a treadmill or weight machine costing a couple of thousand. Choose equipment that fits your goals and space so you get the most out of your home gym without overspending.
- Protective Flooring (Cost Range: $100–$500): Protect your floors (and your joints) by installing proper gym flooring. Interlocking rubber mats or foam tiles are relatively affordable – often, a few hundred dollars will cover a small room. Good flooring prevents damage to your home and provides cushioning for exercises, which makes workouts safer and more comfortable.
- Mirrors for Form (Cost Range: $100–$300): Mounting a large mirror on your wall typically costs between $100 and $300, depending on size and quality. Large mirrors are widely available at hardware and home goods stores. Installing one helps you check your exercise form, stay motivated, and make your space feel like a real gym while letting you track your progress.
- Ventilation and Climate Control (Cost Range: $50–$500): A comfortable temperature and fresh air will keep you coming back to exercise. If your gym area gets stuffy or hot, consider a fan or a portable AC unit – basic models might be around $50, while more powerful units could be a few hundred. Good ventilation prevents the space from feeling damp or smelling like a locker room after intense sessions.
- Music and Entertainment (Cost Range: $50–$300): Music or a bit of entertainment can make workouts more enjoyable. A simple Bluetooth speaker for music might cost around $50, and more elaborate sound systems or a small TV for workout videos could run a few hundred dollars. Having your favorite tunes or a fitness video playing can keep you motivated and make exercise time fly by.
Install a Home Theater
A home theater lets you enjoy a cinematic experience without leaving your house. With the right setup, you can watch your favorite movies or the big game in a comfortable, immersive space.
- Big Screen Display (Cost Range: $500–$2,500): The screen is the centerpiece of a home theater. You can choose between a large flat-screen TV or a projector system – good options start around a few hundred dollars and increase in price for top-of-the-line models. A 75-inch TV or a quality projector paired with a proper screen will bring movies to life, making you feel like you’re at the cinema.
- Surround Sound System (Cost Range: $300–$1,500): Great audio is what makes a movie night truly immersive. A basic soundbar with a subwoofer might be a few hundred dollars, while a full surround-sound speaker setup with a receiver can run into the low thousands. Even an entry-level surround system will significantly enhance dialogue clarity and provide you with those booming sound effects that make action scenes even more exciting.
- Comfortable Seating (Cost Range: $500–$2,000): Plush, cozy seating ensures you can enjoy long films or binge-watch shows without discomfort. You could use a comfortable couch or invest in specialized recliner chairs. A nice sofa might cost several hundred dollars, and dedicated theater recliners can be even more expensive individually.
- Lighting and Soundproofing (Cost Range: $200–$800): Controlling the environment elevates the home theater experience. Blackout curtains or dimmable smart lights allow you to darken the room like a real theater, and you can install them for a few hundred dollars.
- Fun Decor and Extras (Cost Range: $100–$500): Add personal touches to make the theater space fun and unique. For a few hundred dollars or less, you can include fun extras like movie posters, a popcorn machine, or even a mini candy station.
Design a Playroom for Kids
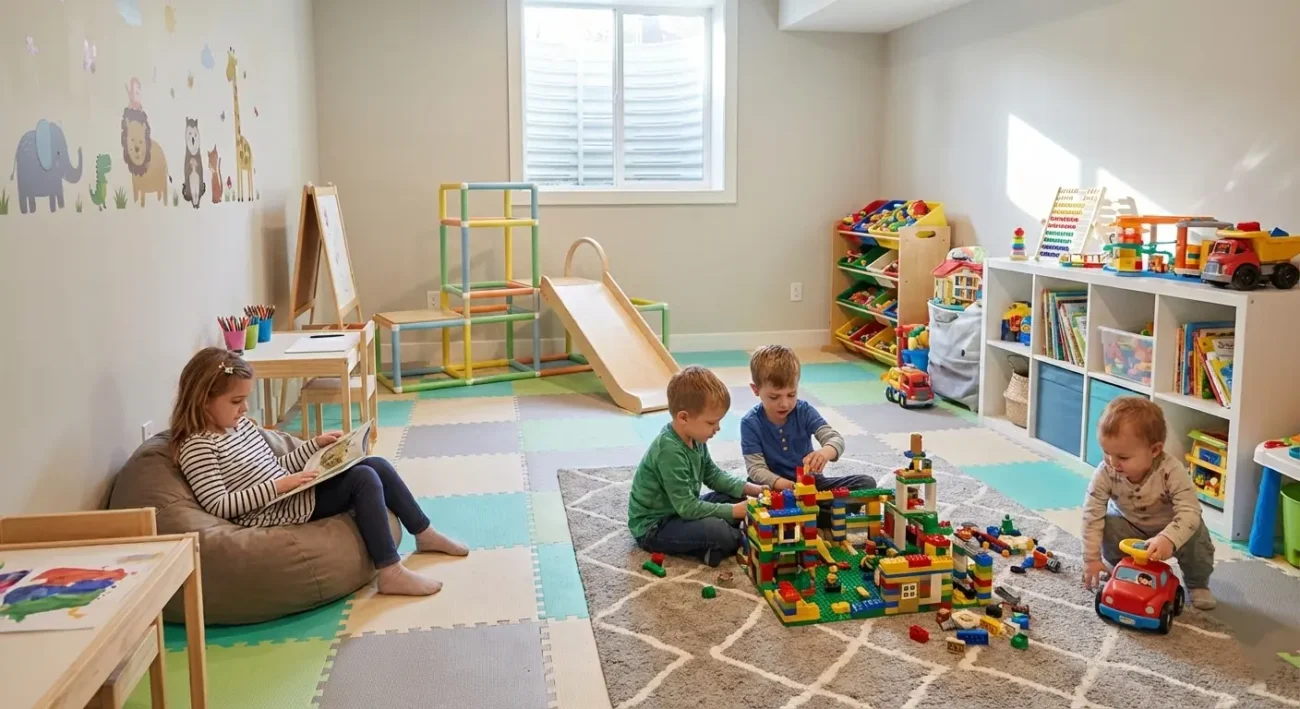
A dedicated playroom provides kids with a fun space to explore, create, and play freely. By designing a space just for them, you can keep the mess of toys in one area and provide an environment that is safe and inspiring.
- Soft and Safe Flooring (Cost Range: $100–$400): Kids often play on the floor, so make it comfy and safe. Foam play mats or a soft carpet can cushion their falls and tumbles, and you can cover a play area for a couple of hundred dollars.
- Organized Toy Storage (Cost Range: $50–$200): Keeping toys tidy is easier with smart storage solutions like low shelves with bins or a sturdy toy chest. You can find these for under a hundred dollars, and this setup makes it simple for kids to grab what they want and learn to put things back where they belong.
- Creative and Learning Zones (Cost Range: $50–$150): Set up different areas in the playroom to spark creativity and learning. For example, you could have a small table for arts and crafts, a reading nook with comfy cushions, or a dress-up corner. These setups don’t cost much – you can use items you have or find budget-friendly pieces, and even add a chalkboard or whiteboard wall for drawing and writing, which is both fun and educational.
- Durable Decor and Furniture (Cost Range: $100–$300): Select decor and kid-sized furniture that can withstand a lot of play. Look for washable wall decals, easy-to-clean paint, and sturdy chairs or bean bags; you can outfit a playroom with these for a few hundred dollars. Durable choices mean the room will still look great after plenty of play sessions, and you won’t worry about things breaking too easily.
Create a Wine Cellar or Bar
Wine lovers and frequent hosts often dream of having a special space for their beverages. With a bit of planning, you can design a stylish wine nook or home bar to store your favorite bottles and entertain friends in a cozy atmosphere.
- Proper Wine Storage (Cost Range: $300–$1,500): If you’re serious about wine, proper storage is a must. A small wine fridge for a dozen or so bottles might cost a few hundred dollars, whereas a larger, temperature-controlled cabinet or a full cellar setup could exceed a thousand dollars. Keeping wines at the right temperature and humidity ensures they taste their best when you open them.
- Bar Counter and Shelving (Cost Range: $200–$800): For a home bar, you’ll want a place to prepare and serve drinks. You could install a simple bar counter or repurpose a piece of furniture; there are bar carts and cabinets available for only a few hundred dollars. Add some shelves or a cabinet to display bottles and store glassware, so everything you need is organized and within reach.
- Lighting and Ambiance (Cost Range: $100–$500): The right mood makes your wine cellar or bar inviting. You can install accent lighting, such as LED strips under shelves or a hanging pendant light over the bar, for a couple of hundred dollars to create a warm, inviting glow. Include some cozy touches, such as stools, a tasting table, or themed wall art – these elements pull the space together and make it a place you’ll love to spend time in with guests.
Incorporate a Multifunctional Space
When you’re short on rooms, a multifunctional space lets one area of your home serve more than one purpose. By combining uses – like a guest room that also functions as a home office – you can make the most of every square foot without feeling crowded.
- Convertible Furniture (Cost Range: $300–$1,500): The key to a multi-use room is furniture that can do double duty. Think of a sofa that opens into a bed or a fold-down desk; a quality sofa-bed might cost a few hundred up to a thousand dollars, but it lets your office become a comfy guest room at a moment’s notice.
- Room Dividers or Zoning (Cost Range: $50–$300): Create distinct areas within the space so each function feels separate. You can use a folding screen, a curtain, or even a bookshelf as a divider – many of these options are budget-friendly, often well under a few hundred dollars. Defining zones (like a study area versus a sleep area) helps you switch modes easily and keeps the room from feeling chaotic.
- Smart Storage Solutions (Cost Range: $100–$400): Keeping the room organized is crucial when it serves multiple purposes. Invest in storage options that conceal clutter: a storage ottoman for extra bedding, a desk with drawers for work supplies, or closet organizers for clothes and files. These solutions might run a couple of hundred dollars, but they ensure that everything has a place to go when you need to transform the room from one use to another.
- Adaptable Decor (Cost Range: $50–$200): Stick to a versatile decor scheme that accommodates all the room’s functions. Choose neutral colors and simple, cozy furnishings that can fit a home office vibe by day and a relaxing guest retreat by night. You may spend a bit on repainting or adjustable lighting, but an adaptable style means you won’t have to redecorate every time you change the room’s function.
Creating a Sports Bar
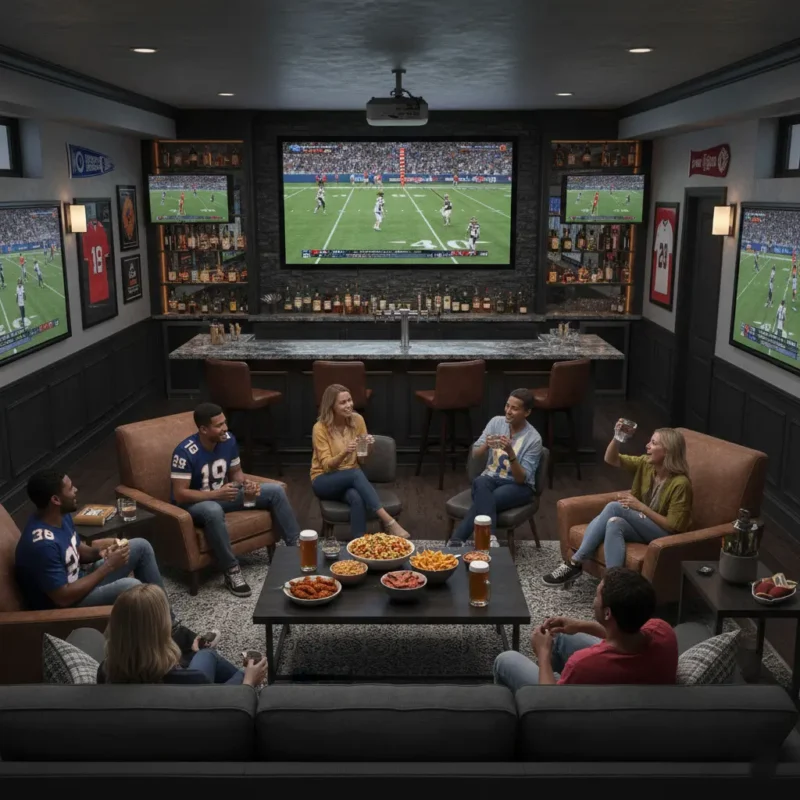
A basement sports bar gives your home a fun hangout for game nights. You get a chill spot for friends, snacks, and big-screen action without crowding your living room.
- Bar Counter and Back Bar: Select a sturdy counter with easy-to-clean surfaces and sufficient depth for preparation. Add shelves for bottles and glassware to keep everything organized. A small sink is helpful for quick rinses between drinks.
- TV Wall and Sound: Mount a large TV at eye level and pair it with a compact sound system for clear commentary. Place screens so guests see the game from every seat, not just one corner. Hide cables in a wall channel to keep the room clean and safe.
- Mini-Fridge and Ice Station: A beverage fridge keeps drinks cold and within reach. An ice bin or countertop ice maker speeds up service during halftime rushes. Store bar tools in a drawer so the setup stays quick before guests arrive.
- Lighting and Mood: Use dimmable overhead fixtures for general light and add warm task light over the counter. LED strips under shelves enhance the ambiance and showcase your collection. Darker paint behind the TV improves screen contrast for daytime games.
- Cost Range (Brooklyn): A simple dry bar with decor typically costs between $8,000 and $18,000. A wet bar with plumbing, tile, and premium appliances can cost between $20,000 and $35,000. The final price depends on the scope, finishes, and any necessary electrical or plumbing upgrades.
Creating a Home Office
A focused workspace turns an unused corner into a productivity hub. With the right layout, you work smarter and keep work separate from home life.
- Ergonomic Desk and Chair: Choose a desk with the correct height to keep your wrists and shoulders relaxed. A chair with lumbar support reduces fatigue during long sessions. Add a footrest if your feet do not rest flat on the floor.
- Task and Ambient Light: Place your desk near natural light to boost energy and focus. Add a bright task lamp for typing or reading at night. Use warm ambient light so the room avoids glare on screens.
- Acoustic Comfort: Quiet walls help you focus during calls and deep work. Add a rug and fabric panels to cut the echo in long, narrow rooms. A solid-core door improves privacy when meetings begin.
- Smart Storage: Use a mix of drawers, shelves, and a file cabinet so clutter stays out of sight. Label bins for cables and accessories you use often. Keep a charging station ready so devices stay topped up.
- Cost Range (Brooklyn): A light refresh with furniture and lighting typically falls within the $4,000–$12,000 range. A fuller build-out with new outlets, millwork, and minor framing can reach $12,000–$25,000. Custom cabinetry and glass partitions drive up costs.
Top Tips for Basement Renovation in Brooklyn
A smart plan saves time and money before the first tool hits the wall. These tips keep you safe, code-aware, and on budget.
- Confirm Basement vs Cellar: A basement sits at least half above curb level, while a cellar sits more than half below. The difference affects habitability and rental options in NYC. Check HPD guidance first so you set the right plan from day one.
- Check Your Certificate of Occupancy: Review the current restrictions on the building and determine what changes would be required. A new apartment or a change in use often needs an updated Certificate of Occupancy. Start with DOB records so that filings align with your goal.
- Plan for Egress and Ceiling Height Early: Bedrooms need proper emergency escape openings and enough clear height. Window wells, hardware, and layout affect compliance and comfort. Design the code at the conceptual stage to avoid redesigns later.
- Budget for Energy-Code Tasks: NYC requires energy compliance on alterations. Expect TR8 inspections and an EN2 as-built energy sign-off at closeout. Coordinate these items with your architect and contractor from the start.
- Hire Licensed Pros: Use a registered design professional for plans and filings, and a licensed contractor for the work. They guide you through approvals, inspections, and sign-offs. This step protects your investment and reduces the risk of violations.
Eligibility & Legal Pathways (CoO, Zoning, & The Pilot Program Status)
Brooklyn homes vary by building type, lot rules, and prior use. The legal path depends on what exists now and what you want to build.
- Know Your Starting Point: Pull the current Certificate of Occupancy and confirm legal use. Compare that with your target plan so you see if an ALT-1 filing or a use change applies. Your team can then map the cleanest route to sign off.
- Understand Basement vs. Cellar Limits: Basements may qualify for habitable use when other rules are met, whereas cellars have stricter limits. Some one- and two-family scenarios do not allow rental of cellars. Read HPD guidance before you invest in finishes.
- Follow DOB Filing Path: Many conversions require Alteration permits and separate electrical or plumbing permits. Plans undergo DOB review, followed by field inspections that confirm compliance. Keep documents and TR forms aligned through any post-approval amendments.
- Check the East New York Pilot: The Basement Apartment Conversion Pilot Program explored the legal conversion of basements and cellars in a defined area. Cypress Hills LDC served as technical support during that effort. Use HPD updates to understand its status and any lessons for future policy.
Minimum Ceiling Heights (What NYC Code Really Requires)
NYC’s 2022 Building Code sets clear rules for headroom. Habitable rooms need at least 8 feet of ceiling height. Occupiable spaces and corridors require a minimum of 7 feet 6 inches. Bathrooms, kitchens, storage areas, and laundry rooms can typically reach 7 feet in height in many cases. Measure from the finished floor to the finished ceiling and plan beam drops so that they do not reduce the required height in key areas. These rules influence layout choices, furniture placement, and whether a room can be considered habitable space.
Egress & Windows: Bedrooms, Window Wells, and Fire Code
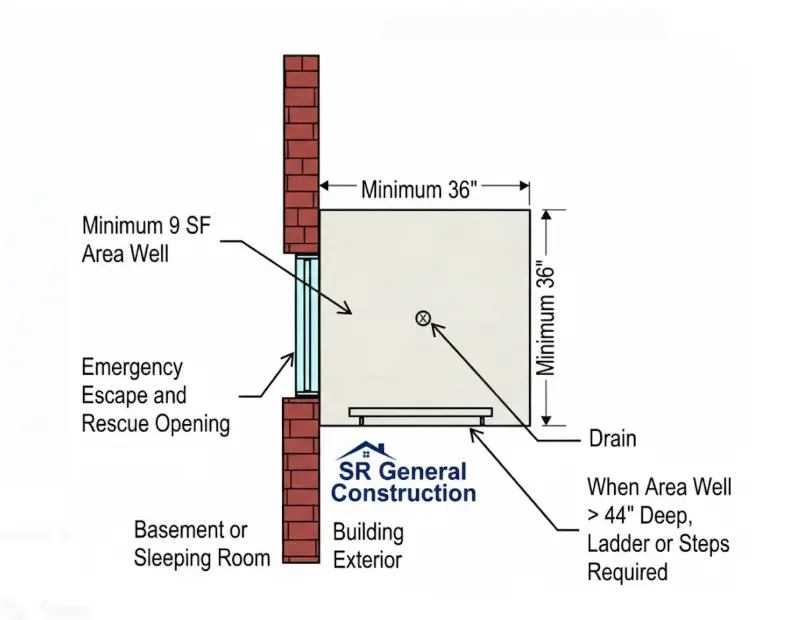
Bedrooms in basements require emergency escape and rescue openings that open from the inside without the need for keys or tools. A compliant egress window or door gives a direct path to the outside, not just to another room. Window wells must allow a full opening with enough clear space for a person to pass through.
Bars or grilles can appear on openings only when they still meet the minimum clear-opening size and release from the inside. Plan egress early, as wall thickness, well dimensions, and hardware choices significantly impact compliance and cost. NYC Fire Code ties these openings back to Building Code requirements for Group R occupancies.
Energy Code Compliance (NYCECC) + TR8/EN2 Inspections
Basement renovations in NYC must comply with the NYCECC standards for insulation, air sealing, lighting, and equipment. Projects require TR8 energy progress inspections during construction and an EN2 as-built energy certification at closeout. Your design professional prepares the energy analysis, and the progress inspector verifies that the built work matches the last-approved analysis. Planning for these steps helps avoid delays at sign-off.
Warmth Matters: Why Insulation Is Crucial in Basement Renovations
Below-grade walls touch cool soil, so uninsulated basements feel damp and chilly. Proper insulation reduces heat loss and cuts energy bills while it improves comfort year-round. Pair insulation with air sealing at rim joists and around penetrations to prevent drafts from undercutting your gains. Select moisture-tolerant materials for walls and floors to prevent damage from minor leaks or seasonal humidity fluctuations. Design your project to meet the NYCECC standards, ensuring it passes inspections and performs well after move-in.
Case Study of Kitchen Renovation
- Client: Abigel
- Location: Park Slope, Brooklyn, NYC
- Design: “Light + Storage” makeover—convert a cramped galley into an L-shape with a 7-ft peninsula, full-height pantry wall, shaker fronts, quartz counters, under-cabinet LED, and concealed microwave drawer. We re-planned the work triangle, added task lighting, and upgraded ventilation to a quiet, code-compliant ducted exhaust system.
- Cost Range: $55,000–$85,000 in Park Slope for this specification and footprint; premium appliance packages or structural tweaks can push the cost higher.
- Time: 9–10 weeks from demo to punch list, including permits, inspections, and lead times.
- Outcome: 34% more usable storage, better sightlines to the dining area, faster meal prep, and a brighter space that fits the brownstone character—delivered by SR General Construction with zero change orders.
Where to Find the Best Brooklyn Contractors
Are you looking for an expert contractor in Brooklyn, NYC? SR General Construction has you covered! Our business is located at 8807 Avenue B, Brooklyn, NY 11236, United States, in the Canarsie area.
Additionally, we offer services at Rockaway Parkway and Ralph Avenue, providing fast access to Flatlands, East Flatbush, Bergen Beach, Brownsville, and the Spring Creek section of East New York.
FAQ
1. Is my space a “basement” or a “cellar” in NYC?
NYC treats them differently: a basement has at least half its height above curb level; a cellar has more than half below curb level. That difference controls if people can legally live there.
2. What is the minimum ceiling height?
The current NYC Building Code requires an 8 ft ceiling height in habitable rooms; occupiable spaces and corridors need a minimum height of 7 ft 6 in. Pilot-program basement apartments reference 7 ft 6 in clear height for habitable rooms. Always verify your project’s code path.
3. How big does that egress opening have to be?
NYC’s 2022 code sets the minimum net clear opening at 6.0 sq ft (or 5.0 sq ft at grade-floor), along with width, height, and sill limits. If the sill sits below grade, you’ll need a code-sized window well.
4. What are the rules for window wells?
Where the egress sill is below grade, provide a window well with at least 9 sq ft of horizontal area and a minimum dimension of 36 in. Ladders or steps are required when the depth exceeds the limits. Design the window so that it can open fully.
5. Do I need a permit to finish or remodel my basement?
Yes, for most scopes. Alterations that change use/egress/occupancy are ALT-1 (new or amended Certificate of Occupancy); interior renovations without those changes are often ALT-2. Your design professional will choose the correct filing.