Do you ever wonder what makes your brownstone roof stand out in Brooklyn? It’s not just the old-world charm. It’s the roof tile. Whether it’s clay, slate, or something else, the right roof tile can completely change how your brownstone looks and performs. But picking the right one? That’s a little trickier.
In this guide, we’ll cover the essentials about roof tiles for Brooklyn brownstones, exploring types, durability, curb appeal, costs, installation, and maintenance.
Now that you understand the importance of choosing the right roof tiles, let’s dive into the details together.
What Are Roof Tiles?
Think of roof tiles as the protective skin of your brownstone. They’re individual units designed to shed water and protect your home from the elements. Made from various materials, roof tiles are stacked in overlapping rows to form a durable, weather-resistant barrier. They’re not just functional; they also add to the stylish charm of your brownstone, contributing to its overall character and appeal.
Which Materials Are Used in Roof Tiles?
When choosing roof tiles for your brownstone, it’s important to understand the available materials. Here’s a breakdown of the most common ones:
- Clay Tiles: Made from natural clay and fired at high temperatures, clay tiles are valued for their durability and classic look. They come in various shapes and colors and add a timeless appeal to brownstones. Clay tiles are fire-resistant and can last over 100 years with proper care.
- Slate Tiles: Natural slate, a metamorphic rock that splits into thin layers, is ideal for roofing. Slate tiles are extremely durable, often lasting over a century, and offer a sophisticated, natural appearance. Installation requires professionals due to their weight and fragility.
- Concrete Tiles: Made from a mixture of sand, cement, and water, concrete tiles are a cost-effective alternative to clay and slate. These tiles can be manufactured to look like other materials and are durable, though they are heavier and may require extra support for your roof. In this context, ‘structural support’ means reinforcing the underlying roof frame to handle the added weight.
- Metal Tiles: Metal roofing tiles, often made of steel or aluminum, are lightweight and resistant to extreme weather. They can be molded to resemble traditional tile shapes and are energy-efficient due to their reflective properties.
- Wood Shingles/Shakes: Made from cedar or other woods, these tiles offer a natural, rustic look. They require regular maintenance to prevent moss and algae growth and are less durable than other materials, but can add unique character to your brownstone.
Understanding Brownstone Architecture and Roofing Needs
Brownstones are iconic in Brooklyn, known for their rich history and distinctive architectural features. These buildings often have steeply pitched roofs, dormer windows, and intricate cornices, all of which contribute to their charm. However, these features also pose unique challenges for roofing.
The age of many brownstones means their roofs may have experienced wear and tear, requiring materials that can withstand Brooklyn’s diverse climate. Additionally, any roofing work must comply with the city’s historic preservation guidelines, ensuring that the building’s character is maintained while upgrading its functionality.
The Advantages of Roof Tiles
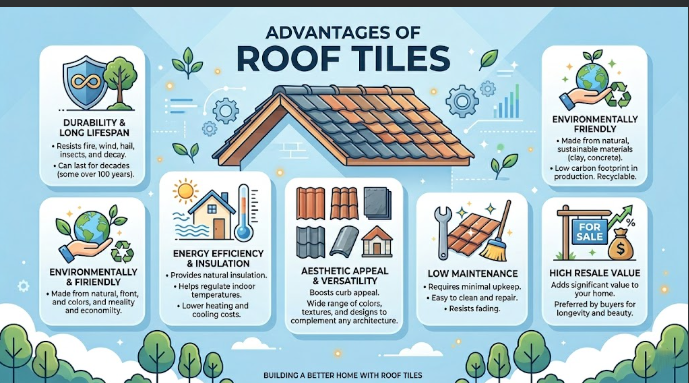
Roof tiles add significant value to your brownstone, especially here in Brooklyn, where architecture and climate both play a role. When you pick the right tile and install it properly, you’ll enjoy superior performance and style for years.
- Long Lifespan: Roof tiles can last several decades, some up to 50 years or more, so you’ll avoid frequent replacements. They hold up well in Brooklyn’s changing seasons and reduce the long-term hassle of re-roofs.
- Excellent Weather Resistance: Tiles are strong against rain, snow, and fluctuating temperatures, which means your home stays better protected. They cope with the freeze-thaw cycles that our region often sees.
- Fire- and Pest-resistant: Many tile materials are non-combustible and unattractive to pests, so your roof gets added safety and peace of mind. That’s especially valuable in tightly packed neighborhoods where fire risk matters.
- Aesthetic Appeal and Value: Roof tiles often look more premium than basic shingles, and they elevate the curb appeal of your brownstone. When potential buyers or visitors walk by, the right roof tile makes an impression.
- Energy Efficiency Potential: Some tile types reflect heat or provide added insulation, which means less energy is used for heating and cooling. You’ll notice the difference in both summer and winter.
- Low Routine Maintenance: While every roof needs care, tile roofs generally require less frequent maintenance than other roofing materials, giving you more time and less worry.
The Disadvantages of Roof Tiles
Of course, roof tiles aren’t perfect. There are drawbacks to consider, so you’re aware of what to expect. Understanding these avoids surprises down the line.
- Higher Up-Front Cost: Compared to some roofing materials, tiles cost more in both materials and installation. If you’re on a tight budget, this can stretch your investment right away.
- Heavier Load on Structure: Many tile types (especially slate and clay) add significant weight, so your brownstone’s roof frame might need reinforcement. That means extra work and cost before you even get to the tiles themselves.
- Complex Installation Requirements: Installing tile requires experienced professionals and proper underlayment and flashings. If the job isn’t done well, you risk leaks, cracks, or premature failure.
- Fragility Under Impact: While tile is durable in many ways, certain types (especially clay or slate) can crack if walked on improperly or struck by heavy debris, such as large tree branches. Repairing broken tiles can be tricky and costly.
- Limited Suitability for Low Slopes: If your roof has a shallow pitch, tile may not perform as well in shedding water. In those cases, you might have to consider alternatives or ensure special waterproofing.
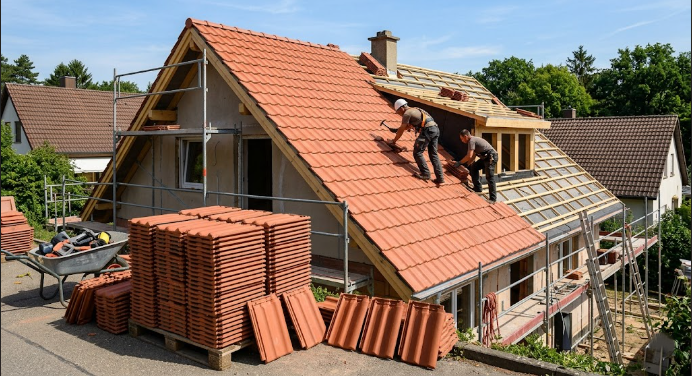
How to Install Roof Tiles
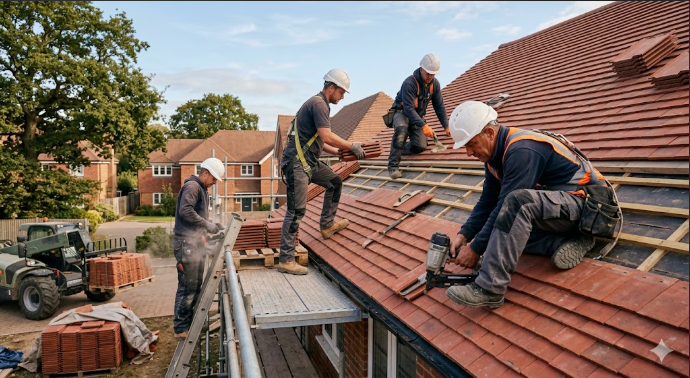
Okay, let’s walk through a clear, friendly step-by-step of how tile installation happens. I’ll walk you through the process so you know what your contractor should be doing and what you should expect.
- Step 1: Inspection and Preparation: First up, you check the existing structure and deck for integrity and suitability for tile. If your brownstone’s roof framing is weak or the deck is damaged, those issues get fixed before tile goes on.
- Step 2: Removal of Old Roofing and Repairs: Your contractor removes the old roofing material and addresses any underlying damage, such as rotten wood, poor flashing, etc., so the new tile has a clean, solid base.
- Step 3: Install Underlayment and Batten System: Next, you lay the waterproof underlayment (a protective sheet that prevents water from reaching the roof deck) and install any required battens (thin strips of material or tile support systems) so the tiles adhere and drain properly. It’s vital for long-term performance.
- Step 4: Set Flashing and Ridge Caps: Flashing, valleys, and ridge caps are installed to prevent water from seeping in at edges, chimneys, or roof intersections. This prevents leaks and protects your investment.
- Step 5: Lay the Roof Tiles: Now the tiles go on, aligned and secured according to manufacturer specs and local code. For your brownstone in Brooklyn, the installer carefully works around dormers, trim, and historic details.
- Step 6: Final Inspection and Cleanup: After the tile is set, your roofer checks for proper alignment, seals, clean drains, and waste removal. You and the contractor walk the project so you’re clear on what was done.
Cost of Roof Tile Installation in Brooklyn (per square foot)
Installing a tile roof in Brooklyn involves various factors, including material choice, labor, and structural considerations. Below is a detailed table showcasing approximate cost ranges for different roof tile types commonly used in the area:
| Roof Tile Type | Material Cost (per sq ft) | Labor Cost (per sq ft) | Total Cost (per sq ft) |
| Concrete Tile | $2 – $4 | $7 – $14 | $9 – $18 |
| Clay Tile | $3 – $7 | $8 – $18 | $11 – $25 |
| Slate Tile | $5 – $30 | $10 – $20 | $15 – $50 |
| Metal Tile | $5 – $10 | $5 – $15 | $10 – $25 |
| Composite Tile | $4 – $16 | $5 – $10 | $9 – $26 |
| Synthetic Barrel Tile | $8 – $16 | $10 – $20 | $18 – $36 |
| Solar Tile | $12 – $25 | $15 – $30 | $27 – $55 |
Roof Tiles for Brooklyn Brownstones: Aesthetic, Codes, and Best Practices
- Historic character: Clay and slate tiles have adorned brownstones for generations, so they reinforce the old-world aesthetic. A tile roof on a Victorian-style brownstone looks like it belongs there, as if it were “classic beauty, heirloom quality”.
- Rich color and texture: Brownstones often have reddish or beige stone. Selecting roof tiles in complementary warm hues (browns, terra-cotta, charcoal) ties the roof to the walls. Textured tiles – whether S-shaped “Spanish” tiles or rough-split slate – add visual interest and depth that a flat shingle might not provide.
- Curb appeal: Quality tile roofs often last many decades, aging gracefully. Over time, a natural slate roof can patina to soft grays or blacks, reinforcing the home’s stately look. All together, a well-chosen tile roof enhances a brownstone’s curb appeal and complements its historic vibe.
By matching the tile style, color, and material to the brownstone’s era, you turn the roof into a design asset. In short, tile roofs bring timeless elegance to Brooklyn’s classic rowhouses and brownstones.
Local Zoning Laws and Historic Preservation Guidelines for Roofing in Brooklyn
Brooklyn is full of landmarked neighborhoods (like Park Slope, Fort Greene, and Brooklyn Heights) where special roofing rules apply. If your brownstone is in a designated historic district or is itself landmarked, the NYC Landmarks Preservation Commission (LPC) will want to review most roof changes. Here are the key points to know:
- LPC Review for Historic Buildings: Any major change to a visible roof typically needs an LPC permit. Ordinary repairs (such as fixing a few broken tiles) generally do not require an LPC permit, but a complete reroofing usually does. The LPC rules say that on buildings six stories or shorter (typical brownstones), if the existing roof is original or historic and visible, you must replace it in-kind (with the same material). For example, a slate roof should be replaced with a slate roof. Only if the roof is above the sixth floor or hidden from the street can you switch to an indistinguishable substitute. Individual landmark buildings are even stricter: they almost always require original roofing materials.
- Building Permits and DOB Rules: Regardless of the landmark’s status, replacing your roof covering requires a Department of Buildings (DOB) permit. (DOB makes an exception for non-structural roof repairs – like changing a few shingles or tiles – which do not need a permit.) Always file the proper application with the DOB before tearing off an old roof. Also, check local building codes: for example, heavy clay or slate tiles require properly reinforced framing.
The Role of Flashing and Underlayment in Roof Tile Performance

A tile roof isn’t just tiles – it’s a complete waterproofing system. Two invisible but vital parts are the underlayment and flashing. They work together to keep water out:
- Underlayment: This is the layer of felt or synthetic membrane installed right on the roof deck before the tiles. Think of it as a waterproof backup: if water sneaks past a tile (say from wind-driven rain or ice dams), the underlayment acts as a “final backstop” to stop leaks. Proper installation is crucial – start at the bottom edge, overlap each layer as specified by the manufacturer, and seal all seams and penetrations. On low-slope tile roofs, you’ll often use two layers of heavy felt (or a single thick synthetic), especially between 2.5:12 and 4:12. In short, the underlayment catches any moisture the tiles miss and channels it off the roof.
- Flashing: These are metal pieces (lead-coated copper, aluminum, galvanized steel, etc.) installed wherever the roof meets another surface or at penetrations. Flashing’s job is to direct water around obstacles. For example, around a chimney or vent pipe, the roof tiles are cut away and a flashing boot or step-flash is installed to guide water past the gap. Proper flashing is installed under the row of tiles above a joint and over the tiles below, so water runs down over the flashing onto the lower tiles. Gravity does the work – a well-installed flashing has no seams open, so water simply flows along it and then onto the tile below.
- Working together: A tiled roof is really a “watershed” of components. Water flows down from tile to tile, then over flashings at transitions, and finally off the roof. The underlayment provides the bottom layer of protection. If any part of this system is installed incorrectly, leaks can follow. In fact, most leaking tile roofs are caused by faulty flashing or damaged underlayment. For example, if flashing around a vent is the wrong size or not properly inserted, water may get under the tiles and age the felt prematurely.
Bottom line: For a tile roof to perform well, use high-quality underlayment and install it correctly. Pay extra attention to flashings – they must be tight, continuous, and correctly lapped with the tiles. When done right, these hidden layers keep your brownstone’s roof watertight for years.
Choosing the Right Roof Tile Based on Slope and Pitch
Your roof’s pitch (slope) determines which tiles will work best. Tiles are not waterproof membranes, so they rely on gravity and design to shed water. Here are the rules of thumb:
- Minimum slope: Building codes require a minimum pitch of 2.5:12 (that is, 2.5 inches up for each 12 inches horizontal) for clay or concrete. Between 2.5:12 and 4:12, a double layer of underlayment is mandatory to prevent. Anything below 2.5:12 is not permitted for tile. In practice, even though the code allows tiles down to 2.5:12, experts say performance really drops off below about 4:12. On low slopes (say 2.5:12–3:12), wind-driven rain and ice can push water under the tiles, making leaks more likely.
- Steep slopes (above 8:12): These roofs drain exceptionally well. They’re ideal for slate shingles – in fact, the National Slate Association notes that 8:12 is a preferred minimum for slate, with slopes of 12:12–18:12 being ideal. On steep roofs, slate (and even clay barrel tiles) last longer because water runs off so quickly. Visually, the steep pitch also showcases the tile or slate texture.
- Moderate slopes (4:12–8:12): This is the sweet spot for most tile types. Flat interlocking concrete or clay tiles, as well as classic S-curve clay tiles, perform well here. At these slopes, a single underlayment is usually sufficient (unless local code or manufacturer says otherwise). Just be sure the tiles are suitable for your region’s weather.
- Flat roofs (<2.5:12): You generally cannot use tile here. By definition, a flat roof in NYC would use low-slope roofing (modified bitumen, EPDM, TPO, etc.). Tile roofs on true flat roofs will leak badly because there’s no pitch to shed water.
Environmental Impact and Sustainability of Roof Tiles
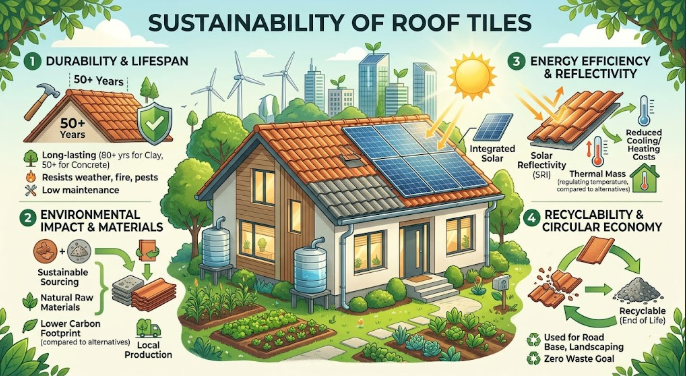
Choosing the right roof tile isn’t just about aesthetics or durability; it’s also about making an environmentally responsible decision. Here’s how roof tiles contribute to sustainability:
- Longevity and Reduced Waste: Roof tiles, especially clay and concrete, have lifespans exceeding 60 years, reducing the need for replacements and associated waste.
- Recyclability: Many roof tiles are recyclable at the end of their life cycle, minimizing landfill contributions.
- Energy Efficiency: Certain tiles, such as those with reflective coatings, can reduce urban heat-island effects, leading to lower energy consumption in buildings.
- Natural Materials: Clay and slate tiles are made from abundant natural resources and require minimal processing, reducing their environmental footprint.
- Low Emissions: Roof tile production typically emits fewer greenhouse gases than other roofing materials, contributing to a smaller carbon footprint.
Legal Considerations for Roof Tile Installation in Brooklyn
Installing roof tiles on your brownstone in Brooklyn involves more than just selecting the right material. It’s essential to navigate local zoning laws and historic preservation guidelines to ensure compliance:
- Zoning Regulations: Brooklyn’s zoning laws dictate how properties can be used and what modifications are permissible.
- Historic Districts: If your brownstone is located within a designated historic district, any exterior alterations, including roofing, must be approved by the New York City Landmarks Preservation Commission (LPC).
- Permits: Obtaining the necessary permits before commencing installation is crucial to avoid potential fines or the need to remove unapproved work.
- Professional Consultation: Engaging with a contractor familiar with local regulations can help navigate the complexities of the approval process and ensure all legal requirements are met.
Roof Tile Maintenance: Keep Your Roof in Top Condition
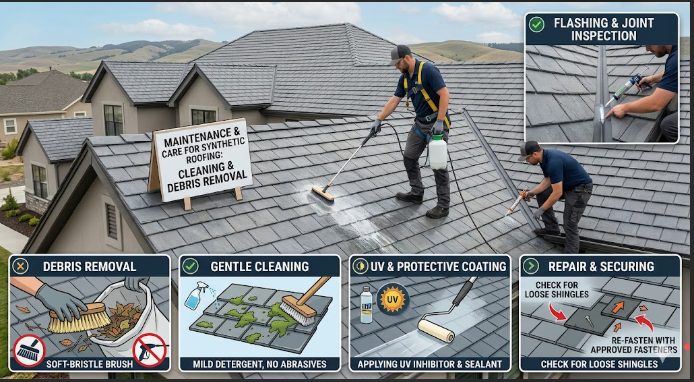
Maintaining your roof tiles is vital to prolonging their lifespan and ensuring your home remains protected. Here’s how you can care for your roof:
- Regular Inspections: Conduct thorough inspections at least twice a year, focusing on the autumn and spring seasons, to identify any potential issues early.
- Gutter Cleaning: Ensure gutters are free of debris to prevent water backup, which can cause tile damage and leaks.
- Moss and Algae Removal: Use appropriate cleaning solutions to remove moss and algae growth, which can degrade tile materials over time.
- Tile Replacement: Promptly replace any cracked or missing tiles to maintain the integrity of your roof.
- Sealant Application: Apply sealants to protect tiles from moisture penetration and extend their durability.
- Professional Maintenance: Consider scheduling professional maintenance services annually to address any issues that may not be visible during routine inspections
Where to Find the Best Brooklyn Roofing Contractors
Are you looking for an expert roofing contractor in Brooklyn, NYC? SR General Construction has you covered! Our business is located at 8807 Avenue B, Brooklyn, NY 11236, United States, in the Canarsie area.
We proudly serve all areas of Brooklyn with high-quality, durable roofing solutions. From new installations to repairs and maintenance, we provide the best service at affordable prices. Contact us and experience why we’re Brooklyn’s roofing experts!
FAQ
1. What is the average cost of installing a tile roof in Brooklyn?
The average cost to install a tile roof in Brooklyn ranges from $18.61 to $25.49 per square foot, depending on material and complexity.
2. How much does a tile roof cost per square foot in Brooklyn?
Tile roofing costs between $7 and $25 per square foot installed, depending on the material and installation complexity.
3. What are the most common types of roof tiles used in Brooklyn?
Common roof tile types in Brooklyn include clay, concrete, slate, and synthetic options. Each offers distinct aesthetics and durability suited to brownstone architecture.
4. What is the lifespan of a tile roof?
Tile roofs can last 40 to 100 years, depending on the material. Clay and slate tiles typically have longer lifespans than concrete tiles.
5. Can I install a tile roof on a low-pitched roof?
Tile roofs are generally not recommended for roofs with pitches lower than 2.5:12, as they may not shed water effectively, leading to potential leaks.
6. Are there zoning laws affecting tile roof installation in Brooklyn?
Yes, if your brownstone is in a designated historic district, any roofing alterations, including tile installation, must be approved by the NYC Landmarks Preservation Commission (LPC).