Have you ever looked up at your flat roof after a storm and thought, “Why does it always leak near the vents?
You’re not alone. Many brownstone and rowhouse owners across Brooklyn face roof vent problems that start small—a slow leak, a patch of damp plaster, or a stubborn draft and grow into major repairs if ignored. Flat and low-slope roofs in our city deal with harsh sun, freezing winters, and tight spacing between buildings, so vents work harder here than almost anywhere else in New York.
In this detailed guide, we’ll talk about what really goes wrong with roof vents in Brooklyn homes and how you can spot trouble before it costs you. Roof vent issues can be complex, but understanding the local context prepares you for smarter upkeep. We’ll cover the most common roof vent problems, from leaks and blockages to rust and poor airflow. You’ll learn how to tell when a vent is failing, what NYC building codes say about vent repairs, and how professionals fix these issues safely and effectively.
Why Roof Vent Problems Happen More Often in Brooklyn
Brooklyn homes sit in Climate Zone 4A, which swings from muggy summers to freezing winters; that swing drives moisture into and out of roof layers and stresses vents. These local conditions make understanding your roof system especially important before discussing individual vent issues. Dense rowhouse blocks and parapet walls block wind, so passive vents get less push than in open suburbs. Many brownstones use flat or low-slope roofs, where ponding water gathers around penetrations and exposes weak flashing. NYC’s code adds rules on how and where exhaust must terminate and how openings must be screened, so shortcuts backfire. Put those factors together, and roof vents here work harder and fail sooner if the detailing is weak.
Inadequate Ventilation
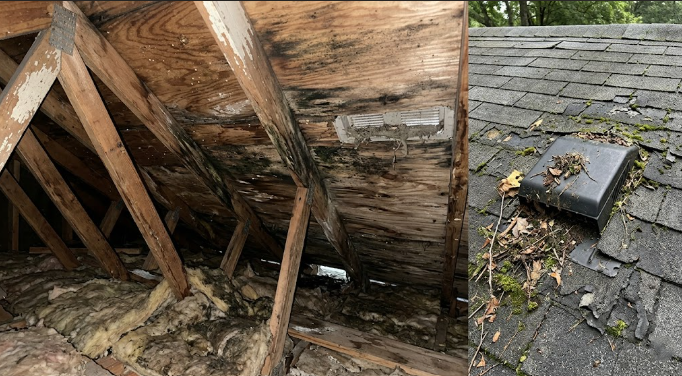
When intake is missing or exhaust is sparse, air sits still in the roof cavity. That still air allows heat and moisture to build up, which drives condensation in winter and hotspots in summer. Building-science guidance says you can use either a balanced vented design or a properly detailed unvented (compact) design, but the goal in both is moisture control at the sheathing.
Problems you’ll notice
- Hot top floor in summer; AC runs longer.
- Condensation on cold days; musty odor in ceilings.
- Membrane blisters around penetrations.
- Frost on sheathing in winter, then drip marks after thaw.
- Shorter roof life from trapped moisture and heat swings.
Solution
- Inspect the roof and roof cavity. First, confirm whether your assembly is vented or compact and note the membrane type.
- Add intake at edges or through parapets, then size the exhaust with multiple hoods or a continuous path.
- Air-seal the ceiling plane. Ensure indoor air does not leak up into the roof cavity.
- If the wind behind parapets is weak, only use a powered fan if you have a dedicated intake and controls in place.
- Before adding or moving vents, check the NYC code for required distances and for opening protection.
Repair cost range (Brooklyn context)
- Add or replace a passive roof vent: expect $300–$650 per vent, with higher costs in urban areas.
- Roof-mounted attic fans: average $500–$1,200 installed, depending on controls and access.
Blocked Vents
Leaves, lint, and bird nests choke openings, so airflow stops. In winter, snow can bury short hoods. NYC also requires screens or louvers on exhaust openings; when screens clog, vents fail.
Problems you’ll notice
- Stuffy top floor and higher cooling bills.
- Musty smell near the ceilings after rain.
- Drips around vent bases from condensation.
- Lint around dryer vent caps on the roof.
- Ice covers the low vents in heavy snow.
Solution
- Schedule roof inspections each spring and fall. Clean screens and caps as needed to maintain proper airflow.
- Install corrosion-resistant screens or louvers with ¼–½ inch openings to meet code allowances and keep vents clear.
- Raise any short vent hoods so that snow does not cover the outlet.
- Clear debris that traps water near vents. Verify the roof slopes properly toward all drains.
- For dryer caps, remove all lint buildup and check that the backdraft damper is operating correctly.
Repair cost range
- Roof inspection and cleaning: about $125–$375, typical.
- Minor vent reseal or small leak fix: about $100–$500, depending on scope.
Incorrect Vent Types
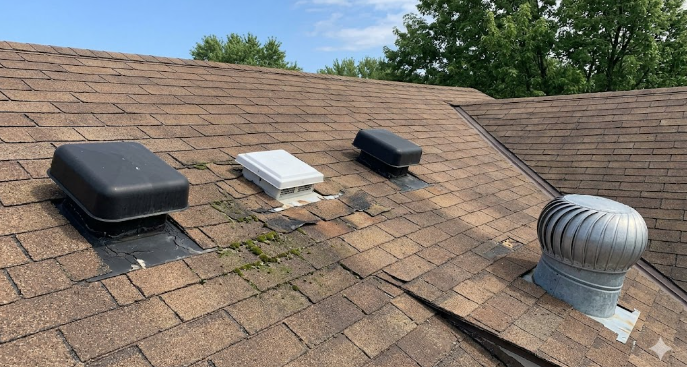
Some flat roofs get ridge vents where no real ridge exists; others rely on turbines in wind shadows behind parapets. Dryers sometimes vent into passive hoods that were never meant for lint. Match the vent type to the assembly and the job you need it to do.
Problems you’ll notice
- Airflow that never crosses the cavity.
- Lint buildup and stuck dampers at dryer terminations.
- Water entry in wind-driven rain through the wrong hood.
- Visible vents that conflict with landmark rules.
- Recurring leaks at bases due to poor compatibility with the membrane.
Solution
- Identify each penetration’s purpose: bath, kitchen, dryer, or roof-cavity ventilation.
- Replace mismatched hoods with gooseneck caps or code-compliant exhaust terminals for appliances.
- Use breather/pressure-relief vents when the goal is vapor relief inside a flat-roof assembly.
- For true ventilation, use static hoods in multiples or a controlled fan where intake is reliable.
- Confirm distances from openings and use rated louvers if wind-driven rain is a risk.
Repair cost range
- Swap in a correct passive roof vent: around $475 per vent on average.
- Roof fan (electric or solar) with proper curb and wiring: about $300–$900+.
Inconsistent Airflow
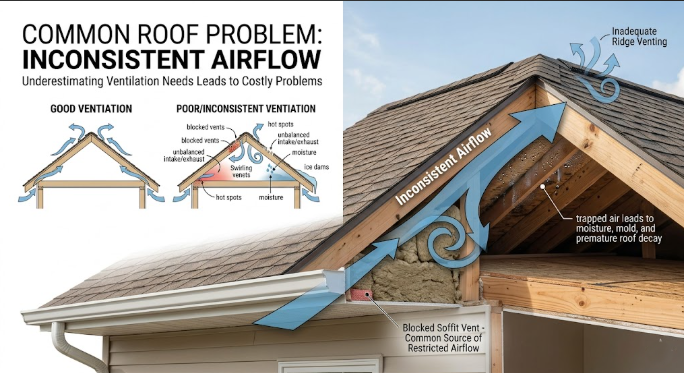
Vents set too close together can short-circuit, so air slips in and out without crossing the space. If intake is missing, a powered fan can pull air from your home instead of from outdoors. The fix is a clear path from intake to exhaust and controls that avoid negative pressure.
Problems you’ll notice
- Hot and cold spots under the roof.
- Persistent damp odor even after adding vents.
- Dust lines at the ceiling cracks from air being pulled upward.
- Fan runs, yet rooms feel drafty on upper floors.
- Higher bills because conditioned air gets sucked out.
Solution
- Map intake and exhaust; keep them apart so air crosses the cavity.
- Add or relocate intakes at edges or through parapets to feed outside air.
- Size and space exhaust hoods for coverage, not clustering.
- If you use a fan, add a thermostat/humidistat and verify dedicated intake.
- Air-seal the ceiling plane so the system does not rob air from your home.
Repair cost range
- Reposition/add passive vents: about $300–$650 per vent, depending on access.
- Roof-mounted fan with controls: about $500–$1,200 installed.
Frost Formation
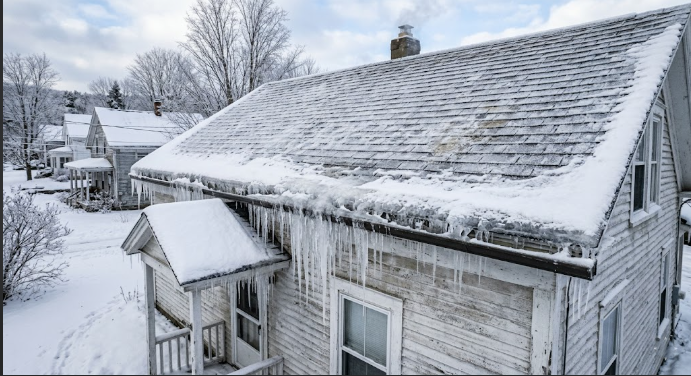
Cold nights push the roof sheathing below the dew point, so moist indoor air condenses and freezes on the underside. When the sun hits, that frost melts and drips onto the ceiling. You solve this by air-sealing, warming the sheathing with the right insulation plan, and using ventilation where it fits the assembly.
Problems you’ll notice
- Frost on nails or sheathing in winter.
- Water stains after a warm-up.
- Mold spots at the top of closets or hall ceilings.
- Peeling paint near the outside walls.
- An odor that gets worse after thaw.
Solution
- Air-seal the ceiling plane to stop moisture from rising.
- Verify the insulation ratio if you choose an unvented compact roof, so the sheathing stays warm.
- If the cavity is vented, add balanced intake and exhaust.
- Use breather vents on flat roofs that already hold moisture.
- Confirm NYC is in Zone 4A and plan details for this mixed-humid climate.
Repair cost range
- Add passive vents: about $300–$650 per vent; add a fan when the layout needs a pull: about $300–$900+.
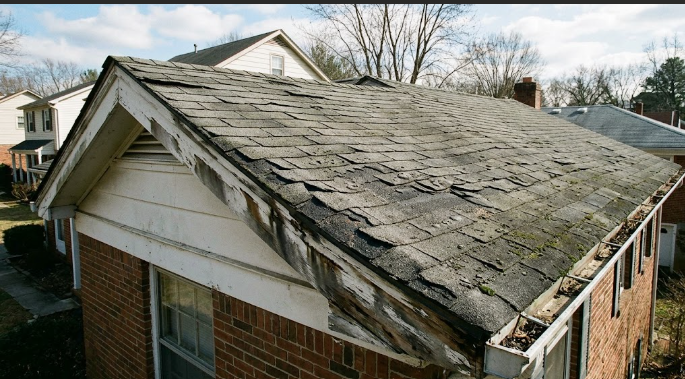
Weathering and Rusting
Salt in coastal air, UV, and freeze–thaw cycles beat up metal caps and fasteners. Sealants dry and crack, then wind-driven rain finds its way in. The cure is better metals, fresh flashing, and rated louvers or hoods that shed water.
Problems you’ll notice
- Rust streaks below caps and fasteners.
- Loose collars at vent bases.
- Cracked or chalky sealant at seams.
- Rattle or whistle on windy nights.
- Leaks during sideways rain.
Solution.
- Replace rusted caps with aluminum, stainless, or coated steel.
- Swap corroded fasteners for stainless and re-seat washers.
- Re-flash bases with membrane-compatible boots; avoid quick tar patches.
- Use louvers/hoods that meet AMCA 550 for wind-driven rain.
- Improve drainage around penetrations; codes and NRCA stress a ¼ in/ft design slope for low-slope membranes.
Repair cost range
- Small leak at flashing: often about $100–$500. Larger roof repairs average higher.
- Replace a passive vent: about $475 per vent on average; complex access adds cost in Brooklyn.
Clogs and Debris Buildup
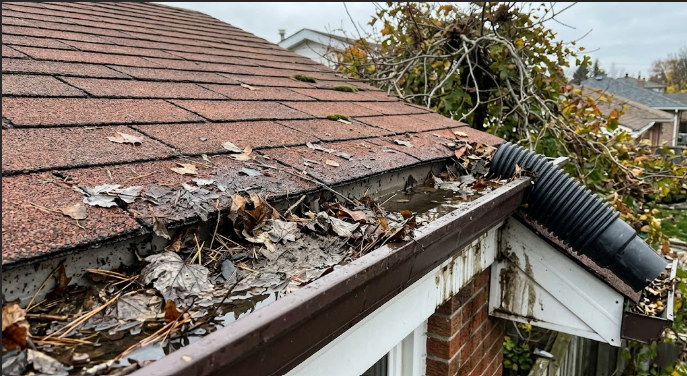
On Brooklyn’s flat and low-slope roofs, dust, leaves, and soot collect fast around vent hoods and screens. When those openings clog, airflow drops, and moisture gets trapped inside the roof build. NYC code also expects outdoor exhaust openings to have corrosion-resistant screens or louvers sized ¼–½ inch, so a dirty screen can choke the vent even more.
Problems you’ll notice
- Stuffy top floor or lingering humidity after showers.
- Musty odor near ceilings after rain.
- Condensation rings or damp insulation around vents.
- Lint buildup at the dryer roof caps and a stuck backdraft damper.
- Bird nesting materials are packed into or around vent heads on flat roofs.
Solution
- Book a roof inspection/cleaning twice a year; have a pro clear vent hoods, screens, and caps. Typical inspection options range from basic ladder checks to drone/IR, depending on need.
- Replace damaged screens with ¼–½ in corrosion-resistant mesh or rated louvers; this keeps pests out and keeps the opening to code.
- Raise or swap low, easily buried hoods for taller, hooded designs; consider AMCA 550 rain-resistant louvers where wind-driven rain is common.
- Keep the roof draining so debris does not sit around vent bases; industry guidance stresses positive drainage on low-slope roofs.
- For dryer caps, clear lint and confirm the damper moves freely; NYC requires dryers to exhaust outdoors through dedicated ducting.
Repair/maintenance cost range (Brooklyn context).
- Basic roof inspection: about $75–$200 for a physical inspection; $150–$400 for a drone; $400–$600 for infrared if moisture is suspected. Urban access can raise prices.
- If a clogged vent already caused a leak, typical roof-leak repairs run about $400–$2,500, depending on scope.
Pests and Insects
Pigeons, sparrows, and insects love warm, sheltered vent openings. Nests and carcasses block airflow and add moisture risk in the roof cavity. NYC’s Mechanical Code addresses this by calling for screened or louvered exhaust terminations with defined opening sizes to keep critters out.
Problems you’ll notice
- Scratching or fluttering sounds near the vent; droppings on the roof around the cap.
- Reduced airflow and higher humidity on the top floor.
- Odor from trapped organic material.
- Loose or torn screens at vent hoods.
- Fire risk or air-quality issues from nests near HVAC or vents on flat roofs.
Solution
- Install or replace code-size screens (¼–½ in) or pest-resistant covers at each exhaust point.
- Remove nests and sanitize the area; add bird-proof covers where roosting is common.
- Seal gaps around penetrations and parapet joints so pests cannot re-enter.
- If wind-driven rain enters through louvers, upgrade to AMCA 550-rated models that reject water and resist intrusion.
- Put vent checks on your biannual roof inspection list so issues don’t return.
Repair/maintenance cost range.
- Minor pest guard/screen replacement is often part of a routine service call; expect the inspection ranges above.
- If pests caused damage that led to leaks, plan for leak repairs in the $400–$2,500 range, depending on wet insulation and membrane work.
Leaks Around Vents
Most vent leaks trace back to flashing failures at the base, not the vent concept itself. Freeze-thaw, UV, and ponding water stress those joints on Brooklyn’s flat roofs. Trade and industry sources repeatedly flag poor flashing and drainage as top drivers of leak calls.
Problems you’ll notice
- Stains or bubbling paint on the ceiling below a vent.
- Soft or wet insulation around the penetration.
- Blisters in the membrane near the vent base.
- Drips during wind-driven rain events.
- Rusted fasteners and cracked sealant at the collar.
Solution
- Confirm the leak with a targeted inspection; escalate to infrared or moisture scanning if the source is unclear.
- Remove failed mastics; re-flash the base with membrane-compatible boots/flanges (EPDM/TPO/PVC/mod-bit) per manufacturer detail.
- Restore positive drainage so water does not pond around penetrations; many references aim for a ¼ in/ft design slope.
- If rain is driving in through the hood, upgrade to deeper hoods or wind-driven rain-rated louvers.
- Replace corroded caps/fasteners with aluminum, stainless, or coated steel to extend service life.
Repair cost range.
- Vent-boot replacement typically averages $400 (normal range $250–$600; NY about $490), subject to access and roof type.
- Broader leak repairs that include wet insulation or deck work often cost $400–$2,500+.
Incorrect Installation
Wrong cap, a wrong location, or no intake path sets you up for moisture and leaks. Some homes tie bathroom or dryer ducts into spaces they shouldn’t or place vents too close to windows and intakes. NYC’s Mechanical Code requires exhaust to discharge outdoors, sets separation distances, and prescribes screening—skipping those rules creates chronic problems.
Problems you’ll notice
- Dryer or bath fans push moisture into the roof cavity instead of outside.
- Short-circuit airflow because the intake and exhaust sit too close.
- Water entry during storms due to the wrong hood or louver.
- Visible rooftop hardware that triggers LPC review if seen from the street.
- Ongoing leaks at the vent base from incompatible flashing or poor detailing.
Solution
- Verify each penetration’s purpose (bath, kitchen, dryer, or roof-cavity ventilation) and route each to the outdoors with the right termination.
- Check location distances from windows, property lines, and intakes; relocate terminations if they miss the code clearances.
- Swap in proper gooseneck caps or louvers and add ¼–½ in screens to block pests per code.
- Re-flash with membrane-compatible boots; restore drainage so water does not sit at the base.
- In landmark districts, shift visible terminations behind parapets and file with the LPC as needed before work.
Repair cost range.
- Vent-boot swap to correct a leaking or mismatched boot: $250–$600 typical (avg. $400; NY around $490).
- If incorrect installation already caused a leak, repair costs often range from $400–$2,500, depending on how far water traveled.
NYC Rules That Affect Roof Vents (What Homeowners Must Know)
- Exhaust outlet distances, screen sizes, and wind-driven rain protection.
The NYC Mechanical Code sets minimum separation for exhaust outlets from property lines, windows/doors, and mechanical air intakes. It also requires corrosion-resistant screens, louvers, or grilles with openings not smaller than ¼ in. and not larger than ½ in. Louvers that protect exhaust openings must comply with AMCA 550 for wind-driven rain resistance. - LPC permits for visible rooftop work in historic districts (apply on Portico).
If a vent or cap is visible from a public way on a landmark or in a historic district, you typically need approval from the Landmarks Preservation Commission (LPC). Use Portico, LPC’s permit portal, and follow the LPC Rules and the Permit Guidebook for submittals.
Signs of Poor Attic Ventilation
Brooklyn’s mix of humid summers and cold winters pushes moisture and heat through the roof plane. If airflow is weak, your home shows clear clues you can spot fast.
- Hot top floor in summer: Rooms feel stuffy, and the AC runs longer. Heat sits under the roof when air cannot move out. This shows poor ventilation or missing intake.
- Musty odor or visible mold near ceilings: Moist air lingers and feeds mold on cool surfaces. The first defense is moisture control with steady ventilation. EPA reminds us that the key to mold control is moisture control.
- Frost on nails or sheathing in winter, then drips during a warm-up: Warm indoor air hits cold roof parts and freezes. Sun or a thaw melts it and stains the ceilings. That points to air leaks plus weak ventilation.
- Membrane blisters around roof penetrations: Trapped vapor forms pressure pockets under flat-roof membranes. Blisters crack under the sun and traffic. Better drying paths and relief vents help.
- Peeling paint and damp spots at the top of walls: Moisture drives through the assembly and shows at finishes. That often pairs with poor exhaust paths. Fix the air path and the moisture source.
- Higher energy bills without comfort: Heat collects under the roof and loads your AC. In winter, warm air escapes into the roof space. Balanced airflow reduces peaks and waste.
How to Identify Roof Vent Leaks
You do not need to guess. A simple order of checks helps you confirm the source before you spend on repairs.
- Inspect after storms, not just on dry days: Look for fresh stains under vent locations, soft drywall, or damp insulation. Check the vent based on the roof for cracked sealant or rusted fasteners. Keep notes and photos for your roofer.
- Isolate with a gentle water test: Wet the area above a suspect vent first and move upward in small steps. Avoid spraying into the hood. If the stain appears, you likely found the leak path at the flashing or cap.
- Use infrared (IR) at night to find wet insulation: Pros follow ASTM C1153, which maps temperature differences that often reveal moisture under membranes. Night surveys help because roofs cool evenly, and wet zones hold heat.
- Confirm with moisture meters or impedance scans: Where IR flags suspect areas, a pro can scan or take targeted readings to verify. This avoids random patches and pinpoints the real problem. Standards support this workflow.
- Open and verify as a last step: If instruments agree, a small opening or core at the vent base confirms wet layers. Replace damaged insulation and re-flash with the correct boot or curb. Then retest after repair.
Roof Ventilation Repair Tips
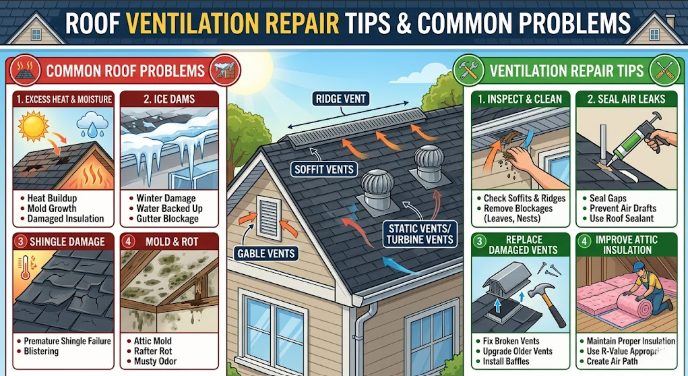
A few smart choices protect your roof and your budget. These steps fit Brooklyn’s flat-roof reality and NYC rules.
- Match the fix to the code details: Keep required distances from windows, property lines, and air intakes. Add ¼–½ in screens and use louvers that meet AMCA 550 where wind-driven rain hits. These small checks prevent repeat leaks.
- Use membrane-compatible flashing, not quick tar: EPDM, TPO, PVC, and modified bitumen each need the right boot or welded flange. Proper flashing stops the classic “leak at the vent” call. It also lasts longer under UV and freeze-thaws.
- Balance intake and exhaust, not exhaust alone: Add intake at edges or through parapets so air moves across the cavity. Where wind is weak, add a controlled roof fan with a clear makeup-air path. That avoids negative pressure in your home.
- Upgrade hardware where rain blows sideways: In coastal storms, choose deeper hoods or louvers rated for wind-driven rain. That cut-in upgrade often stops water entry without a full rework.
- If your home is landmarked, place vents out of view and file early: Move new terminations behind parapets when you can. File on Portico and consult the LPC Rules and Permit Guidebook for faster staff-level review.
Where to Find the Best Brooklyn Roofing Contractors
Are you looking for an expert roofing contractor in Brooklyn, NYC? SR General Construction has you covered! Our business is located at 8807 Avenue B, Brooklyn, NY 11236, United States, in the Canarsie area.
We proudly serve all areas of Brooklyn with high-quality, durable roofing solutions. From new installations to repairs and maintenance, we provide the best service at affordable prices. Contact us and experience why we’re Brooklyn’s roofing experts!
FAQ
1. Do flat roofs need roof vents?
Yes—even flat roofs require ventilation or a well-designed unvented (compact) system, because without airflow or drying paths, moisture can build up under the membrane.
2. Why does my roof leak around the vent base?
Most leaks at vents stem from flashing failures or ponding water at the vent collar, not the vent itself: weak seals, cracked boot flanges, or water collecting enhance the risk.
3. How often should I inspect my roof vents in Brooklyn?
You should inspect at least once a year and after major storms, focusing on flashing, screens, debris, and corrosion—more frequent inspection is wise given NYC’s climate and building constraints.
4. Can blocked vents cause high energy bills?
Yes. If vents are clogged, heat and moisture stay in the roof space or attic, which forces your HVAC system to work harder and drives up energy costs.
5. What size screen or louver should my exhaust terminations have in NYC?
NYC code requires corrosion-resistant screens or louvers with openings between ¼ in and ½ in for exterior vent terminations.
6. How much should I budget for roof vent repairs in Brooklyn?
Simple vent replacements might run $300-$650 per vent, but full repair involving leaks, wet insulation, or fans can rise to $500-$1,200+ or more depending on access and damage.
7. Does historic district status affect what I can do about roof vents?
Yes—if your home is in a landmark district and vent work is visible from the street, you often must file with the LPC via Portico, which may limit vent types or placement.