Do you own a Brooklyn brownstone with a flat roof and wonder which Roof Vent Types truly work in NYC weather?
You want fewer leaks, stable energy costs, and a plan that respects a landmark façade; I’ll show options that fit those goals.
Here’s the plan for this guide. First, we’ll cover why flat roofs in brownstones need smart airflow and what goes wrong without it. Then we’ll explain how ventilation works on a flat roof, in plain language. After that, we’ll compare the main roof vent types for this setting—box vents, mushroom vents, breather vents, turbine vents, powered fans, and louvers—plus where soffit and ridge vents fit when the roof design allows it.
Let’s get you the right vent plan for your Brooklyn roof.
The Importance and Benefits of Ventilation in Flat Roofs
You want your brownstone’s flat roof to stay dry, durable, and efficient through Brooklyn’s extreme seasons. Ventilation helps control moisture and heat so materials last. It also supports healthier indoor air by limiting mold-friendly dampness.
- Moisture control protects structure: Venting routes humid air out, reducing condensation and trapped moisture. That cuts blisters, rot, and leaks over time. Building-science guidance lists moisture control as the top reason to vent roof spaces.
- Temperature moderation that eases stress: In warm months, ventilation helps release heated air, keeping the roof cooler. In cold months, balanced venting keeps roof temperatures more uniform and can reduce the risk of ice dams. Lower thermal stress supports longer membrane life.
- Energy efficiency and comfort gains: Removing hot, stagnant air reduces the upstairs cooling load and helps insulation perform closer to its rated value, stabilizing interior temperatures for your family and supporting whole-home, healthier-air strategies.
- Health protection through drier assemblies: Mold needs moisture. Ventilation in and around the roof reduces dampness, lowering mold risk and helping protect indoor air quality and health. Public health agencies emphasize moisture control and ventilation as the first steps.
- Longer roof lifespan and fewer emergency repairs: Assemblies that dry out faster tend to suffer fewer material failures. That means fewer surprise leak calls and better odds your roof reaches its expected service life. It’s a simple control layer that supports the entire roofing system.
Ventilation Challenges in Brooklyn Brownstones
Brownstones rarely have big attics; most have compact roof cavities and parapet walls that trap heat and humidity. Access can be tight, and many homes sit in historic districts with visibility rules for rooftop work. NYC codes and landmark permits add a layer of process you should plan for before cutting any new openings.
- Parapet walls that block cross-flow: Parapets enclose the perimeter, so air can stagnate unless you create intake and exhaust paths at the edges or through the wall. Some designs add discreet through-parapet vents to move air without extra roof penetrations. Detailing must still protect the waterproofing.
- Limited or no soffits on flat-roof cornices: Many brownstones lack open eaves, so classic soffit-to-ridge airflow isn’t available. Intake has to come from alternative details (perimeter vents, wall vents, or mechanical exhaust). That makes planning more important for you and your roofer.
- Historic-district visibility and permit rules: If your home is landmarked or in a historic district, the Landmarks Preservation Commission must approve exterior work, including rooftop penetrations visible from the street. Plan for LPC review along with DOB permits. This helps you avoid stop-work orders and fines.
- NYC climate zone 4A demands moisture discipline: Our mixed-humid climate swings from muggy summers to freezing winters, which pushes moisture in different directions across seasons. Designs that control vapor and allow drying are safer for your roof in Brooklyn.
- Code coordination with mechanical exhaust: Bathroom, dryer, and kitchen exhaust must discharge outdoors and follow the NYC Mechanical Code. New vents, terminations, and clearances should be coordinated to ensure the entire system works together.
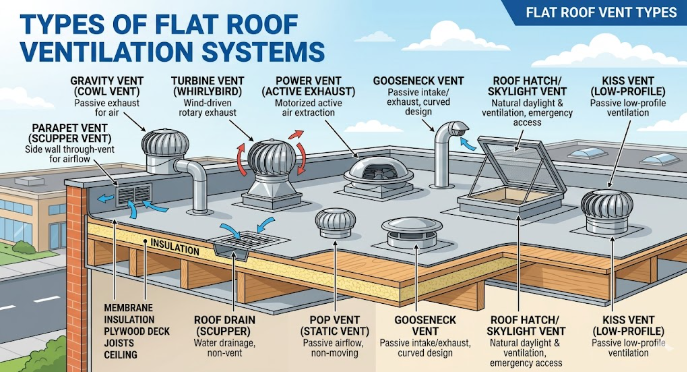
Best Roof Vent Types for Flat Roofs
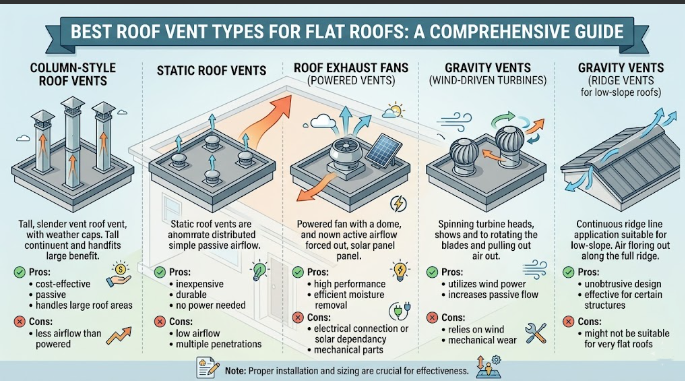
On flat and low-slope roofs, you won’t rely on ridge-and-soffit alone. You’ll often mix passive exhaust (roof louvers/box style) with intake strategies at edges or parapets, or add mechanical exhaust when natural flow falls short. The “best” type depends on your roof type (EPDM, TPO, modified bitumen, or BUR), your parapet details, and how visible rooftop elements are. The goal is simple: provide a reliable path for humid air to escape while keeping water out of the assembly.
Roof Louvers (Static Roof Vents)
Description
Think of roof louvers as low-profile exhaust hoods that let hot, moist air exit passively near the higher parts of a flat roof. They have no moving parts, which keeps maintenance simple. Performance depends on placement, count, and clear airflow from intake points. They must be flashed to your membrane correctly to stay watertight.
Features
- Fixed, hooded exhaust opening with internal baffle/screen.
- Low-profile silhouette that sits on the roof field.
- Metal or plastic body; metal resists UV and heat better over time.
- Installed in multiples to cover the roof area.
- Requires compatible flashing with EPDM, TPO, modified bitumen, or BUR.
Benefits
- Simple, passive airflow without electricity or moving parts.
- Lower maintenance versus turbines or powered fans.
- Flexible layout so your contractor can target heat pockets.
- Works alongside parapet or edge intake details for cross-flow.
- When flashed properly, it supports the assembly’s drying and a longer service life.
Cost Range
Typical U.S. installations average $300–$650 per vent, depending on roof access, materials, and sealing work; complex urban jobs can run higher.
Lifespan
Expect roughly 15–30 years, with metal bodies tending to outlast plastic under UV and heat. Inspect after major storms and reseal as needed.
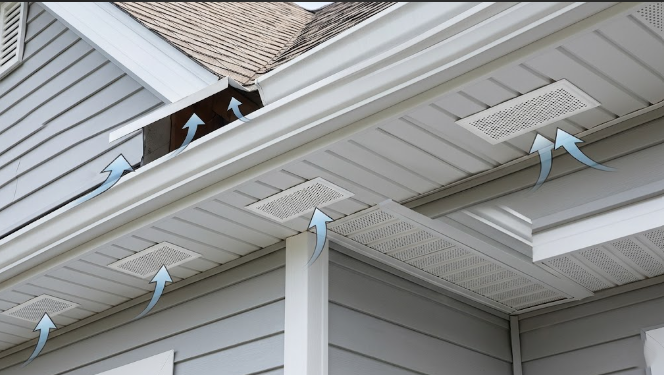
Soffit Vents (Under-Eave Intake Vents)
Description.
Soffit vents feed cooler outdoor air into the roof cavity so exhaust vents can pull stale air out. On many brownstones, true soffits are rare; alternatives such as continuous edge intake or a vented drip edge may serve a similar role. Wherever the intake sits, it must stay open and unobstructed by insulation. Think of intake and exhaust as a pair; both matter.
Features
- Perforated strips or individual grills under eaves or at edge details.
- Continuous options that run the full length for steady intake.
- Insect screens are sized to keep pests out while allowing airflow.
- Compatible with baffles to keep insulation from blocking air paths.
- Can be adapted with edge vents where no traditional soffit exists.
Benefits
- Provides the “fresh air in” that passive exhaust needs to work.
- Helps lower attic/roof cavity temperatures and humidity.
- Supports insulation performance by reducing moisture around it.
- Pairs well with static louvers for a balanced system.
- When maintained, it helps the roof dry faster after wet weather.
Cost Range
Typical installed cost for vented soffit runs about $5.75–$9.75 per linear foot nationally; tight access and NYC labor can push higher.
Lifespan
Quality metal or vinyl soffit vents often last 20 years or more when kept clear; exposure, salt air, and UV can shorten that. Keep screens clean for steady intake.
Ridge Vents (Roof Ridge Exhaust)
Description.
If your brownstone’s roof includes a true ridge (some low-slope sections do), a ridge vent runs along that high line to let warm, moist air escape evenly. It works passively, using natural pressure differences, and pairs with intake vents to keep air moving. On flat roofs without a ridge, this option usually isn’t suitable, and other vent types make more sense. When a ridge exists and intake is balanced, ridge vents offer clean, low-profile exhaust.
Features
- Continuous slot along the ridge for uniform exhaust.
- Internal baffles to resist wind-driven rain and snow.
- Low, discreet profile that blends with the roofline.
- Designed to work only with adequate intake (e.g., soffit/edge).
- Compatible with many roof coverings on low-slope, ridge-bearing roofs.
Benefits
- Even exhaust across the entire roof peak for stable airflow.
- No electricity or moving parts, which keeps upkeep simple.
- Helps moderate attic/roof temperatures and moisture.
- Subtle look that suits historic façades when not street-visible.
- It can improve energy use by reducing heat buildup under the roof.
Cost Range (installed)
Typical U.S. projects fall in the $300–$650 range, often priced at $7–$15 per linear foot, depending on length, access, and detailing.
Lifespan
Well-installed ridge vents commonly last 20+ years, though exposure, material, and maintenance affect service life. Inspect periodically for damage or blockage.
Powered Attic Fans (Mechanical Roof Fans)
Description.
Powered roof fans actively pull hot, damp air out, which helps when natural airflow struggles behind parapet walls or in sealed cavities. Units can mount on curbs through the roof deck and are often controlled by thermostats or humidistats. They work best with a clear intake so the fan doesn’t pull conditioned air from living spaces. Good design pairs the fan with proper inlets and tight air-sealing below the roof.
Features
- An electric or solar motor that drives a consistent exhaust.
- Thermostat and/or humidistat controls for set-and-forget use.
- Roof-mount housings with backdraft dampers and screens.
- Sizing options to match roof volume and moisture load.
- Requires a dedicated intake to avoid negative pressure indoors.
Benefits
- Reliable airflow regardless of wind, helpful in dense city blocks.
- Can lower peak heat in summer and speed dry-out after storms.
- Adds control (thermo/hygro set points) for your specific conditions.
- Useful retrofit when a ridge does not exist or soffits are limited.
- Works as pa rt of a balanced system to protect membranes and framing.
Cost Range (installed)
Most homeowners spend about $500–$1,200 total, depending on fan type, power source, and access; some projects are priced lower or higher, depending on the scope.
Lifespan
Expect ~10–15 years for typical motors with routine maintenance; exposure and heat can shorten life. Plan periodic service checks.
Turbine Vents (Wind-Powered “Whirlybirds”)
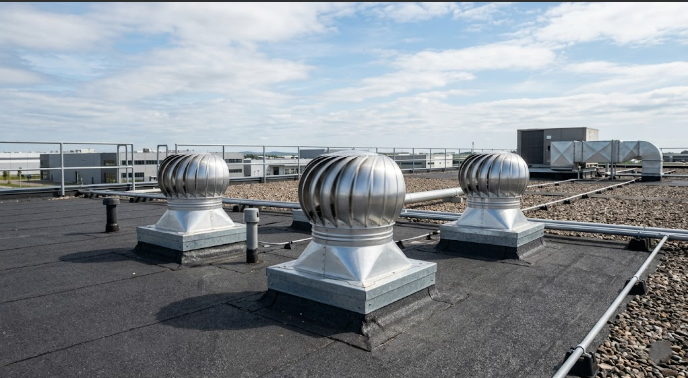
Description.
Turbine vents spin with wind and thermal updrafts to pull stale air out without electricity. They’re popular where steady breezes help the head turn and can supplement other passive vents. Bearings and seals need occasional attention, and performance drops on still days. On a Brooklyn roof, they work best with clear intake and secure flashing around the base.
Features
- Rotating head with wind-catching fins and low-friction bearings.
- Passive design that uses wind and stack effect—not power.
- Integral hooding to shed rain and protect the opening.
- Available in aluminum or steel for better durability.
- Typically installed in multiples for coverage on larger roofs.
Benefits
- Zero operating cost and simple operation when wind is present.
- Helps clear heat and humidity from the roof cavity.
- Visible spin gives you a quick health check from the ground.
- Pairs with perimeter/soffit intake for balanced flow.
- Lower upfront cost than many mechanical options.
Cost Range (installed)
Budget about $200–$400 per unit in many U.S. installs, with material, size, and roof access affecting price; some unit-only prices run lower.
Lifespan
Wind-driven vents often last 10–25 years, depending on metal quality, bearings, and weather exposure; plastic heads tend to fail sooner than metal.
Breather Vents (Moisture Release Vents)
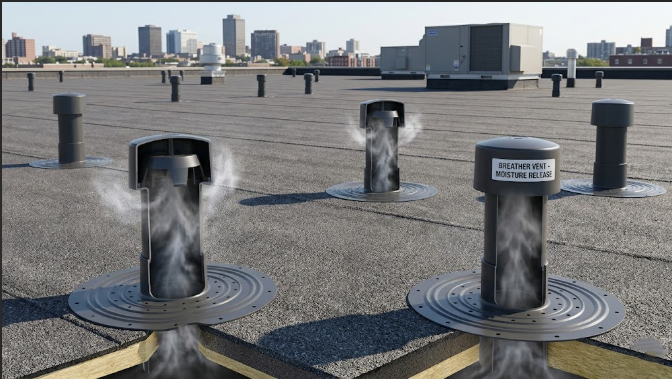
Description.
Breather (or pressure-relief) vents are installed on flat roofs to allow trapped vapor within the membrane system to escape. They don’t move big volumes of air; they relieve moisture and pressure that cause blisters and premature failure. You’ll see them used with single-ply, modified bitumen, or BUR systems, especially on re-roofs with existing moisture. Think of them as safety valves that help the roof dry out.
Features
- One-way or pressure-relief design to vent vapor from the assembly.
- Flanged bases to weld or seal to flat-roof membranes.
- Low-profile caps to resist rain entry.
- Installed strategically where moisture accumulates.
- Often used alongside passive or powered exhaust for overall balance.
Benefits
- Reduces blistering and membrane stress by venting vapor pressure.
- Supports dry-out after leaks or during recovery projects.
- Helps extend the service life of modified bitumen and single-ply roofs.
- Minimal profile and no moving parts for low maintenance.
- Complements other vents to manage moisture in mixed-humid climates.
Cost Range (installed)
Installed pricing typically aligns with other single-vent roof vents; many homeowners see $300–$600+ per vent, depending on roof access and membrane detailing. Use local quotes for accuracy.
Lifespan
Service life depends on membrane compatibility and sealing quality; when detailed well, these vents often match the roof’s service life window. Inspect during regular roof checks.
Box Vents (Static Hooded Vents)
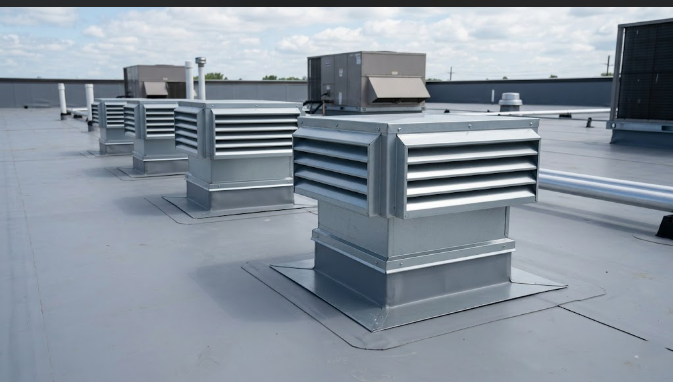
Description.
Box vents are simple, hooded openings that let hot air drift out near higher points of the roof. They have no motors, which keeps cost and maintenance in check. On flat roofs, multiple units are spaced to cover the area and paired with an intake for real airflow. Proper flashing to EPDM, TPO, modified bitumen, or BUR is the make-or-break detail.
Features
- Fixed hood with screened throat to block pests.
- Modular approach—install as many as needed for coverage.
- Works with most common flat-roof membranes via compatible flashing.
- Low-to-moderate profile for discreet exhaust.
- No electrical connections or controls to maintain.
Benefits
- A cost-effective way to add passive exhaust on a flat roof.
- Lower maintenance than moving-part systems.
- Flexible placement to target hot spots behind parapets.
- Plays well with intake at edges/through parapets.
- Helps reduce heat and humidity that shorten membrane life.
Cost Range (installed)
National averages cluster around 300–600 percent, though urban access, membrane work, and permit context can push higher.
Lifespan
Static vents commonly last 15–30 years when metal bodies and flashings are maintained; UV and storm exposure drive replacement timing.
Cost Considerations for Flat Roof Ventilation in Brooklyn, NYC
Installation (typical ranges, then NYC context)
- Static or ridge vents: National installs often cost about $240–$600 per vent; ridge vents commonly cost about $7–$15 per linear foot. Brooklyn projects trend higher due to access and compliance steps.
- Powered roof fans (electric/solar): Many homeowners pay about $500–$1,200 total for a roof-mounted fan. Expect NYC premiums when electrical work, curb mounts, and permits are added to the scope.
- Why NYC can cost more: Prevailing/union wage schedules and compliance steps (DOB permits, LPC, where applicable) add time and cost.
Materials (ballpark)
- Roof-mounted vents: Many standard units are priced at about $30–$50 each; accessory items (sealants, fasteners, boots) add to the cart. Powered fan units range from $65 to $650 before labor.
- Membrane-compatible flashings: EPDM/TPO/PVC or mod-bit details shift material lists and hours; verify manufacturer instructions and code references in your permit set.
Repairs (leaks, flashing, storm fixes)
- Typical roof repairs cost around $400–$2,000 nationwide; small flat-roof patches can be about $200, while complex leak tracing and re-flashing push higher. Brooklyn access and permits can widen the range.
- Many homeowners see about $400–$2,500 for leak fixes depending on location, membrane, and water damage level. Move fast to avoid hidden mold and rot.
Permits and historic checks
- NYC Mechanical Code governs exhaust terminations and related work; confirm your scope with the DOB. Landmarked homes may require LPC review; LPC fees apply when DOB permits are required.
The Dangers of Poorly Ventilated Flat Roofs
Moisture and heat do not “work themselves out” in a sealed flat roof. Without a clear path for air, vapor gets trapped, temperatures swing, and materials fail early. You protect your brownstone by dealing with these risks upfront.
- Condensation inside the roof: Warm indoor air meets a cold roof layer and condenses into water. That moisture can feed mold and soften sheathing. Building-science guidance lists condensation control as a primary reason to ventilate.
- Membrane blisters and pressure pockets: Vapor pressure under membranes forms bubbles and blisters. Those blisters crack in the sun and with foot traffic. Pressure-relief strategies and vents help release trapped vapor.
- Heat buildup and higher cooling bills: Trapped hot air raises attic or roof-cavity temperatures. That adds load on your AC and stresses the roofing. Vent strategies lower peak temps and stabilize performance.
- Ice and winter stress: In the mixed-humid Zone 4A, winter heat loss can warm the roof surface and create ice problems where snow collects. Better airflow and proper assembly reduce this risk.
- Shorter roof life and repeated leaks: When drying paths fail, small seams become persistent leak points. Re-sealing without ventilation repeats the cycle. A balanced plan extends service life.
How Flat Roof Vents Work
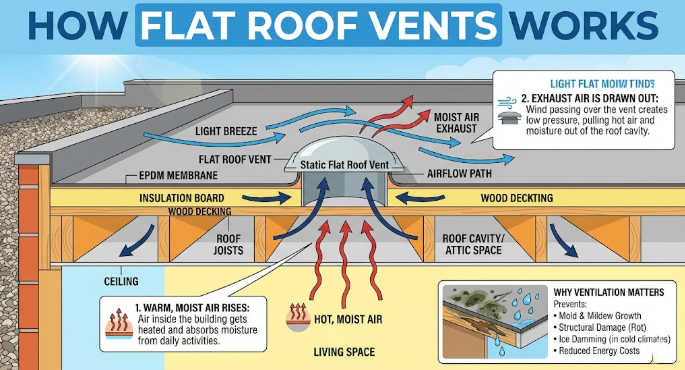
A flat roof needs a path for warm, moist air to escape and a path for cooler, drier air to enter. Wind across the roof and small temperature differences create pressure that moves air through those paths. If natural forces fall short, a mechanical fan can pull air out.
- Create an exhaust path: Place the exhaust near the higher parts of the roof so rising air finds the opening. Static hoods or continuous slots release stale air. Keep rain and pests out with baffles and screens.
- Provide intake: Pair that exhaust with intake at edges, parapets, or soffits (when present). Intake feeds outside air, so the system does not pull from your living space. Clear any insulation blocks at intake locations.
- Let physics do the work: Wind over the roof lowers pressure at the exhaust; the stack effect lifts warm air upward. Those forces move air from the intake to the exhaust without power.
- Add power when needed: In dense blocks or sealed cavities, a roof fan can pull air out on a schedule or at set humidity/temperature points. Fans need a dedicated intake to keep the system balanced.
- Tie into code-compliant terminations: Coordinate bathroom, dryer, and kitchen exhaust so each discharges outdoors through proper caps and clearances per the NYC Mechanical Code. This keeps moisture out of the roof build.
Vented vs. Unvented Flat Roof Systems
Cold (vented) roof: A vented assembly maintains an air space above the insulation, with intake and exhaust vents to move moisture out. It fits certain brownstones, allowing you to create continuous airflow paths and maintain clear cavities. Hot (unvented/compact) roof: An unvented assembly moves air, vapor, and thermal control to the roof deck plane with sufficient insulation above or below the deck so the sheathing stays warm and dry.
It fits brownstones where cavities are inaccessible, parapets block intake, or historic rules restrict visible vents. Both approaches are code-acceptable when detailed correctly; the right choice depends on your roof build, climate (NYC = Zone 4A), and moisture loads.
How to Choose the Right Flat Roof Vents
A smart choice starts with your roof build, moisture sources, and local rules. Once you map those, match a vent type and layout that gives you a clear airflow path with watertight detailing. Keep the plan simple so maintenance stays easy for you.
- Step 1: Confirm your assembly: Identify the membrane (EPDM, TPO, PVC, mod bit, or BUR), the insulation location, and whether a vent cavity exists. This sets your options for static vents, breather vents, or a compact unvented design. Use the approach that keeps the sheathing dry in Zone 4A.
- Step 2: Map intake and exhaust: If you can provide edge/soffit/parapet intake, pair it with roof-level exhaust (louvers/box/ridge where present). If intake is limited, consider through-parapet intake or a powered exhaust to maintain flow.
- Step 3: Right-size the hardware: Use multiple small hoods for broad coverage or a continuous slot where a ridge exists. For sealed cavities or humidity spikes, set a fan with a thermostat/humidistat so it runs only when needed.
- Step 4: Detail the flashing: Match boots and flanges to the membrane and follow manufacturer instructions plus NYC code. Good flashing prevents leaks that undo ventilation gains.
- Step 5: Check NYC compliance early: Coordinate the DOB permit scope, and if your brownstone is landmarked, get LPC approval for visible rooftop work. Fees apply when a DOB permit is required; this avoids delays and change orders.
- Step 6: Budget with Brooklyn in mind: Use national cost guides to set a floor, then add a local premium for labor, access, and permits. Compare at least three quotes that include materials, flashing, and cleanup.
- Step 7: Plan maintenance: Schedule seasonal checks for screens, bearings (if turbines), sealants, and debris. A quick inspection after nor’easters pays for itself
Common Mistakes to Avoid with Flat Roof Vents
Flat roofs on Brooklyn brownstones require careful airflow and waterproofing. A few small errors can snowball into leaks, mold, or wasted energy. Use this list so you avoid the traps that catch many homeowners.
- Skipping intake and relying only on exhaust: Exhaust vents cannot move air if fresh air never enters the cavity. A balanced plan pairs intake at edges or walls with exhaust near the high points so air actually travels through the roof space. Building-science guidance stresses balanced paths and an airtight interior boundary for dependable performance.
- Flashing that sits too low or does not match the membrane: Penetrations should rise high enough above the roof plane so water, snow, or ponding does not breach seams. Many thermoplastic details require approximately 8 inches of vertical flashing and safe spacing between penetrations. Follow membrane-specific details to avoid chronic leaks at vent bases.
- Sending bathroom or dryer exhaust into the roof cavity: Those ducts must discharge to the outdoors, not into a plenum or roof void. Terminations also need to be maintained at safe distances from intakes and openings per the NYC Mechanical Code. Route each exhaust to a proper roof cap so moisture and lint do not load the roof assembly.
- Adding a powered fan without air-sealing or dedicated intake: A roof fan can pull air from your home if the ceiling plane leaks or if intake is missing. That negative pressure can drag conditioned air and pollutants into the roof space while bills climb. Independent experts warn about these side effects when fans run in leaky or unbalanced systems.
- Short-circuit layouts and blocked intake: Vents placed too close together allow air to slip in and out without crossing the roof cavity, which reduces drying. Clogged screens or covered edge intakes also choke airflow and trap humidity. Keep intakes open, separate intake from exhaust, and respect the flow path shown in industry guidance.
Where to Find the Best Brooklyn Roofing Contractors
Are you looking for an expert roofing contractor in Brooklyn, NYC? SR General Construction has you covered! Our business is located at 8807 Avenue B, Brooklyn, NY 11236, United States, in the Canarsie area.
We proudly serve all areas of Brooklyn with high-quality, durable roofing solutions. From new installations to repairs and maintenance, we provide the best service at affordable prices. Contact us and experience why we’re Brooklyn’s roofing experts!
FAQ
1. Which vent types pair best with EPDM, TPO, PVC, or modified bitumen?
Use membrane-compatible boots/flanges and follow the manufacturer’s instructions; breather vents are often used on mod-bit/BUR/single-ply for vapor relief, while static hoods or mechanical fans provide exhaust. Trade guides and technical notes summarize options by membrane.
2. Are soffit vents an option on brownstones?
Sometimes—if the cornice/eave allows it; otherwise, use perimeter/edge intake or through-parapet details. Practitioner Q&A threads confirm soffits where possible, with terminals added when crossflow is still lacking.
3. How much does it cost to add ventilation to a flat roof?
Ballparks: ridge vents commonly cost $7–$15 per linear foot (where a ridge exists); roof/attic fans often total $500–$1,200 installed, varying by access and wiring. Expect Brooklyn premiums due to access, labor, and permitting.
4. What does NYC’s climate zone mean for flat roof design?
NYC is in Climate Zone 4A (mixed-humid), which drives dew-point and moisture-control strategies for both vented and unvented roofs. The NYC Energy Code references Zone 4A for compliance.
5. How many vents does my flat roof need?
There’s no one-size-fits-all ratio for flat roofs; design for balanced intake/exhaust, and for the actual cavity. The 1:300 attic-vent rule is common in codes for attics, but BSC stresses that assemblies can also be safely unvented when designed correctly.
6. What’s the difference between vented (cold) and unvented (hot/compact) flat roofs?
A vented roof has intake and exhaust pathways above insulation; an unvented compact roof keeps the sheathing warm and dry with insulation at the deck and robust air/vapor control. BSC explains both approaches and when each is appropriate.X