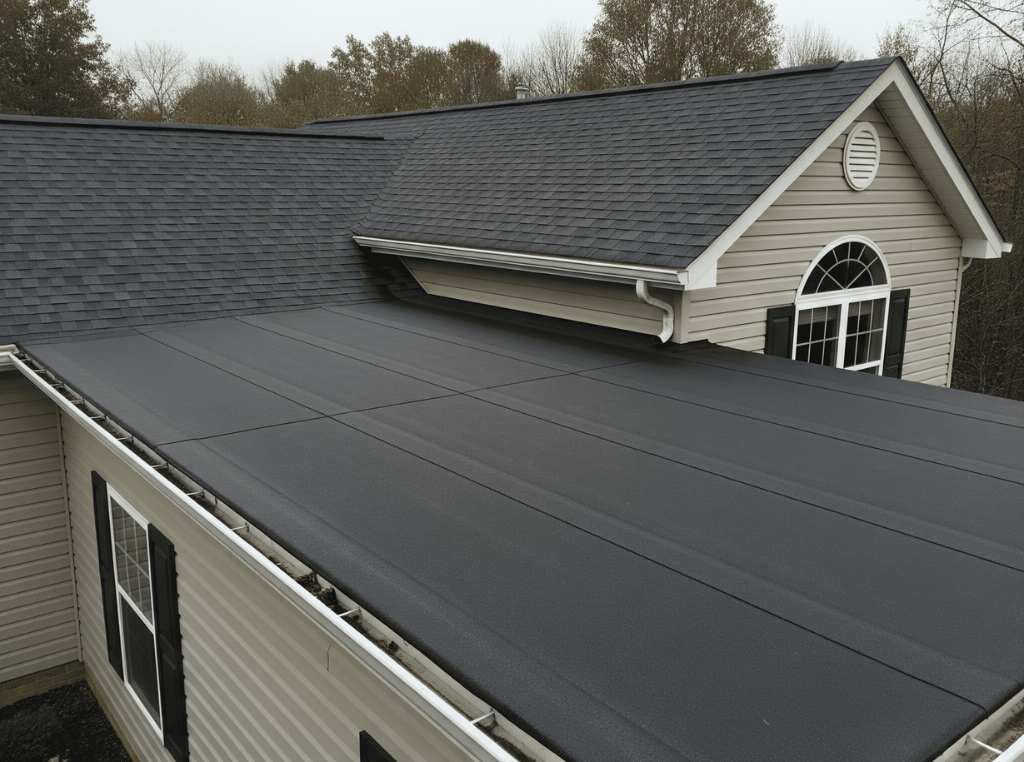
Is your Brooklyn roof ready for hot summer days, sudden storms, and freezing nights? If you own a porch, garage, or low-slope rooftop in Brooklyn, you know the weather here can switch fast. Roll roofing is simple, affordable, and handles frequent temperature changes and stormy weather. That’s why local homeowners pick it for small flat areas. You may think of it as a roof that keeps water out and requires no maintenance.
In this detailed guide, we’ll keep things plain and helpful. We’ll explain what roll roofing is, what it’s made of, and the kinds that work best in Brooklyn. You’ll get the good points and the limits, color choices, basic insulation tips, and an easy step-by-step on installation. We will also share typical Brooklyn costs, quick fixes for common problems, how it compares to other roofs, its lifespan, care tips, and how to find a reliable local roofer.
Key Information
- Roll roofing suits small low-slope roofs in Brooklyn (porches, garages).
- It’s asphalt in long rolls; overlaps and sealed laps keep water out.
- Best picks for Brooklyn: SBS self-adhered or cold-adhered mod bitumen; APP torch-down with pros.
- Pros: low cost, fast installation, lightweight, simple repairs.
- Cons: shorter life, limited look, seam/drainage sensitivity, poor fit for complex roofs.
- Slope rule: use at ≥1:12 (many brands ask 2:12+); avoid true flat with MSR.
- Lifespan: MSR about 5–10 years; modified bitumen lasts longer.
- Brooklyn costs (installed): MSR $3–$6/ft²; mod bitumen 2-ply $3.5–$8.5/ft².
- Insulation: Use polyiso (tapered when possible) to guide water and boost comfort.
- Care: Clear drains, check seams twice a year, add walk pads, and patch on clean, dry surfaces.
What is roll roofing?
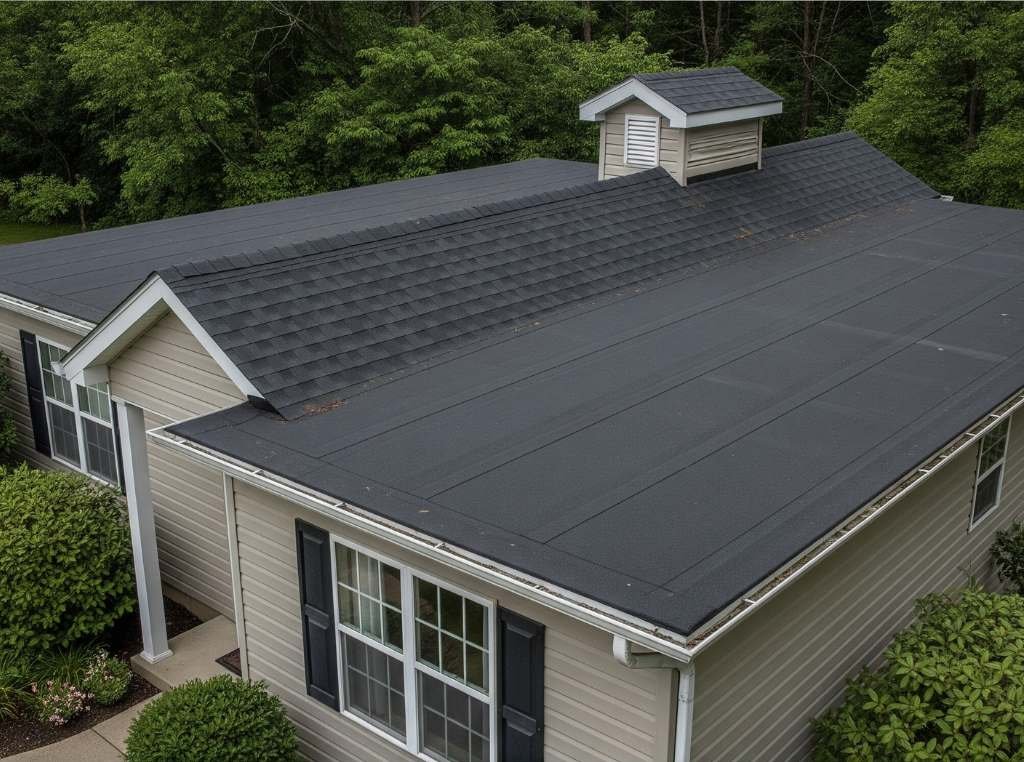
Roll roofing is an asphalt-based roof cover sold in long, narrow rolls. It suits flat and low-slope areas such as porches, garages, and small additions. The sheets unroll in straight courses and seal at the laps to keep water out. People choose it for simple repairs, quick installs, and a lower upfront cost.
What Materials and Components Are Used in Roll Roofing?
A solid roll roof starts with the right parts. The sheet, the base, and the trim pieces all work together to move water off the roof.
- Mineral-surfaced cap sheet: This is the top layer you can see. It has asphalt on a mat with colored mineral granules that guard the surface from the sun and rain. It forms the main waterproof skin when you seal the laps.
- Base sheet or underlayment: This sheet is placed under the cap sheet to add strength and create a smooth bed. It helps the roof handle movement from heat and cold. It also improves adhesion at seams and details.
- Adhesives or self-adhesive backing: Some systems use factory adhesive with a release film. Others use cold adhesive or hot asphalt to bond layers. Strong bonding reduces gaps and stops water wicking.
- Fasteners (roofing nails and cap nails): Many systems still call for nails at edges and laps. Wide-head or cap nails spread the load and keep the sheet flat. Correct spacing keeps the sheet tight in the wind.
- Primers and sealants (roofing cement or mastic): Primers help sheets stick to metal and tricky spots. Sealants close cut edges, laps, and small cracks. Leaks are prevented at these spots by careful detailing.
- Metal edge and flashings: Drip edge, gravel stop, and wall flashings move water off the roof and protect edges. Metal trim also locks the sheet line in place. Tight joints here add years of service life.
- Insulation or cover board (where used): Polyiso boards add R-value and can be tapered to guide water to drains. A fiberglass-faced cover board gives a firm, clean surface under the cap sheet. This stack improves comfort and helps the roof resist dents.
Pros and Cons of Roll Roofing
A detailed understanding of the pros and cons helps you to know the strengths and limits before you spend money. A roof that suits the building and climate lasts longer and requires fewer repairs. Clear pros and cons also guide you on when to call a pro and when a simple patch will do.
Advantages of Roll Roofing
- Lower upfront cost: Roll roofing often costs less per square foot than many flat-roof systems. That helps on tight budgets or small projects. You can target upgrades only where they matter most.
- Fast installation: Rolls cover wide areas in fewer passes. That cuts time on-site for small roofs. Less time often means less disruption at home.
- Works on low slopes: It suits roofs that are too flat for shingles. Lapped seams guide water toward drains and edges. The result is simple coverage for porches, sheds, and small additions.
- Lightweight system: The sheets add little load to the structure. That helps older decks with limited capacity. It also eases transport up ladders and across tight sites.
- Simple repair process: Many fixes use basic tools and small patches. You can clean, prime, and lap a patch over a slit or blister. Good prep yields a neat, tight seal.
- Multiple install methods: You can choose self-adhered sheets, cold adhesive, or torch-applied systems (pro only). This flexibility fits many job sites and budgets. It also allows you to avoid open flames when the site requires it.
- Cool color options: Light or white granules reflect sunlight and lower roof temps. That helps with comfort on top floors in summer. It can also support local energy goals.
Limitations of Roll Roofing
- Shorter service life than premium membranes: Basic mineral-surfaced rolls often last fewer years than systems like modified bitumen multi-ply or single-ply. Sun and temperature swings can cause the surface to age. Plan for more frequent replacement on busy roofs.
- Limited curb appeal: Color and texture choices are fewer than those available for shingles, tile, or metal. The look suits utility areas more than showpieces. Front-facing roofs may require a different material.
- Seam and drainage sensitivity: Laps and edges need clean, dry prep and firm pressure. Poor slope or clogged outlets can cause water to accumulate and stress seams. Good drainage design protects the field and the joints.
- Not ideal for complex roofs: Many penetrations, tight corners, or heavy foot traffic raise risk. More details mean more places where leaks can occur. In those cases, a tougher multi-ply or single-ply system may serve better.
- Product and code limits: Some rolls need a minimum slope and specific fastener spacing. Torch work requires trained crews and strict safety protocols. Always check the data sheet and local rules before you start.
Types of Roll Roofing
Roll roofing covers low-slope roofs with sheets that come in long rolls. The best type depends on roof size, slope, foot traffic, and local rules. Below are six common systems you will see on homes, porches, garages, and small additions.
Mineral-Surfaced Roll Roofing (Nail-Down MSR)
- Description
A single layer of asphalt on a mat with mineral granules. Crews nail it in place and seal laps with roofing cement. It suits small, simple roofs. - Features
• One-ply coverage for quick jobs.
• Works on low slopes that do not fit shingles.
• Granules protect the surface from the sun.
• Lightweight, which is easy to carry. - Materials
Asphalt-saturated fiberglass or organic mat, mineral granules, roofing nails, roofing cement, and metal edge. - Benefits
• Low upfront cost for small areas.
• Fast installation on porches and sheds.
• Easy patchwork for future repairs.
• Good choice when budgets are tight.
Smooth-Surfaced Asphalt Roll (Coated Felt)
- Description
An asphalt-coated felt without granules. It serves as a temporary cover, base sheet, or flashing. You can coat the surface with aluminum or elastomeric products. - Features
• Smooth face that accepts coatings.
• Flexible sheet for curves and details.
• Useful as a base under other rolls.
• Lower material cost than many caps. - Materials
Asphalt-coated felt, primers, cold adhesive or hot asphalt, nails were allowed, and metal edge. - Benefits
• Adds strength under a cap sheet.
• Helps tune the surface before the top layer.
• Supports low-budget temporary dry-in.
• Accepts reflective coating for heat control.
SBS Modified Bitumen: Self-Adhered (Peel-and-Stick)
- Description
A rubber-modified asphalt sheet with a factory adhesive back. You peel the film and press it to the deck or base sheet. It works well in cold seasons because the sheet stays flexible. - Features
• No open flame on site.
• Clean layout with few tools.
• Strong bond at laps with pressure.
• Good flexibility during freeze-thaw cycles. - Materials
SBS-modified bitumen cap sheet, matching base sheet, primer where needed, rollers, metal edge, and flashings. - Benefits
• Safer approach for tight urban sites.
• Reliable seams with proper pressure.
• Better movement tolerance than plain MSR.
• White granule options that help cut heat.
APP Modified Bitumen: Torch-Applied
- Description
A plastic-modified asphalt sheet that crews fuse with a torch. Heated seams form a tight bond. It shines on sun-exposed low-slope roofs. - Features
• Heat-welded laps with strong seals.
• High UV and heat resistance.
• Durable surface for service paths.
• Works as one- or two-ply designs. - Materials
APP-modified bitumen cap sheet, base sheet, primer where needed, propane torch with safety gear, metal edge, and flashings. - Benefits
• Long service life on low-slope areas.
• Tight seams that resist pond splash and wind.
• Broad color choices, including cool white.
• Suits pro crews that work on urban flats.
Cold-Adhered Modified Bitumen (Adhesive-Applied)
- Description
Modified bitumen sheets are set in cold adhesive instead of torch or hot asphalt. The adhesive forms a uniform layer under the sheet. This method avoids flame and kettle odors. - Features
• No burn risk from a torch.
• Consistent bond over large areas.
• Good option near sensitive spaces.
• Works with base-and-cap multi-ply builds. - Materials
SBS or APP sheets, approved cold adhesive, primer as needed, rollers, metal edge, and flashings. - Benefits
• Safer method for tight rowhouse sites.
• Strong waterproof bond when cured.
• Better detail control at edges and walls.
• Fits many climates with the right cap sheet.
BUR Cap Sheet (Granulated Cap Over Built-Up Roofing)
- Description
A mineral-surfaced cap sheet rolled over a built-up base of asphalt and felt. The cap gives a clean, granulated finish. It upgrades old BUR roofs without a full rebuild. - Features
• Granulated face that sheds sun and rain.
• Compatible with many BUR bases.
• Neat look compared to flood-coat gravel.
• Works with reflective color choices. - Materials
Granulated cap sheet, BUR plies or existing BUR base, cold or hot adhesive, primers, metal edge, and flashings. - Benefits (4)
• Extends a BUR system with a fresh surface.
• Reduces mess compared to loose gravel.
• Easier future patchwork on a clean face.
• Color options that support heat control.
Which Types of Roll Roofing Are Suitable for Brooklyn’s Weather?
SBS self-adhered and cold-adhered modified bitumen suits Brooklyn best because they stay flexible in cold snaps and handle summer heat well. APP torch-applied also performs well in the sun but requires professional crews and strict fire safety protocols. Basic MSR is suitable for small, simple roofs, such as porches, rather than large, lived-in spaces. For code and comfort, choose a cool, light-colored cap sheet that reflects heat.
Roll Roofing Colors: What You Can Expect
Color sets the look and affects the heat inside the top rooms. Light-colored shades bounce the sun’s rays and help keep spaces cooler. Dark shades hide dirt and match classic trims.
- White / Cool White: This color reflects a large share of sunlight. The roof runs cooler on hot days, which helps keep the top floors comfortable. Many homeowners choose it to support local energy goals.
- Light Gray / Slate: Light gray delivers a calm, modern look that pairs well with brick. It reflects more heat than charcoal without the stark feel of pure white. Dust and pollen show less than on bright white.
- Medium Gray / Charcoal: This shade gives a classic flat-roof look. It effectively hides stains and patch lines. It absorbs more heat than light colors, so add good insulation or a reflective top coat.
- Brown / Tan: These colors suit wood trim and tan walls. They work well on porches and street-facing additions. The heat control is in the center of the range.
- Green: Green suits garden sheds and rear additions with a traditional touch. It pairs nicely with red or brown brick. It remains warmer than gray or white under strong sun.
- Designer Granule Mixes: When granules are mixed together, they create a speckled effect. The pattern helps hide dirt and small patches. If you care about controlling the heat, ask suppliers about versions with cool-roof ratings.
What Is Roll Roof Insulation, and How Does It Work?
Roll roof insulation adds a thermal layer between your rooms and the outside. Most homes use rigid polyiso boards above the deck, with a thin cover board to provide a firm base for the cap sheet. Tapered boards create gentle slopes that move water to drains and reduce ponding. Rooms below feel steadier in both summer and winter, and utility costs can drop. Seal gaps, keep vent paths clear, and install tight flashings to prevent moisture from entering.
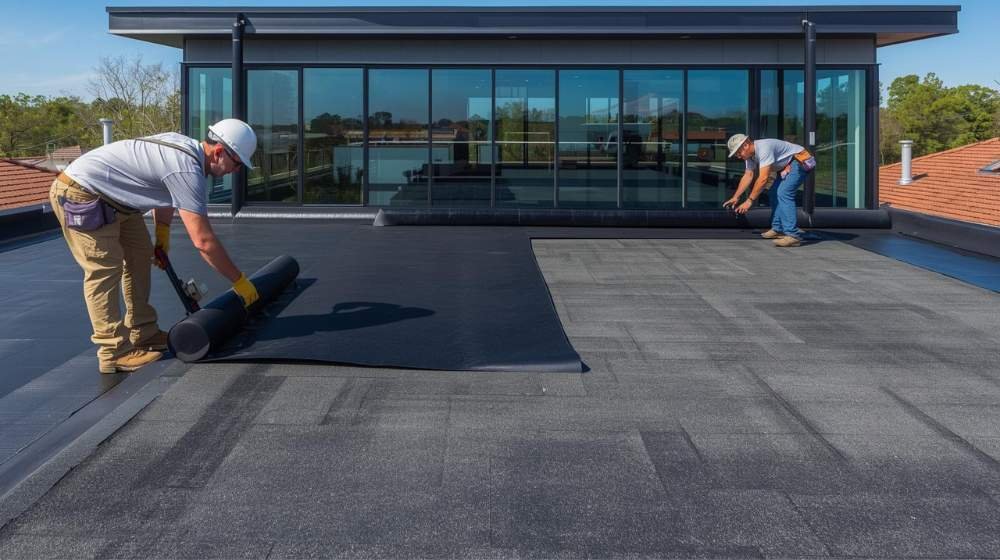
How to Install a Roll Roof
A smooth install starts with clean prep and clear lines. Follow these seven steps and move at a steady pace; you want tight laps, straight courses, and dry, sound edges.
1) Inspect and prep the deck: Walk the roof and mark soft spots, loose boards, and popped fasteners. Repair the damage, re-nail or screw the deck securely, and sweep away all dust and grit. The surface must be flat, clean, and dry before you start.
2) Plan the layout: Find the low edge and snap chalk lines for straight courses. Check lap directions so water always flows over, not under, each seam. Dry-fit around pipes, walls, and corners to ensure accurate cut sizes.
3) Prime and install a base (if your system uses one): Brush or roll primer where the manufacturer calls for it, usually on metals and tricky areas. Set the base sheet straight to your lines and press it down with firm, even pressure. Keep laps uniform so your cap sheet lands clean.
4) Install metal edge and starters: Set drip edge at eaves and match gravel stop or edge metal at rakes. Fasten to code spacing and keep corners snug with preformed outside and inside pieces. Seal joints with compatible mastic for a tight edge.
5) Set the cap sheet: Start at the low edge. For self-adhered products, peel the film a bit at a time and roll as you go. For cold-applied products, spread the adhesive as per the data sheet. For nail-down MSR, fasten the product on the marks and add cement at the laps. Keep the sheet straight and avoid stretching.
6) Seal laps and roll them tight: Overlap to the printed line or the specified width. Use a weighted roller to press seams and apply a bead of roofing cement where specified. Sprinkle loose granules into fresh cement to protect it from the sun’s harmful rays.
7) Flash details and do a final check:Flash pipes, walls, and skylights with the approved method for your system. Clear drains and scuppers to ensure water has a clear path off the roof. Walk the roof once more and fix any fishmouths or gaps now, not later.
What You Need: Tools (for installation)
A short kit keeps the job neat and safe.
- Tape measure
- Chalk line
- Utility knife with hook blades
- Hammer or screw gun
- Weighted hand roller
- Roofing cement and trowel
- Primer and roller frame
- Metal snips
- Caulk gun
- Broom and leaf blower
- PPE: gloves, eye protection, long sleeves, non-slip shoes
Expert Tips
Before pressing a seam, ensure the laps are clean and dry. Work during the cooler part of the day so the sheet is easier to handle and your lines stay straight.
How Much Does Roll Roofing Installation Cost (per sq ft) in Brooklyn?
Here are the estimated ranges per square foot for common roll-roof systems in Brooklyn for 2025. Ranges reflect material plus typical local labor; additional costs may apply for tear-off, insulation, and code upgrades.
| Roll Roof type | Material Cost (per sq ft) | Labor Cost (per sq ft) | Total Cost (per sq ft) |
| Mineral-Surfaced Roll (MSR, nail-down) | $0.75 – $1.50 | $1.75 – $4.50 | $3.00 – $6.00 |
| Smooth Asphalt Roll + Reflective Coating | $0.75 – $1.50 | $1.75 – $4.50 | $3.00 – $6.00 |
| SBS Modified Bitumen (Self-Adhered, 2-ply) | $1.50 – $3.00 | $2.50 – $5.00 | $4.50 – $8.00 |
| APP Modified Bitumen (Torch-Down, 2-ply) | $1.50 – $3.00 | $2.00 – $4.00 | $3.50 – $7.00 |
| Cold-Adhered Modified Bitumen (2-ply) | $1.50 – $3.00 | $3.00 – $5.00 | $4.50 – $8.00 |
| Torch-Down Rolled Roofing (general range) | $1.80 – $3.50 | $3.00 – $5.00 | $4.80 – $8.50 |
How to Repair a Rolled Roof
Small leaks often start at seams, edges, or around pipes. Work step by step and use only a clean, dry surface.
1) Find the source:Trace stains inside, then check the roof upslope of that spot. Inspect laps, corners, pipes, and any area where water can accumulate. Mark every suspect area so nothing gets missed.
2) Clean and dry the area: Sweep away grit and cut back blisters or loose granules around the defect. Wipe the surface with a dry cloth; use a heat gun gently if the shade and airflow do not dry it fast. A clean, dry surface lets your patch bond.
3) Cut out damaged material: Use a hook blade to remove cracked or torn sections back to the sound sheet. Round the patch corners you plan to install so the edges do not lift later. Avoid deep cuts into the base or deck.
4) Prime the surface: Brush primer on the exposed sheet, metal, or base where the patch will land. Let it flash off per the label so it feels tacky, not wet. Primer boosts bond strength at critical edges.
5) Install the patch: Cut a patch that extends at least 3–4 inches past the damaged area on all sides. Set it straight, then press down from the center outward to push out the air. For self-adhered, peel a little at a time; for cement-set, trowel a uniform bed first.
6) Seal and roll the seams: Run a bead of roofing cement at the patch edge if the system calls for it. Roll the seam with a hand roller to lock it tight. Broadcast spare granules into fresh cement to guard it from the sun.
7) Test and watch: Hose the area lightly or wait for the next rain and check inside for drips. Re-check after 24–48 hours and again after the next storm. Keep drains clear so the repair stays stress-free.
Comparing Roll Roofs to Other Roofing Options
Below is a simple comparison of how roll roofing (MSR) stacks up against six common systems across five practical factors: cost, life, slope fit, installation difficulty, and appearance.
| Roof Type | Cost Installed (per sq ft)* | Typical Lifespan | Slope Fit | Install Difficulty | Look / Notes |
| Roll Roofing (MSR) | $2.5–$4.0 | 5–10 yrs | Low-slope only | DIY-possible on small areas | Budget choice; simple seams; limited colors |
| Modified Bitumen (SBS/APP) | $4.5–$7.5 | 12–20 yrs | Flat to low-slope | Pro | Tough seams; good for porches and additions |
| EPDM Rubber | $5–$10 | 15–25 yrs | Flat to low-slope | Pro | Large sheets; few seams; dark surface unless coated |
| TPO | $6–$12 | 15–25 yrs | Flat to low-slope | Pro | Light surface; heat-welded seams |
| PVC | $7–$14 | 18–30 yrs | Flat to low-slope | Pro | Strong welded seams; handles pond-prone spots better than many |
| Asphalt Shingles | $4–$8 | 15–30 yrs | 2:12+ (best at higher slopes) | Pro or skilled DIY | Broad styles; not for very low slopes |
| Standing Seam Metal | $10–$18 | 30–50 yrs | Low to steep (check profile) | Pro | Sleek look; reflective finishes available |
How long does a roll of roofing last?
Most roll roofs (MSR) serve about 5 to 10 years on small, low-slope areas. A tidy deck, sealed laps, and clear drainage help the roof reach the upper end of that range. Harsh sun, standing water, or heavy foot traffic can reduce the service life. Step up to modified bitumen if you want to extend the lifespan of your lived-in spaces.
Expert Tips for the Care and Maintenance of Roll Roofing
- Clear outlets and gutters so water leaves fast after each storm.
- Walk the seams and edges each spring and fall, and seal small gaps before they become larger.
- Keep the surface clean by sweeping grit and leaves that trap moisture.
- Add walk pads on paths to vents or equipment to reduce scuffs and punctures.
- Recoat or refresh granules as the face ages to boost reflectance and protect the sheet.
Why should you choose a professional roofing contractor?
Are you looking for an expert roofing contractor in Brooklyn, NYC? SR General Construction has you covered! Our business is located at 8807 Avenue B, Brooklyn, NY 11236, United States, in the Canarsie area.
We proudly serve all areas of Brooklyn with high-quality, durable roofing solutions. From new installations to repairs and maintenance, we provide the best service at affordable prices. Contact us and experience why we’re Brooklyn’s roofing experts!
FAQ
1. What is roll roofing?
Roll roofing is an asphalt-based sheet sold in long rolls for low-slope areas like porches, garages, and small additions. It installs fast and costs less than most flat-roof systems, but it’s not as durable or attractive as multi-layer options.
2. Is torch-down the same as roll roofing?
No. “Torch-down” uses modified bitumen sheets heated with a torch to fuse the seams; basic “roll roofing” usually refers to a single-ply, mineral-surfaced asphalt sheet nailed or cemented in place. Both come in rolls, but they’re different systems with different performance.
3. What roof slope do you need for roll roofing?
The International Residential Code specifies a minimum slope of 1:12 for mineral-surfaced roll roofing. However, many brands require a slope of 2:12 or greater; always refer to the data sheet for specific requirements.
4. Can you use roll roofing on a flat roof?
Not on decks that are really flat. Code and many manufacturers don’t allow mineral-surfaced roll roofing with a slope below 1:12; use modified bitumen or single-ply for flat conditions.
5. How long does roll roofing last?
You may expect it to last about 5 to 10 years. Many guides say that a basic MSR lasts about 5 to 8 years.
6. What’s the difference between SBS and APP modified bitumen?
SBS remains more flexible in cold snaps and tolerates movement, while APP excels in UV and heat resistance. Brooklyn’s freeze-thaw conditions favor SBS, while sunny, hot zones often prefer APP.